How to Set the Torque on a Cordless Drill: A Step-by-Step Guide for Accurate Results
Have you recently purchased a cordless drill but are unsure of how to set the torque? Well, fear not! Setting the torque on a cordless drill is a simple process that can make a huge difference in the outcome of your project. Torque refers to the amount of force applied to the screw or fastener and can greatly affect the stability and durability of your work. In this blog post, we will guide you through the steps to set your cordless drill torque correctly, so you can get to work with confidence and precision.
So grab your drill and let’s get started!
Understanding Torque Settings
Setting the torque on a cordless drill may seem daunting at first, but it is actually quite simple once you understand how it works. Torque settings are used to control the amount of force the drill applies to the surface you are drilling into. By selecting the right setting, you can prevent overdriving screws, stripping threads, and damaging materials.
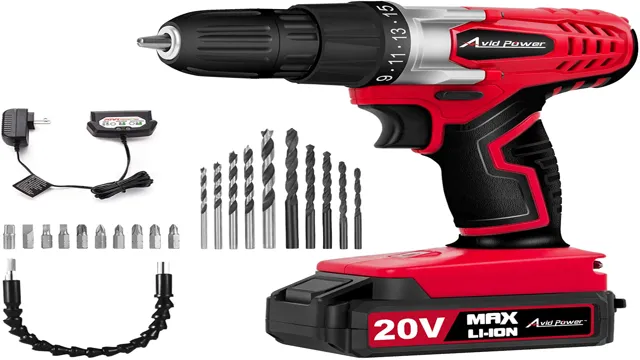
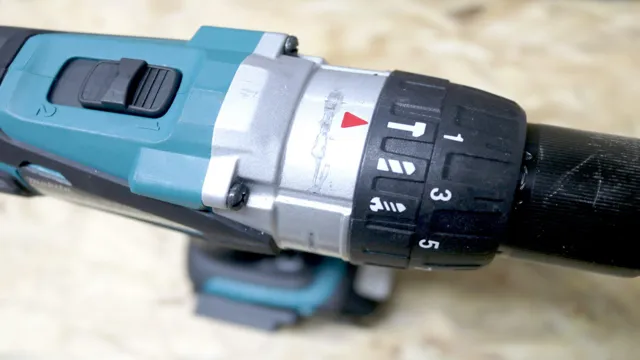
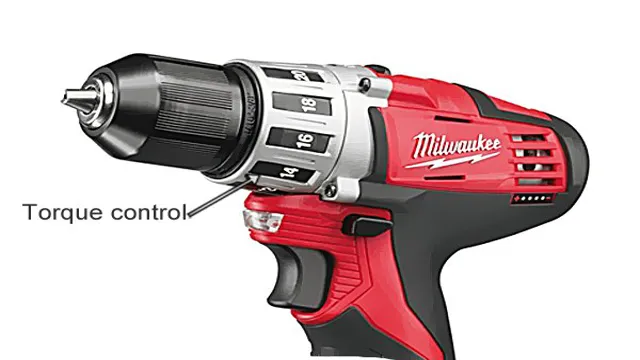
Most cordless drills have a clutch dial that adjusts the torque setting. The higher the number on the dial, the greater the torque applied. It is important to note that different materials and screw sizes require different torque settings.
For example, softer materials like wood require a lower torque setting than harder materials like metal. It is always best to start with a lower setting and gradually increase until you reach the desired result. Overall, understanding torque settings is crucial for achieving a successful and professional-looking outcome on your projects.
What is Torque?
Torque is a term that refers to rotational force, or the measure of a force acting on an object to cause it to rotate around an axis. It’s commonly used in fields like engineering, physics, and mechanics to describe the amount of twisting force needed to turn a bolt or screw. Understanding torque settings is important because it helps ensure that the proper amount of force is being applied to different types of fasteners, preventing damage or failure.
Torque wrenches are commonly used to apply a specific amount of force, and they come in a variety of shapes and sizes depending on the application. Remember, too much torque can strip threads or break fasteners, while too little torque can result in a loose or ineffective connection. So the key is finding the right balance – the sweet spot where the right amount of force is applied without causing damage.
In conclusion, torque is a fundamental concept in mechanics and understanding its application is crucial for achieving optimal performance and safety.
What Are Torque Settings?
Torque settings are an essential aspect of many mechanical works. Understanding them is critical since they impact the tightness of bolts and nuts, which can significantly affect a machine’s structural integrity. Torque refers to the force that rotates an object, and the setting determines how tight an object is secured.
Various factors determine the appropriate torque setting, including the material used, the size of the bolt or nut, and the application for which the object is being used. For instance, a torque setting for a car’s lug nut will be different from that of a small electronics device. If the torque setting is not set correctly, bolts and nuts may loosen over time, leading to potential accidents or damage to the equipment.
Therefore, it is crucial to understand the appropriate torque settings to ensure the safety and functionality of the machinery.
Steps to Set Torque on a Cordless Drill
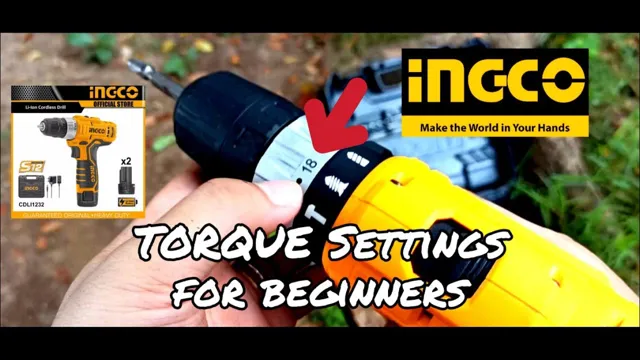
If you want to get the most out of your cordless drill, learning how to set the torque is essential. The torque setting determines the force the drill uses when tightening screws or driving other fasteners, so it’s important to get it just right. To set the torque, first identify the dial on the drill that controls the torque setting.
Turn the dial to the desired setting – lower settings provide less force, while higher settings provide more. If you’re not sure which setting to use, start low and work your way up until you reach the desired tightness. Once you’ve set the torque, you’re ready to start drilling.
With the right torque setting, you’ll be able to handle a variety of tasks with ease. So next time you pick up your cordless drill, take a minute to set the torque and experience the difference it can make.
Step 1: Locate the Torque Adjustment Ring
If you’re looking to set the torque on your cordless drill, the first step is to locate the torque adjustment ring. This ring is usually located near the chuck and is marked with numbers or symbols representing different levels of torque. To use it, first, make sure your drill is turned off and select the appropriate torque level for your task.
You May Also Love:
Higher torque settings are useful for tougher materials, while lower settings are better for delicate work. Once you’ve set the torque, you’re ready to go. Just remember to adjust it as needed as you work and don’t over-tighten screws or bolts, as this can cause damage to your drill or project.
By understanding how to locate and adjust the torque, you’ll be able to get the most out of your cordless drill and tackle any DIY project with confidence.
Step 2: Set the Drill Bit
When it comes to setting the drill bit on a cordless drill, it’s important to make sure you’re doing it correctly to achieve the best results for your project. The first step is to make sure your drill is turned off and unplugged, or if it’s a cordless drill, make sure it’s properly charged. Then, select the appropriate drill bit for your project and insert it into the chuck of your drill.
Next, tighten the chuck jaws securely onto the bit by turning it clockwise. It’s important to make sure the bit is tightened properly to prevent it from slipping or becoming loose during use. Once the bit is secured, adjust the torque setting on your cordless drill to the appropriate level.
Different torque levels are needed for various materials and applications, so it’s important to refer to your drill’s manual for guidance on what setting to use. By properly setting the drill bit and torque, you’ll be able to achieve precision and efficiency in your drilling projects.
Step 3: Adjust the Torque Setting
When it comes to using a cordless drill, adjusting the torque setting is a crucial step to ensure the desired outcome. To adjust the torque, start by identifying the maximum torque your drill can produce. Then, set the clutch collar to the desired torque level by rotating it until the indicator aligns with the desired setting.
Keep in mind that the torque setting will vary based on the material you are drilling into, so it’s important to refer to the manufacturer’s instructions or consult an expert if you’re unsure. By setting the torque correctly, you can prevent overdriving or stripping the screws. This not only saves you from costly mistakes but also extends the life of your tool.
So, take the time to learn how to adjust the torque setting on your cordless drill and ensure you’re getting the most out of your tool every time you use it.
Step 4: Test the Torque Setting
Now that you’ve set the proper torque on your cordless drill, it’s time to test it out before starting your project. To do this, use a scrap piece of material similar to the one you’ll be using for your project. Drill a hole and check the depth and width to ensure it matches your desired outcome.
If it’s too shallow or deep, adjust the torque setting accordingly. Repeat the process until you achieve the desired results. Don’t forget to pay attention to the sound of the drill as well.
A properly set torque will make a consistent sound while drilling, indicating the drill is operating smoothly. If the sound is inconsistent or there is excessive shaking, recheck the torque setting and make necessary adjustments. Testing the torque setting before starting your project will save you time and frustration in the long run.
Tips and Tricks for Torque Settings
If you’re looking to set the torque on your cordless drill, there are a few tips and tricks you should keep in mind. First and foremost, it’s essential to check the manufacturer’s instructions for the correct torque settings. This will ensure that you don’t run the risk of damaging your drill or the material you’re working on.
Once you’ve found the appropriate settings, make sure you’re using the correct drill bit for the job. This will help you achieve optimal results and prevent any potential mishaps. Another helpful tip is to use a torque wrench or a torque screwdriver to ensure accuracy and precision.
Additionally, it’s important to keep in mind that different materials require different torque settings, so adjust accordingly. With these tips, you can effectively set the torque on your cordless drill and achieve professional results every time.
Check the Drill Bit Size
When it comes to torque settings, there are a few tips and tricks that can come in handy. One of the most important things to keep in mind is to always check the drill bit size before starting any project. Using the wrong drill bit size can throw off your torque settings and cause damage to your workpiece.
It’s important to use the right size bit for the job at hand. You can check your drill bit size by looking at the markings on the bit or by using a drill bit gauge. Taking the time to ensure you have the correct size drill bit can save you time, money, and frustration in the long run.
So always double-check before you start drilling!
Adjust the Torque for Different Materials
When it comes to using torque settings, it’s important to customize the level of force needed based on the materials you’re working with. Different materials will require different torque settings to ensure the proper level of tension without causing damage or striping. So, how do you adjust the torque for different materials? One tip is to consult the manufacturer’s recommendations for the specific tool you’re using and the materials you’re working with.
Another trick is to start with a lower torque level and gradually increase it until you achieve the desired tension. Using a torque wrench can also help with precision and accuracy when adjusting the torque for different materials. Remember, it’s always better to use a little less torque than to over-tighten and cause damage.
With these tips and tricks, you’ll be able to adjust the torque for different materials with ease and confidence.
Final Thoughts
Setting the torque on a cordless drill might seem like a daunting task for beginners, but it’s actually quite simple. The first step is to locate the torque adjustment collar on the drill because that’s the part you’ll use to set the torque. Once you’ve found it, turn the collar clockwise or counterclockwise to adjust the torque setting depending on what you need.
It’s important not to force it too much or you might damage the drill. Keep in mind that the torque setting you choose will determine how easily your drill will drive screws or drill holes. A high torque setting will work best for tougher materials, while a lower torque setting will work for softer materials.
With practice and testing, you’ll be able to perfect the torque setting that works best for your specific project.
Conclusion
So there you have it, folks! The torque setting on your cordless drill may seem like a small detail, but it can make a world of difference in the success of your project. With a little practice and attention to detail, you can set the torque with ease and be on your way to DIY domination. Remember, it’s all about finding the sweet spot – not too loose, not too tight – just like Goldilocks and her porridge.
Happy drilling!”
FAQs
What is torque and why is it important for a cordless drill?
Torque is the rotary force generated by the drill’s motor. It is important for a cordless drill because it determines how much rotational force the drill can apply to a screw or bolt.
How can I determine the correct torque setting for my drill?
The correct torque setting depends on the size and type of the screw or bolt you are using. Check the manufacturer’s instructions or use a torque chart to determine the appropriate setting.
What happens if I use too much torque on a screw or bolt?
Using too much torque can damage the screw or bolt, strip the threads, or cause the material it is securing to crack or break. It can also damage the drill itself.
How can I adjust the torque setting on my cordless drill?
Most cordless drills have a torque adjustment collar or switch that you can set to the desired torque level. Some drills also have digital displays or indicators that show the torque setting.
Can I use my cordless drill without setting the torque?
Yes, you can use your cordless drill without setting the torque, but this can increase the risk of damaging the material you are working on or the drill itself.
Do I need to calibrate my cordless drill’s torque settings?
It is not always necessary to calibrate your cordless drill’s torque settings, but it is a good practice to ensure that the drill is operating within the manufacturer’s specifications.
Are there any safety precautions I should take when using a cordless drill with torque settings?
Yes, always wear eye and ear protection and follow the manufacturer’s instructions for safe use of the drill and its torque settings. Additionally, always make sure to tighten screws and bolts gradually and check for proper alignment before applying torque.

