How to Measure Drill Press Belt: Step-by-Step Guide for Accurate Results

When it comes to using a drill press, the belt is an essential component that facilitates effective drilling. However, over time, the belt may become worn out or damaged, necessitating its replacement. To replace the drill press belt, you must first measure it to ensure that you get the correct size.
But how do you measure your drill press belt? In this blog, we will explore the simple steps you need to take to measure your drill press belt accurately. Whether you are a DIY enthusiast or a professional woodworker, understanding how to measure your drill press belt is a vital skill that will save you time, money, and hassle in the long run. Let’s get started!
Introduction
If you’re in need of a new belt for your drill press, one of the first things you’ll need to do is measure the belt to ensure that you purchase the correct size. Fortunately, measuring a drill press belt is a relatively simple task. The first step is to turn off your drill press and unplug it from the power source.
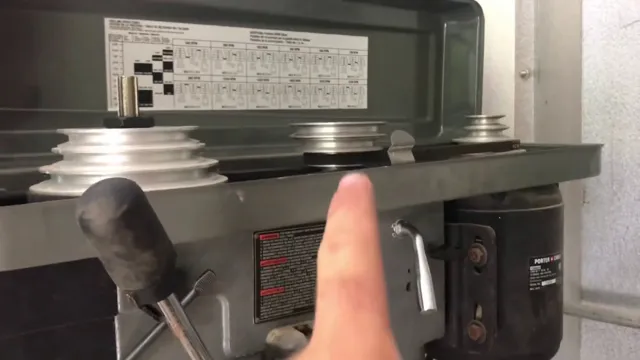
Once that’s done, locate the old belt, which will still be attached to the pulleys. Measure the length of the belt by wrapping a tape measure around it or using a string and the measuring the string. Be sure to measure the width of the belt as well, as this will also help you to determine the correct size when you go to purchase a new one.
If the belt is broken or completely worn out, you can find the belt size in your drill press manual or by contacting the manufacturer. By taking the time to measure your drill press belt carefully, you can ensure that you purchase the right size and get back to work quickly and safely.
Explanation of Drill Press Belt Measurement
Introduction: If you are working with a drill press, you may have to replace its belt at some point. To do that, you need to know the correct measurement of the belt. It can be overwhelming to determine the right size, especially if you have never done it before.
But don’t worry; it’s not rocket science! In this article, we will explain the drill press belt measurement and help you find the correct size for your machine. When it comes to measuring drill press belts, the most important thing is accuracy. A simple mistake might cost you money and time.
Therefore, it’s vital to take the correct measurements and choose the right belts to avoid any problems. Are you ready to learn more? Let’s dive into the details!

Tools You Need
As a DIY enthusiast or hobbyist, having the right tools can make all the difference in achieving your desired results. Whether you’re tackling a new project or completing a long-standing one, the right tools can help you save time, effort, and money. Some of the tools you may need include a set of screwdrivers in various sizes, pliers, a hammer, a saw, and measuring tools like a tape measure or ruler.
Other essentials may include a power drill, a level, and safety gear like gloves and goggles. By investing in quality tools, you can get the job done efficiently and effectively, ensuring the best possible outcome. So, next time you embark on a DIY project, remember that having the right tools can make all the difference.
Step-by-step Process
If you own a drill press, chances are the belt will eventually wear out and need to be replaced. Knowing how to measure the belt properly can save you a lot of frustration and ensure you get the correct size belt. The process for measuring a drill press belt is relatively simple.
The first step is to determine the length of the belt by measuring the circumference of the pulley system that the belt runs on. Next, measure the width of the belt by laying it flat on a surface and measuring the width across. Finally, measure the thickness of the belt by placing a ruler on the belt and measuring from the top of the belt to the bottom.
Once you have all three measurements, you can order a replacement belt that matches the size you need. By following these simple steps, you’ll be able to get your drill press up and running in no time!
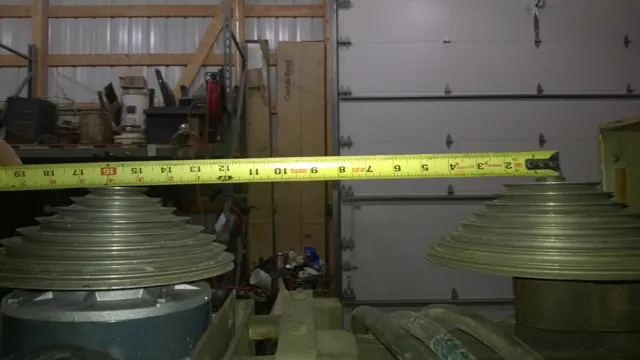
Step 1: Measure the Center Distance
When it comes to measuring the center distance of two objects, the first step is to gather all necessary tools and accurately measure the distance between the centers of each object. This measurement will determine the distance between the two objects and can be done using various tools such as a ruler, a tape measure, or a caliper. The center distance is a crucial measurement as it ensures the objects are aligned properly and are in the correct position.
Without measuring the center distance accurately, there is a risk that the objects will not function or work as intended. Therefore, taking the time to measure the center distance is essential to ensure the objects are aligned and positioned correctly.
Step 2: Measure the Belt Length
Once you have determined the type of belt that you need, the next step is to measure its length accurately. To do this, you will need a measuring tape. Begin by placing one end of the tape measure on the center of the belt buckle and keeping it in place throughout the measuring process.
Pull the tape measure along the belt’s entire length until you reach the other end. Make sure that you take note of the measurement in both inches and centimeters as some belts may require one or the other. Remember to also take into account any overlaps or gaps in the belt and factor those into the final measurement.
Getting the correct length is an important factor to consider as it determines how the belt fits. An improperly measured belt can cause discomfort and even affect the overall look of your outfit. So, take your time to get the measurements right and ensure that your belt fits perfectly.
Step 3: Determine the Belt Width
When determining the right belt width for your outfit, it’s important to consider not only the style of the belt but also the occasion and your body type. If you’re looking for a casual belt to wear with jeans or khakis, a width between 5 and 2 inches is usually a good choice.
For more formal occasions, a belt with a width of about 1 inch will give you a sleek and sophisticated look. It’s also important to consider your body type when choosing a belt width. If you’re tall or have a long torso, a wider belt will balance out your proportions.
However, if you’re short or have a small waist, a skinny belt will help elongate your frame and create the illusion of a longer torso. Ultimately, the right belt width will depend on your personal style and the overall look you’re trying to achieve.
Conclusion
In conclusion, measuring your drill press belt may seem daunting at first, but with a few simple steps, you’ll be able to avoid any headaches and keep your drill press running smoothly. So break out that tape measure, grab hold of your belt, and give it a good stretch! Remember, a well-fitting belt is the key to a successful drilling experience, so don’t be afraid to get up close and personal with your press. And always remember, when in doubt, consult the manual or seek help from a professional.
Happy drilling!”
Tips and Tricks for Measuring Your Drill Press Belt
If you own a drill press, you are likely aware of the importance of having a properly functioning belt. But how can you ensure that your belt is the right size and tension? Measuring your drill press belt might seem like a daunting task, but with a few tips and tricks, it can be done easily and accurately. The first step is to identify the make and model of your drill press, as this will help you determine the correct belt size.
Once you have this information, you can use a belt gauge or a ruler to measure the length and width of the belt. It is also important to check the tension of your belt using a tension gauge or by pressing down on it with your finger. By following these simple steps, you can ensure that your drill press is operating at its optimal level and avoid any potential mishaps.
Why Properly Measuring Your Drill Press Belt Matters
Properly measuring your drill press belt can seem like a tedious task, but it’s worth the effort in the long run. Not only does it ensure that your drill press is working at optimal efficiency, but it can also prevent unnecessary wear and tear on your machine. Here’s a step-by-step process to properly measure your drill press belt: First, turn off your drill press and unplug it from the power source.
Next, remove the belt cover to expose the belt. Use a piece of string or measuring tape to measure the circumference of the belt. Make sure to measure the section of the belt that is wrapped around the pulleys, rather than the flat part of the belt.
Once you have the circumference measurement, divide it by 14 to get the diameter of the belt. Finally, use the diameter measurement to find the correct replacement belt for your drill press.
It’s important to note that using the wrong size belt can cause your drill press to run inefficiently and even damage the machine over time. Taking the time to properly measure your drill press belt ensures that you’re using the correct replacement belt and ultimately, prolonging the lifespan of your drill press. So next time you’re in doubt, take the time to measure your drill press belt correctly, it will save you time and money in the future.
FAQs
What is a drill press belt used for?
A drill press belt is a component that transmits power from the motor to the spindle, allowing for the operation of the drill press.
How do I know if my drill press belt needs to be replaced?
Signs that your drill press belt may need to be replaced include slipping or squeaking noises during operation, visible cracks or wear on the belt, or decreased performance.
What tools do I need to replace my drill press belt?
To replace your drill press belt, you will need a wrench, a replacement belt, and a basic understanding of how to access and remove the old belt.
Can I replace my drill press belt myself, or do I need to take it to a professional?
While it is possible to replace your drill press belt yourself, it may be helpful to consult a professional if you are unfamiliar with the process or feel unsure about your ability to complete the task.
How do I select the right replacement belt for my drill press?
To select the right replacement belt for your drill press, you will need to consider the make and model of your machine, as well as the dimensions and specifications of the original belt.
What are some common problems with drill press belts, and how can I address them?
Common problems with drill press belts include slipping, squeaking, or a loosening tension. These issues can often be addressed by adjusting the tension, lubricating the belt and pulleys, or replacing the belt altogether.
How often should I replace my drill press belt?
The frequency with which you should replace your drill press belt will depend on how frequently you use your machine, as well as the conditions under which it is operated. As a general rule, however, it is a good idea to inspect your belt regularly and replace it if signs of wear or damage are present.


