How to Set Auto Darkening Welding Helmet in 5 Simple Steps
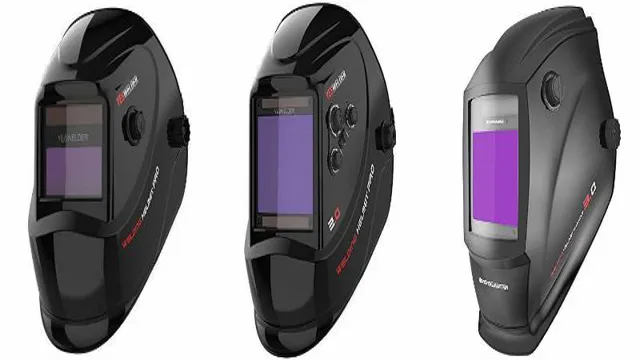
If you’re new to welding, you’ve probably heard of the importance of using a welding helmet. However, you might not be aware of the various features that come with modern welding helmets. One of these features is Auto Darkening, which automatically adjusts the level of shade based on the luminosity of the welding arc.
This produces a high-quality weld, prevents eye damage, and makes welding safer and more efficient. In this blog post, we’ll be discussing how to set your auto darkening welding helmet correctly, ensuring that you’ll have the best experience possible while welding. Read on to find out more!
What is an Auto Darkening Welding Helmet?
If you’re new to welding, you may be wondering how to set up an auto-darkening welding helmet. An auto-darkening welding helmet is a piece of protective equipment used by welders to protect their eyes and face from harmful UV and infrared radiation during the welding process. This type of helmet has a special lens that automatically darkens when the welder strikes an arc.
To set up an auto-darkening welding helmet, first, you need to adjust the sensitivity and delay controls. These controls determine how quickly the helmet darkens when an arc is struck and how long it takes to return to the light state after the welding is complete. You should also adjust the shade level to match the welding process you will be using, as different processes require different levels of shade.
Once you’ve set up your auto-darkening welding helmet, you’ll be able to work more efficiently and with greater comfort, knowing that you’re protected from the harmful effects of welding radiation.
Definition and Overview
An auto darkening welding helmet is essentially a type of helmet that has an electronic filter lens which allows the user to see clearly through the lens while welding. This type of helmet is becoming increasingly popular because it makes the welding process easier and safer for the user. The lens is automatically darkened when the welding process is initiated and then returns to a lighter shade when it is complete.
This means that the user does not need to manually adjust the lens, which saves time and makes the welding process more efficient. Additionally, because the lens automatically adjusts to the welding light, it prevents the user from suffering from eye strain or damage caused by prolonged exposure to bright welding lights. Overall, an auto darkening welding helmet is a must-have piece of safety equipment for any professional welder or DIY enthusiast.
Step-by-Step Guide to Set Auto Darkening Welding Helmet
Are you having trouble setting up your auto darkening welding helmet? Don’t worry, it’s a common issue among beginners. The first step is to check your instruction manual to ensure you understand the process properly. Once you have a clear understanding, you can start the process by adjusting the sensitivity level.
This level determines how much light is required to activate the lens. Next, adjust the delay setting. This determines the amount of time it takes for the lens to switch back to its original state once the welding arc has stopped.
Finally, adjust the shade level. This level determines how dark the lens will become when the arc is activated. It’s important to practice adjusting these settings while wearing the helmet to ensure a comfortable and safe welding experience.
By following these steps, you’ll be able to set up your auto darkening welding helmet properly and start your welding project with confidence!
Step 1: Prepare your Welding Helmet
Auto Darkening Welding Helmet As a welder, it is essential to have the right safety gear, and that means having a reliable welding helmet. Knowing how to set up your auto darkening welding helmet is a crucial first step to protecting your eyes from harmful UV and IR rays generated during the welding process. Firstly, clean the lens and headgear of your helmet with a soft cloth and check that the batteries are functioning correctly.
Ensure that the sensitivity and delay settings are adjusted to suit your welding environment. Adjust the helmet’s shade level and arc sensors based on your welding process and material type. It is also essential to check and adjust the helmet’s fit, ensuring that it sits comfortably on your head while offering ample coverage.
With these simple steps, you should be well on your way to preparing your welding helmet for a safer and more productive welding experience.
Step 2: Adjust the Sensitivity Settings
Auto Darkening Welding Helmet Once you’ve got your auto darkening welding helmet on, the next step is to adjust the sensitivity settings. This will ensure that the helmet correctly detects the arc and darkens the lens accordingly. Firstly, locate the sensitivity control knob which usually sits next to the delay control knob.
Turn your sensitivity down to the minimum level and adjust as needed once you’ve started welding. Having too much sensitivity can result in the helmet being very dark and making it difficult to see your welding workpiece. You want to find the right balance between having enough sensitivity to detect the arc, but not too much that it makes it hard to see.
Once you find the right sensitivity level, you’ll be well on your way to a comfortable and safe welding experience.
Step 3: Adjust the Delay Settings
Adjusting the delay settings on your auto-darkening welding helmet is crucial to ensure that the helmet adjusts to the brightness of the welding arc fast enough to protect your eyes from its damaging light. The delay setting controls the time that the lens takes to transition back from the darkened state to the clear state after the welding stops. Depending on the type of welding and your skill level, you need to adjust the delay time to get the perfect balance between visibility and eye protection.
Generally, a shorter delay time will work better for faster welding techniques, while a longer delay time is recommended for deep and penetrating welds. With a little bit of trial and error, you should be able to discover the perfect delay setting for your welding projects and enjoy better safety and efficiency.
Step 4: Test the Settings
After adjusting the auto-darkening settings on your welding helmet, it is crucial to test the settings to ensure they work effectively. To do this, you should first test the sensitivity setting. This setting controls the helmet’s reaction time when exposed to light.
To test this, place your welding helmet in a bright area and see if it automatically darkens. If the sensitivity is too high, the helmet may darken too quickly, making it difficult to see your work. If the sensitivity is too low, the helmet may not darken fast enough, causing eye strain or even injury.
Next, test the delay setting, which controls how long the lens stays dark after welding. To test this, strike an arc and note how long it takes for the lens to lighten. If the delay time is too long, the lens may stay dark for longer than necessary, which can be problematic.
Finally, test the shade level setting, which controls how dark the lens becomes when welding. You want to ensure that the shade level is appropriate for the type of welding you are doing to protect your eyes adequately from harmful UV rays. By taking the time to test the settings, you can ensure that your auto-darkening welding helmet is working correctly and providing you with the necessary protection needed during welding projects.
Tips and Tricks to Ensure Optimal Performance of your Auto Darkening Welding Helmet
If you’re wondering how to set your auto-darkening welding helmet for optimal performance, there are a few tips and tricks to keep in mind. Firstly, make sure that the helmet is securely fastened to your head, as any movement can interfere with the sensor’s ability to detect when to darken. Adjust the sensitivity and delay settings to your preference, depending on the level of brightness and speed of your welding process.
Keep the lens clean and free from scratches or debris, which can also negatively impact the sensor’s accuracy. Lastly, make sure to properly store and maintain your helmet, as extreme temperatures or damage to the internal components can cause malfunctions. By following these steps, you can ensure that your auto-darkening welding helmet will perform optimally and keep you safe on the job.
Clean Your Lens
One of the most important aspects of maintaining proper functionality of your auto darkening welding helmet is to keep the lens clean. Over time, dust, debris, and even welding spatter can accumulate on your helmet, causing decreased visibility and hazardous working conditions. To prevent this, using a compressed air duster to blow away any loose debris before each use can help keep your helmet clean.
Additionally, wiping down the lens with a soft, dry cloth can help remove any remaining dust or smudges. It is important to avoid using harsh chemicals or abrasive materials, as these can scratch or damage the lens. Remember, a clean lens is crucial for optimal performance and safety in all welding applications.
Store Your Helmet in a Safe Place
It’s important to store your welding helmet properly to ensure optimal performance and longevity. When you’re done welding, make sure to store your helmet in a safe, dry place away from extreme temperatures and sunlight. Avoid leaving it on the welding table or in a spot where it could be knocked over.
The key to a long-lasting welding helmet is to keep it protected from damage. Invest in a carrying case or helmet bag to keep it in when you’re transporting it to different job sites. With proper storage, your welding helmet will be ready to go for your next welding project.
Remember, a well-maintained helmet is a key component of welding safety and helps you stay protected on the job. For welders, a well-maintained helmet is essential for maintaining their welding quality.
Conclusion
In conclusion, setting up your auto darkening welding helmet doesn’t have to be rocket science. Just like baking a cake, all it takes is a little patience and attention to detail. So, whether you’re a beginner or a seasoned welder, take the time to carefully follow the manufacturer’s instructions and adjust the sensitivity and delay settings to your liking.
After all, a well-set welding helmet is the key to a successful and safe welding experience. Happy welding, folks!”
FAQs
What are the advantages of using an auto darkening welding helmet?
Some advantages include better visibility, increased productivity, and better safety as it protects the eyes and face from harmful radiation.
How do I know when to replace the batteries in my auto darkening welding helmet?
Most helmets have a low battery indicator, such as a flashing light or beeping sound, that will notify you when it’s time to replace the batteries.
Can auto darkening welding helmets be used for all types of welding?
Yes, auto darkening welding helmets can be used for MIG, TIG, stick welding, and other types of welding.
How do I adjust the sensitivity and delay of my auto darkening welding helmet?
Most auto darkening welding helmets have adjustment knobs that allow you to change the sensitivity and delay settings. Consult the user manual for specific instructions.
Can auto darkening welding helmets be used for other tasks besides welding?
Yes, auto darkening welding helmets can be used for tasks such as plasma cutting, grinding, and other activities that require eye protection.
How do I properly maintain my auto darkening welding helmet?
Keep it clean and store it in a cool, dry place. Check the helmet regularly for cracks or signs of wear and tear, and replace any damaged parts.
How do I choose the right shade for my auto darkening welding helmet?
Consult the user manual or OSHA guidelines to determine the appropriate shade for the type of welding you will be doing and the level of amperage being used.

