How to Unclog a Paint Sprayer Tip: Tips and Tricks for a Clean Finish

Have you ever been in the middle of a painting project and had your paint sprayer tip suddenly clog up? Talk about frustrating! Not only does it slow down your progress, but it can also leave you with an uneven finish on your project. Luckily, unclogging your paint sprayer tip is a relatively simple process. With just a few steps and a bit of patience, you can get your paint sprayer back up and running smoothly in no time.
So, whether you’re a seasoned pro or a novice DIYer, keep reading and learn how to unclog your paint sprayer tip like a pro.
Causes of Clogging
If you’ve ever used a paint sprayer, then you know that clogging can be a major issue. There are several causes of clogging, but a few simple steps can help you unclog your paint sprayer tip and get back to your project. The most common cause of clogging is using paint that is too thick.
This can be remedied by thinning the paint before you put it in the sprayer. Another common cause is using a tip that is too small for the paint you’re using. Make sure you use the appropriate tip for the type of paint you’re working with.
Occasionally, clogging can be caused by debris in the paint or in the sprayer itself. In this case, you’ll need to clean the sprayer thoroughly. Finally, make sure you keep the sprayer tip clean during use by wiping it with a damp cloth periodically.
By following these simple steps, you can prevent clogging and keep your paint sprayer working smoothly. And if you do run into a clog, now you know how to quickly and easily unclog your paint sprayer tip!
Dried Paint
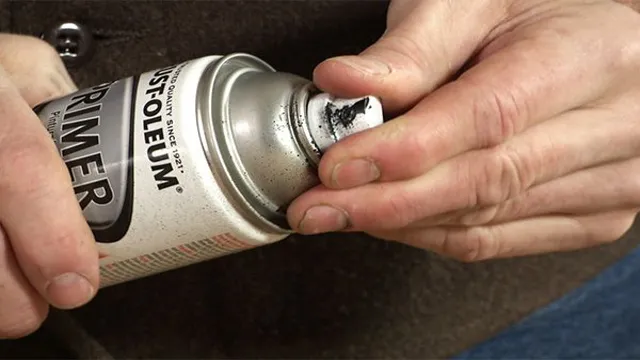
Dried paint is a frustrating issue that can clog up your painting equipment and make your projects a lot more difficult. There are several possible causes of this problem, and it’s important to understand them so you can prevent it from happening. One common cause of dried paint is leaving your equipment exposed to air for too long.
When paint is left in a container or sprayer with air contact, it can begin to harden and dry out. This can happen even if the equipment is covered, as air can still circulate. Another cause is not properly cleaning your equipment after use.
Paint residue can build up and dry on the equipment, leading to clogs and blockages. Using old or expired paint can also contribute to dried paint problems, as the pigments and other ingredients can break down over time. By being diligent in cleaning your painting equipment after use, properly storing your paint, and using fresh products, you can avoid issues with dried paint and keep your projects running smoothly.

Debris or Contaminants
One of the main causes of clogging in pipes and drains is the presence of debris or contaminants. These unwanted materials can accumulate over time and gradually obstruct the flow of water or other liquids. Debris can include items such as food particles, hair, and paper products, while contaminants can come from chemicals or other substances that are not meant to be flushed down the drain.
When these materials build up, they can lead to blockages and eventually cause serious plumbing issues. It’s important to properly dispose of waste and avoid pouring harmful chemicals down the drain to prevent clogs from forming. By being mindful of what goes into our pipes and regularly cleaning them out, we can prevent the hassle and expense of dealing with a clogged drain.
Poor Paint Quality
Poor Paint Quality can be caused by a number of factors, one of which is clogging. This occurs when the paint is unable to flow smoothly through the nozzle due to a blockage, resulting in an uneven and patchy finish. There are several reasons why clogging can happen, such as using low-quality paint that contains impurities, not cleaning the spray gun properly after use, and using a tip size that is too small for the paint being used.
Another possible cause is not thinning the paint enough for the spray gun, which can lead to thicker particles clogging the nozzle. It’s important to take the time to clean your equipment thoroughly and ensure that you are using the correct tip size and paint viscosity for the job at hand, in order to avoid clogging and achieve a smooth, high-quality finish. By doing so, you’ll be able to avoid poor paint quality and get great results every time.
Steps to Unclog Your Paint Sprayer Tip
Paint sprayers are great tools for covering larger areas in a short amount of time. But every now and then, the sprayer tip will become clogged, putting a stop to your progress. Luckily, it’s fairly easy to unclog the tip yourself.
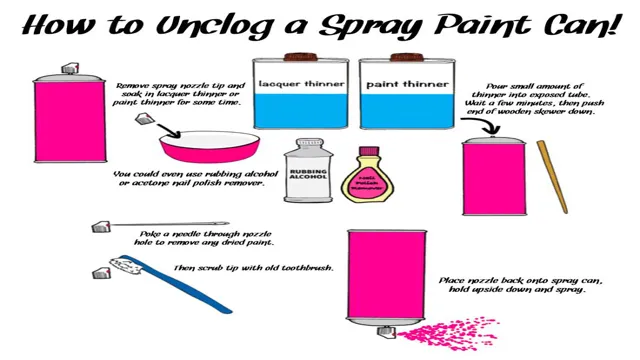
The first step is to turn off the sprayer and detach the spray tip from the gun. Then use a small pin or needle to clear out any blockages in the tip. If that doesn’t work, soak the tip in a cleaning solution (like vinegar or mineral spirits) for a few hours before reassembling and testing the sprayer.
If the sprayer still isn’t working properly, you may need to consult the manufacturer’s instructions or take it in for repairs. By following these steps, you’ll be able to avoid the frustration of having to stop and unclog your paint sprayer during your projects.
Step 1: Disassemble the Sprayer
If you’re experiencing issues with your paint sprayer tip, the first step to take is disassembling the sprayer. This is important because it allows you to access and clean every part of the sprayer, including the tip. You need to turn off the sprayer and unplug it from the power source to avoid any potential accidents.
Then, unscrew the tip and remove it along with the guard and nozzle. Dip all the parts in a cleaning solution, and scrub them gently with a brush. Once you’re done, rinse them in water and let them dry completely before putting the sprayer back together.
Disassembling the sprayer is vital because it ensures no part is left unclean, preventing any future clogging issues from arising.
Step 2: Clean the Tip with a Pin or Needle
Unclogging a paint sprayer tip can be frustrating, but it doesn’t have to be. Once you’ve removed the clog from the tip with a toothbrush, you’re ready for the next step: cleaning it with a pin or needle. This step is important because it allows you to get into the nooks and crannies of the tip where paint might be stuck.
Take a pin or needle and carefully insert it into the tip, making sure not to damage the tip itself. Move the pin in a circular motion to loosen any stubborn paint. Once you’ve done this, you can run water through the tip to clear any remaining debris.
It’s important to note that this step should only be done once the clog has been removed with a toothbrush, otherwise, you risk pushing the clog further into the tip. By taking your time with this step and being gentle with the pin or needle, you can achieve a fully functioning paint sprayer tip in no time.
Step 3: Soak the Tip in Solvent
When it comes to unclogging your paint sprayer, one essential step is soaking the tip in solvent. This step is crucial as it helps to break down and dissolve any paint or debris that may be causing the clog. Firstly, unscrew the tip of your sprayer and place it in a container filled with your chosen solvent.
The most commonly used solvents are mineral spirits, lacquer thinner, or denatured alcohol, depending on the type of paint you are using. Allow the tip to soak in the solvent for at least 30 minutes, or according to the manufacturer’s instructions. Once the time has elapsed, remove the tip from the solvent, and rinse it thoroughly with water.
You may need to use a cleaning brush to remove any remaining debris. After cleaning and washing with water, dry the tip before reassembling it onto your paint sprayer. With this step done, you can continue painting with a fully functioning paint sprayer, no more clogs!
Step 4: Rinse and Reassemble the Sprayer
Congratulations, you’ve made it to the final step in unclogging your paint sprayer tip! After soaking and flushing out the clog with the appropriate solvent, it’s time to rinse the sprayer thoroughly with clean water. Ensure that all parts, including the nozzle and filter, are completely clean and dry before reassembling the sprayer. A simple way to check for any remaining clogs is to spray plain water through the nozzle and observe the spray pattern.
If the pattern is consistent, you should be good to go. Remember, maintaining a clean sprayer will ensure a better finish, save you time and money in the long run, and prevent costly repairs. So, don’t hesitate to take the extra time and effort to clean your sprayer after each use.
With these steps, your paint sprayer will be ready to use again in no time.
Preventative Measures
Knowing how to unclog a paint sprayer tip is crucial for any painter or DIY-enthusiast. Not only can a clogged tip be frustrating, but it can also cause spray patterns to be uneven or even non-existent. However, preventing clogs is just as important as knowing how to fix them.
One preventative measure is to always strain your paint before pouring it into the sprayer. This removes any debris that could potentially clog the tip. Additionally, it’s important to properly clean your sprayer after every use.
Failing to do so can cause leftover paint to dry and harden inside the tip, leading to a clog. By taking these preventative measures, you can reduce the likelihood of a clogged paint sprayer tip and keep your painting projects running smoothly.
Use High-Quality Paint
One key preventative measure when it comes to interior painting is using high-quality paint. It may be tempting to go for the cheaper option, but it could end up costing you more in the long run. High-quality paint is made with better ingredients and will give you a smoother, more durable finish.
It also tends to have better coverage, so you may need fewer coats, which can save you time and money. Additionally, higher quality paint can resist fading, staining, and mildew better than cheaper alternatives. When it comes to paint, it’s worth investing in the good stuff to ensure your interior looks its best for years to come.
Clean the Sprayer After Each Use
When it comes to using a paint sprayer, many people overlook the importance of cleaning it after each use. However, neglecting to clean your sprayer can lead to a buildup of paint residue that can clog the machine and render it useless over time. That’s why it’s crucial to take preventative measures and clean your sprayer after each use.
Not only will this extend the life of your machine, but it will also ensure optimal performance the next time you need it. To clean your sprayer, start by flushing it with clean water. This will remove any excess paint and help prevent the buildup of residue.
Next, disassemble the machine and clean each part individually with soapy water and a soft brush. This will remove any paint that may have become stuck in the nooks and crevices of the sprayer. Once each part is clean, reassemble the machine and run clean water through it again to ensure that all paint residue has been removed.
By taking the time to clean your sprayer after each use, you’ll create a habit that will not only keep your machine working efficiently, but will also ensure that your paint jobs look professional and smooth. Don’t let a buildup of paint residue clog your sprayer and ruin your projects – make cleaning your sprayer a priority and enjoy a long and productive lifespan for your machine!
Store the Sprayer Properly
When it comes to properly maintaining your sprayer, one of the most important steps is storing it correctly. If you neglect to take preventative measures, you may end up harming your sprayer and shortening its lifespan. To start, be sure to clean your sprayer thoroughly after each use.
This involves flushing out the solution and letting it dry completely before putting it away. In addition, keep your sprayer in a dry, cool place when not in use. Avoid storing it near any heat sources or in direct sunlight, as this can cause the tank and hose to become brittle and crack.
By taking these simple steps, you can help ensure your sprayer remains in great condition and lasts for many years to come. So, don’t forget to properly store your sprayer and keep it in top-notch shape!
Conclusion
In conclusion, unclogging a paint sprayer tip requires a combination of patience, persistence, and know-how. It’s an art form, really. You can’t just slap on some duct tape and hope for the best.
You need to take your time, assess the situation, and choose the right tools for the job. And remember, prevention is key. Regular cleaning and maintenance can help you avoid clogs in the first place.
But if you do find yourself facing a stubborn paint blockage, don’t despair. With these tips and tricks, you’ll be back to spraying in no time.”
FAQs
What causes paint sprayer tips to clog?
Paint sprayer tips can clog due to dried paint particles, debris, or inadequate cleaning.
How do I prevent paint sprayer tips from clogging?
To prevent paint sprayer tips from clogging, it’s important to clean the equipment thoroughly after every use, use appropriate filters, and strain your paint before filling the sprayer.
What’s the best way to clean a clogged paint sprayer tip?
To clean a clogged paint sprayer tip, you can try soaking it in a cleaning solution, using a cleaning brush, or using a cleaning needle to remove any obstructions.
Can I unclog a paint sprayer tip with compressed air?
Using compressed air to unclog a paint sprayer tip can be risky and may damage the equipment. It’s best to use safer cleaning methods such as soaking, brushing, or cleaning needles.
What should I do if my paint sprayer tip won’t unclog?
If your paint sprayer tip won’t unclog using the standard methods, it may be time to replace the tip or seek professional assistance.
How often should I clean my paint sprayer tip?
It’s recommended to clean your paint sprayer tip after every use to prevent clogging and ensure maximum performance.
What paint types are most likely to clog a sprayer tip?
Thick or unstrained paint types like oil-based paints, urethane, and lacquer are more likely to clog a paint sprayer tip, requiring extra care and cleaning.


