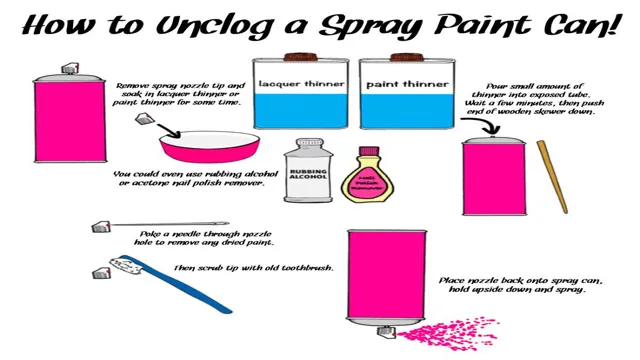
How to Unclog a Paint Sprayer Tip: Tips and Tricks for Smooth Painting

Are you tired of having to stop mid-project to unclog your paint sprayer tip? It can be frustrating to deal with, but luckily there are some quick and easy solutions to get your sprayer working smoothly again. First, try using a clean paintbrush to gently scrub the tip and remove any built-up paint. If that doesn’t work, soaking the tip in warm, soapy water for 15-20 minutes can often do the trick.
Just be sure to thoroughly rinse and dry the tip before using it again. Another option is to use a can of compressed air to blow out any obstructions in the tip. And if all else fails, you can try using a specialized tip cleaning tool to really get into the nooks and crannies and dislodge any stubborn clogs.
Don’t let a clogged paint sprayer tip slow down your progress. With these simple solutions, you’ll be back to painting in no time.
Understanding the Causes of Clogs
When it comes to using a paint sprayer, clogs can happen all too easily. Understanding the causes of clogs is key to preventing them, but you may still find yourself with a clogged tip from time to time. The good news is that unclogging a paint sprayer tip isn’t actually all that difficult.
The most common cause of clogs is dried paint, which can occur when paint is left in the sprayer for too long or when the sprayer is not cleaned properly after use. To unclog a paint sprayer tip, start by removing the tip and soaking it in hot water mixed with a cleaning solution or rubbing alcohol. Once it has soaked for a sufficient amount of time, use a small brush or toothpick to dislodge any remaining paint.
You can also try using compressed air to blow out any particles that may be causing the clog. With these tips in mind, you should be able to unclog your paint sprayer tip quickly and easily, keeping you on task and getting your painting projects done in no time.
Types of Paint Buildup in Sprayer Tips
When it comes to sprayer tips, one of the most common problems that people face is clogs. There are many different types of paint buildup that can cause clogs, and understanding these causes is key to preventing them. The most common type of paint buildup is known as tip buildup.
This occurs when paint dries and accumulates on the tip of the sprayer over time. Another type of buildup is called filter buildup, which occurs when paint particles accumulate on the filter screen inside the sprayer. If these types of buildup are not addressed, they can lead to serious clogs that can damage your sprayer and even cause it to stop working altogether.
To prevent clogs from occurring in the first place, it is important to clean your sprayer regularly and use the proper cleaning methods. By taking care of your sprayer and being aware of the types of buildup that can cause clogs, you can avoid frustrating and costly problems in the future.

Symptoms of a Clogged Paint Sprayer Tip
When it comes to using a paint sprayer, there are a number of things that can cause clogs and disruptions in the application process. Perhaps the most common culprit of a clogged paint sprayer tip is dried paint buildup, which can occur when the sprayer is not properly cleaned and maintained after each use. Another cause of clogs may be residue from unfiltered paint, which can lead to blockages over time.
In addition to these factors, using the wrong type of paint or using paint that has become too thick and viscous can also lead to tip clogs. Understanding the causes of clogs is important in preventing them from occurring and ensuring a smooth, efficient painting process. By taking proper care of your paint sprayer and being vigilant about any signs of clogging, you can ensure that your equipment continues to function effectively and efficiently for all of your painting needs.
Preventive Measures
If you’re a frequent user of a paint sprayer, you know how frustrating it can be when the tip gets clogged. It prevents you from getting a smooth finish and can slow down your work flow. Luckily, there are preventive measures you can take to avoid this issue.
Firstly, always strain your paint before putting it into the sprayer. This will remove any impurities and chunks that could potentially clog the tip. Secondly, make sure to clean the sprayer thoroughly after each use.
This will prevent any dried paint from accumulating and blocking the tip. Lastly, use the right nozzle size for the job. If the nozzle is too small for the paint viscosity, it can cause the tip to clog.
By taking these simple preventive measures, you can avoid the frustration of a clogged paint sprayer tip and keep your work flowing smoothly.
Proper Cleaning and Maintenance of Your Paint Sprayer
Proper cleaning and maintenance of your paint sprayer is essential to maintaining its optimal performance and ensuring it lasts for years to come. One of the most important preventive measures you can take is to always clean your sprayer thoroughly after each use. This means completely disassembling the sprayer, removing any excess paint, and cleaning out each part with a suitable solvent.
Be sure to pay special attention to the nozzle, which can easily clog if left uncleaned. Additionally, always store your sprayer properly, preferably in a clean and dry location, to prevent any damage or wear and tear. By taking these simple steps, you can ensure your paint sprayer stays in excellent condition for all your future painting needs.
Choosing the Right Paint for Your Sprayer
When choosing the right paint for your sprayer, taking preventive measures is crucial for a successful and stress-free painting experience. First and foremost, always read the label on the paint can to ensure it is suitable for your sprayer. Using the wrong type of paint can cause clogs and damage to your equipment.
It’s also important to properly prepare your sprayer by thoroughly cleaning it before and after each use and using appropriate filters to prevent paint buildup. Additionally, wearing proper safety gear like goggles, gloves, and a respirator can protect you from harmful fumes and chemicals. By taking these preventive measures, you can ensure that your sprayer and the paint you use will work together seamlessly for a flawless finish.
Storing Your Sprayer Correctly
When it comes to storing your sprayer, taking preventive measures can make a significant difference in keeping it in good condition and prolonging its lifespan. One of the essential steps is to clean the sprayer thoroughly after each use to prevent residue buildup. Additionally, you should remove any leftover pesticides or chemicals and flush the system with clean water to avoid corrosion.
Once cleaned, make sure to store the sprayer in a dry and cool place where it’s protected from direct sunlight. Avoid extreme temperatures as they can cause damage to the sprayer’s components. Furthermore, be sure to inspect the sprayer regularly for any signs of wear and tear.
Replace or repair any faulty parts to ensure the sprayer’s optimal performance. By implementing these preventive measures, you can maintain your sprayer in excellent condition, making for a hassle-free experience when it’s time to use it again.
Unclogging Methods
If you’re having trouble with your paint sprayer tip clogging up, don’t worry! There are a few methods you can use to quickly and effectively unclog it. One option is to use a toothbrush or small wire brush to gently scrub away any paint buildup. You can also use a cleaning solution specifically designed for spray guns, which can help dissolve any stubborn clogs.
Another option is to try changing the pressure setting on your sprayer or using a different nozzle size to prevent clogs from forming in the first place. Whatever method you choose, make sure to follow the manufacturer’s instructions carefully and take the time to properly clean and maintain your sprayer after each use to prevent future clogs. With a little patience and effort, you’ll be back to spraying perfect coats of paint in no time!
Using a Pin or Needle
Using a pin or needle to unclog a drain is a handy method that can quickly clear out smaller blockages. Simply straighten out the pin or needle and insert it into the drain, moving it around to dislodge any debris. Then, remove the tool and run hot water down the drain to help flush everything out.
This method works best for minor obstructions like hair or soap build-up and can easily be done at home without the need for professional plumbing services. It’s important to remember to never force the pin or needle down the drain too forcefully, as this can damage pipes and cause even more problems. Additionally, be sure to wear gloves when handling any unsanitary material that may come out of the drain.
Overall, using a pin or needle can be an effective unclogging method for minor blockages in your drain.
Soaking in Solvents
When it comes to unclogging methods, soaking in solvents is a popular solution. A solvent is a substance capable of dissolving other substances, such as fats, oils, and grease commonly found in clogs. Soaking a clogged item in a solvent can break down the blockage and restore proper flow.
However, it is essential to choose the right solvent based on the type of clog. For example, a drain that is clogged with hair may require a different solvent than one clogged with cooking grease. It’s also important to follow safety precautions when using solvents, such as wearing gloves and working in a well-ventilated area.
By using the correct solvent and taking the proper safety measures, soaking in solvents can effectively unclog stubborn blockages.
Expert Advice
If you’re a painter, you know the frustration that comes with a clogged paint sprayer tip. But fear not, because unclogging it is easier than you might think. The first step is to turn off the sprayer and detach the tip carefully from the gun.
Next, hold the tip under warm water and use a small brush or toothbrush to remove any clogging material. Don’t use anything too harsh like wire or a needle, as this can damage the tip. If that doesn’t work, you can try soaking the tip in a solution made of equal parts vinegar and water for about 30 minutes before brushing it again.
Then, rinse it with warm water and reattach it to the gun. With these simple steps, you’ll be back to spraying like a pro in no time. Keep in mind that prevention is key- make sure to clean your sprayer thoroughly after each use to avoid future clogs.
When to Seek Professional Help
The decision to seek professional help can be a tough one. It’s not always clear when it’s time to reach out for expert advice. But if you’re experiencing significant emotional distress, struggling with relationships, or experiencing symptoms that interfere with daily functioning, it may be time to consider seeking professional help.
A trained therapist or mental health professional can work with you to develop coping strategies, manage symptoms, and promote overall well-being. Additionally, if you’re dealing with a chronic or persistent issue, professional help can be a valuable resource for long-term support. Remember, seeking help is a sign of strength, not weakness, and taking care of your mental and emotional health is just as important as taking care of your physical health.
How to Avoid Clogs in the Future
If you’ve experienced a clogged drain before, you know how incredibly frustrating it can be. Luckily, there are steps you can take to avoid this problem in the future. One simple solution is to use drain guards in your sinks and showers to catch hair and other debris before it has a chance to go down the drain.
Additionally, be mindful of what you put down your garbage disposal. Avoid dumping large quantities of food scraps down the drain at one time and always run the water while using the disposal. Finally, consider scheduling regular plumbing inspections to catch any potential issues before they turn into clogs.
By taking these measures, you can avoid the headache of dealing with clogs in the future and maintain a healthy plumbing system.
Conclusion
In conclusion, unclogging a paint sprayer tip might seem like a daunting task, but fear not, with the right techniques and mindset, you can tackle it like a pro. Whether you choose to use a pin, a toothbrush, or the good old reverse flushing technique, always remember to be gentle and patient. And if all else fails, just remember the wise words of Bob Ross, “We don’t make mistakes, just happy little accidents.
” So don’t be afraid to experiment and have fun with your painting projects, even if that means some occasional unclogging challenges along the way. Happy painting!”
FAQs
What are common causes of a clogged paint sprayer tip?
The most common causes of a clogged paint sprayer tip include using a paint with a heavy consistency, not cleaning the sprayer after use, and allowing paint to dry in the nozzle.
How can I prevent my paint sprayer tip from clogging?
You can prevent your paint sprayer tip from clogging by using paint with the correct consistency, cleaning the sprayer after each use, and using a filter to strain the paint before spraying.
What is the best way to clean a clogged paint sprayer tip?
To clean a clogged paint sprayer tip, soak it in a solvent such as mineral spirits or acetone for a few hours, then use a small wire brush or toothpick to remove any remaining paint buildup.
Can I use water to clean a clogged paint sprayer tip?
While water can be effective in cleaning a paint sprayer, it is not recommended for cleaning a clogged paint sprayer tip. Water may not dissolve or break down the paint residue, leaving the tip clogged.
Are there any maintenance tips for keeping my paint sprayer tip unclogged?
Yes, regular maintenance is important for keeping your paint sprayer tip unclogged. This includes cleaning the sprayer after each use, replacing worn parts as needed, and storing the sprayer in a clean, dry place.
What should I do if my paint sprayer tip remains clogged after cleaning?
If your paint sprayer tip remains clogged after cleaning, you may need to replace the tip or other parts of the sprayer. It is important to use the correct replacement parts for your specific sprayer model.
Can I prevent my paint sprayer tip from clogging by using a thinner paint?
Yes, using a thinner paint can help prevent clogging in your paint sprayer tip. However, it is important to use the correct type and consistency of paint for your sprayer and the project you are working on.


