How to Attach a Wire Wheel to an Angle Grinder: A Step-by-Step Guide

Are you planning to attach a wire wheel to your angle grinder but don’t know where to start? No need to worry! In this step-by-step guide, we’ll walk you through the process and help you get your wire wheel up and running in no time. Angle grinders are versatile tools that can be used for various purposes, including grinding, sanding, polishing, and cutting. Attaching a wire wheel to your angle grinder can make your task easier, especially when it comes to rust removal, paint stripping, and metal cleaning.
But before you get started, it’s essential to ensure that you have the right tools and safety equipment. This includes an angle grinder, a wire wheel, safety glasses, gloves, and a wrench. Once you have everything you need, the first step is to remove the disc that’s currently attached to your angle grinder.
The next step is to attach the wire wheel by screwing it onto the spindle. Make sure to tighten the wire wheel securely to prevent it from coming loose during use. After attaching the wire wheel, it’s essential to test run it to ensure everything is in working order.
Make sure to wear your protective gear, turn on the angle grinder, and allow the wire wheel to run for a few seconds to check for any vibrations or wobbles. In conclusion, attaching a wire wheel to your angle grinder can be a straightforward process if you follow these steps. Always prioritize your safety by wearing appropriate gear and testing the setup before use.
Now, let’s get to work and make those metal surfaces look brand new!
Gather Materials
If you want to learn how to attach a wire wheel to an angle grinder, the first step is to gather the necessary materials. You will need an angle grinder with a compatible arbor size, a wire wheel that fits the grinder’s arbor, and protective gear such as gloves, eye protection, and a dust mask. It is also recommended to have a flat surface to work on and a clamp to secure the grinder during the attachment process.
Once you have everything ready, make sure to inspect the wire wheel for any damage or defects before attaching it to the grinder. Make sure to follow proper safety guidelines at all times and consult the manufacturer’s instructions for specific details on how to attach the wire wheel to your angle grinder. With the right materials and precautions in place, you can begin using your wire wheel to tackle a variety of tasks in no time!
-Angle Grinder
An angle grinder is a versatile and powerful tool that can be used for a variety of tasks including cutting, grinding, and sanding. Before using an angle grinder, it is important to gather all the necessary materials to ensure safety and efficiency. First and foremost, one should have a good quality angle grinder with a durable blade or disc suitable for the specific task at hand.
Depending on the materials being worked on, one may also need a respirator, safety goggles, gloves, and earplugs to protect against airborne debris and noise. Additionally, a sturdy work surface and clamps or vice grips may be necessary to secure the workpiece during use. Overall, by gathering all the necessary materials, you can ensure that your use of an angle grinder is safe, efficient, and successful in achieving your desired outcome.

-Wire Wheel
When preparing to wire wheel a surface, it’s essential to have all the necessary materials on hand. Firstly, you’ll need a wire wheel attachment that’s appropriate for the job at hand. These come in various sizes and densities, so choose the one that’s best suited for your project.
Next, ensure you have safety equipment such as gloves and safety glasses to protect yourself while using the wire wheel. You should also have a dust mask on hand as wire wheels can produce a lot of dust and debris. Before you begin, clean the surface you’ll be working on to ensure the best results.
You can use a brush or vacuum to remove any debris and give yourself a clean slate to work from. By having all your materials together, you’ll be able to wire wheel your surface safely and efficiently.
-Wrench
When it comes to fixing things around the house, one tool that should never be left out of your arsenal is a wrench. But before you start using it, you need to gather some materials first. The first thing you need to do is identify the size and type of wrench you will need for the job at hand.
This will depend on the size of the bolt or nut you are trying to loosen or tighten. You can find wrenches in different sizes, including small ones for precision work and large ones for heavy-duty applications. Once you have determined the right size, find a reliable and sturdy wrench made of high-quality materials that will last you through many projects.
You can find wrenches in different materials such as steel, aluminum, and even titanium. Finally, if your wrench does not have a comfortable grip, consider buying a grip or wrapping it with rubber material to reduce hand fatigue during use. With these materials, you should be equipped to tackle any job with your trusty wrench.
Identify the Correct Size
If you are wondering how to attach a wire wheel to your angle grinder, you must first identify the correct size to use. The size of the wire wheel you need will depend on the size of your angle grinder. Most angle grinders have a spindle size of either 5/8 inches or 7/8 inches.
You can check your angle grinder’s manual or measure the spindle size with a caliper to determine which size you need. Once you have identified the correct size, you can attach the wire wheel by following the manufacturer’s instructions. It’s important to make sure the wire wheel is properly installed and secured before using it.
With the right size wire wheel attached to your angle grinder, you’ll be able to tackle a variety of tasks, from removing rust and paint to polishing and deburring metal surfaces.
-Check Grinder’s Instructions
When it comes to using a grinder, it’s essential to check the instructions carefully to identify the correct size. Using the wrong size can lead to poor results and can also damage the grinder. Generally, grinders come in different sizes, and each has a specific use.
The most common sizes are #5, #8, #12, #22, and #32, with #5 being the smallest and #32 the largest. Before grinding, ensure that you know the correct size of your grinder and the appropriate plates and knives to use. Using the wrong plate and knife can also damage the machine and affect the texture of the meat’s final product.
Therefore, if you want to achieve well-ground meat that meets your expectations, adhere to the grinder’s instructions and use the right size. By doing this, you’ll not only have good results, but you’ll also extend the lifespan of your grinder.
-Match Size for Wire Wheel
When it comes to wire wheels, matching the size of the wheel to the size of the wire is crucial for optimal performance and safety. The first step in identifying the correct size is to determine the diameter of the wheel. This is typically measured in inches and can range from as small as 4 inches to as large as 24 inches or more.
Once you have determined the diameter, you should then measure the gauge or thickness of the wire. This is usually measured in inches or millimeters and can range from a thin 0.010 inches to a thick 0.
035 inches or more. To ensure that you select the correct size wire for your wheel, it is important to consult the manufacturer’s guidelines or seek the advice of a professional. By matching the size of your wire wheel to the size of your wire, you can improve its performance, longevity, and overall safety.
Disconnect Power Source
Attaching a wire wheel to an angle grinder can be a beneficial way to remove rust, paint, and other stubborn materials from surfaces. However, before you begin the process, it is crucial to disconnect the power source of the angle grinder. This means unplugging the tool or removing the battery if it is cordless.
This step ensures that no accidental activation of the angle grinder occurs during the attachment process, preventing any harm or injuries. Once the power source is disconnected, carefully read the manufacturer’s instructions on how to install the wire wheel and follow them. It is important to note that there are different types of wire wheels available for use on different materials, so it is essential to select the appropriate one for your project.
With the right wire wheel and proper safety precautions, attaching a wire wheel to an angle grinder can be a hassle-free process that will simplify your project’s completion.
-Unplug Grinder or Remove Battery
When it’s time to use your grinder, the first step should always be to disconnect the power source to keep yourself safe. Whether you’re using an electric grinder plugged into an outlet or one with a battery, unplugging or removing the battery before use is essential. Not only will this prevent any accidental activation of the grinder while you’re handling it, but it will also reduce the risk of any electrical hazards from faulty wiring or damaged batteries.
Remember, safety should always come first when using power tools, so make sure to always disconnect the power source before using a grinder.
Loosen Grinder’s Clamp Nut
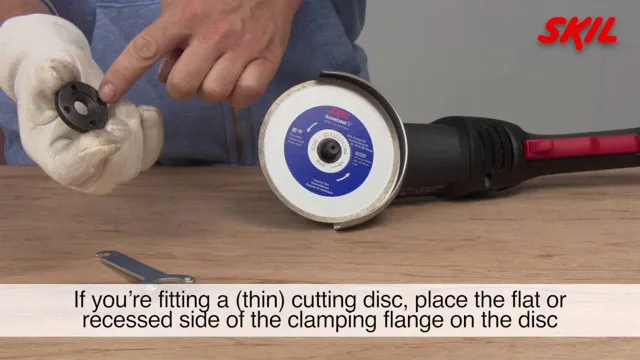
Before attaching a wire wheel to an angle grinder, it is important to first loosen the grinder’s clamp nut. This nut holds the current grinding wheel in place, and must be loosened in order to remove it and attach the wire wheel. To do this, use the wrench that came with your grinder to turn the clamp nut counter-clockwise.
This will release it from the spindle of the grinder, allowing you to slide off the current grinding wheel and attach the wire wheel. It is essential to make sure the clamp nut is secure once you have tightened it back on, to prevent any accidents or injury while using the angle grinder. Always follow the manufacturer’s instructions when attaching accessories to your angle grinder for optimal performance and safety.
-Use Wrench to Turn Nut Counter-Clockwise
If you’re looking to adjust the grind settings on your grinder, loosening the clamp nut is the first step in the process. To do so, you’ll need a wrench to turn the nut counterclockwise. This may seem like a simple task, but it’s important to use the proper tools and technique to avoid damaging the grinder or injuring yourself.
Once the nut is loose, you can adjust the grind setting to your desired level. Remember to always tighten the clamp nut securely before using the grinder to ensure safe and efficient operation. Using the wrench to loosen the clamp nut may require a bit of force, but be patient and careful to avoid stripping the nut.
With this step completed, you’re ready to move on to adjusting the grind settings and achieving the perfect cup of coffee. By following these steps and using the proper tools, you’ll ensure your grinder remains in good condition and consistently produces high-quality coffee grounds.
Place Wire Wheel on Grinder’s Arbor
Attaching a wire wheel to your angle grinder is a simple process that can be accomplished in just a few easy steps. First, you need to make sure that your angle grinder is unplugged and the arbor nut is loose. Once you have ensured this, you can place the wire wheel on the arbor.
Make sure that the wheel fits snugly onto the arbor and that it is properly aligned. Next, you can tighten the arbor nut using a wrench or pliers. It is important to make sure that the nut is tightened securely so that the wire wheel does not come loose while in use.
Once you have tightened the nut, you can turn on the angle grinder and test the wire wheel to make sure it is running smoothly. By following these simple steps, you can attach a wire wheel to your angle grinder and be ready to tackle any cleaning or polishing job.
-Center Wheel on Grinder’s Arbor
When it comes to using a wire wheel on your grinder, one important step is centering the wheel on the arbor. This not only ensures better balance for your tool, but also maximizes the effectiveness of the wire wheel. To center the wheel, first make sure the grinder is unplugged and remove any previous attachments.
Then, carefully slide the wire wheel onto the arbor and check for any wobbling or misalignment. If needed, adjust the wheel until it is properly centered and secured in place. This will help avoid any unnecessary vibrations or hazards while using your wire wheel grinder.
Remember to always wear safety goggles and protective gear when working with power tools. By properly centering your wire wheel on the grinder’s arbor, you can ensure a clean and efficient grinding experience every time.
Tighten Clamp Nut
Attaching a wire wheel to an angle grinder is a simple and straightforward process, but it’s essential to ensure that you tighten the clamp nut correctly before using it. To start, ensure that your angle grinder is turned off and unplugged. Next, remove the backing pad and place the wire wheel onto the spindle, making sure that it is centred and level.
Once in place, tighten the clamp nut by hand, ensuring that it is secure enough to hold the wheel in place while you work. Finally, use a spanner or wrench to tighten the nut further, being careful not to overtighten it which may damage the spindle. By following these steps, you can safely and securely attach a wire wheel to your angle grinder, allowing you to tackle a range of tasks with ease and efficiency.
Remember to always wear proper safety gear when working with power tools!
-Hand Tighten Nut
When it comes to tightening a clamp, it’s important to ensure that the nut is properly secure without overdoing it and risking damage to the clamp. This is where hand tightening comes in. Hand tightening means using only your hands to tighten the clamp nut to the point where it’s snug and secure, but not so tight that it’s difficult to remove later on.
The reason why hand tightening is important is because it allows you to feel the resistance and adjust accordingly, ensuring that the clamp nut is just tight enough to do its job without causing any unnecessary damage. So next time you’re tightening a clamp nut, remember to hand tighten and the job will be done right the first time!
-Use Wrench to Tighten Nut Clockwise
When working on a project that requires a clamp, one of the crucial steps is tightening the nut to ensure a secure hold. To do this, you’ll need a wrench and a bit of elbow grease. Begin by placing the wrench around the nut and turning it clockwise.
As you turn the wrench, take care not to apply too much pressure, or you risk damaging the clamp. You also want to make sure that the nut is tightened evenly, so that the pressure is distributed across the clamp evenly. If you find that the nut is difficult to turn, you can try applying some lubricant to the threads.
With a well-tightened clamp nut, you can be sure that your project will remain securely in place.
Test Wheel’s Stability
Attaching a wire wheel to an angle grinder can be a bit tricky, but once you have it securely attached, you’ll be able to tackle a variety of household or professional projects. Before you get started, it’s important to make sure that the wheel is compatible with your grinder. To attach the wire wheel, first, turn off the grinder and disconnect it from the power source.
Then, loosen the nut on the spindle by turning it counterclockwise. Next, slide the wire wheel onto the spindle, making sure that it rests securely against the nut. Tighten the nut by turning it clockwise with the wrench provided.
After you’ve attached the wire wheel, turn on the grinder for a test spin. This will allow you to check the stability of the wheel and make any necessary adjustments before you start using it for your project. Remember, safety should always come first, so make sure you wear the appropriate protective gear before operating any power tools.
-Plug in Grinder or Reinsert Battery
When it comes to using a grinder, it’s essential to ensure that the wheel is stable before starting to grind. To check the stability, you should first plug in the grinder or reinsert the battery if it’s a cordless one. Next, spin the wheel with your hand and check for any wobbling or vibration.
If you notice any irregularity, turn off the grinder and inspect it for any damage or debris stuck in the wheel. A wobbly wheel can be dangerous, causing accidents and damaging the surface you’re working on. If everything looks fine, you can start using the grinder but remember to always wear personal protective equipment like safety goggles and gloves.
The keyword highlighted in this section is “wheel’s stability,” which indicates the importance of checking this before using a grinder to ensure your safety and the quality of your work.
-Turn On Grinder and Check for Wobbling
When it comes to using a grinder, wheel stability is crucial. Before you start grinding, it’s essential to check if the wheel wobbles. A wobbling wheel means the grinder isn’t stable and could pose a risk to your safety.
There are a few things you can do to check the stability of the wheel. First, turn on the grinder and observe the wheel’s movement. Look out for any noticeable wobbling or movement as it spins.
If there is wobbling, the wheel could be damaged, unbalanced, or incorrectly fitted, and you should not use it. It’s best to replace the wheel if it’s damaged or unbalanced. Proper wheel stability isn’t just about safety; it’s also crucial for better grinding results.
A stable wheel provides a consistent grind and reduces the risk of producing uneven surfaces. So, always ensure your grinder has a stable wheel before you start grinding to get the perfect results you’re looking for.
Conclusion
Attaching a wire wheel to an angle grinder may seem like a daunting task, but fear not! It’s a wheel-y simple process that can be accomplished in just a few steps. Just make sure to follow the manufacturer’s instructions, wear the proper safety gear, and take your time – you don’t want to wire yourself out too quickly. So go ahead, spin that wheel and let your creativity shine, just remember to keep it grounded and wire-ly amazing!”
FAQs
What tools do I need to attach a wire wheel to my angle grinder?
You will need an angle grinder, a wire wheel, a wrench, and possibly a screwdriver or allen key depending on the type of attachment on your grinder.
How do I attach a wire wheel to my angle grinder?
Firstly, make sure the grinder is unplugged. Then, remove the grinding disc if one is attached. Next, place the wire wheel on the spindle of the grinder and tighten the nut using the wrench. Make sure it is secure and does not wobble.
Can I use any size wire wheel on my angle grinder?
No, you need to use a wire wheel that is specifically designed for your grinder. Check the size of your grinder and make sure the wire wheel matches it.
What materials can I use a wire wheel on with my angle grinder?
Wire wheels can be used on a variety of materials, including metal, wood, and concrete. However, it is important to make sure you are using the correct type of wire wheel for the material you are working on.
How do I properly maintain my wire wheel attachment?
After each use, make sure to clean the wire wheel by brushing off any debris or buildup. If it becomes overly clogged with material, it may need to be replaced.
Can I use a wire wheel for grinding or cutting?
No, wire wheels are designed for cleaning and brushing surfaces, not for grinding or cutting.
How should I store my angle grinder with a wire wheel attachment?
It is best to store the grinder with the wire wheel removed to prevent damage or wear on the attachment. If this is not possible, be sure to store it in a secure and upright position.


