How to Change the Blade on an Angle Grinder: Easy Step-by-Step Guide

Angle grinders are versatile tools used in a variety of DIY projects, from cutting metal to polishing surfaces. However, over time, the blade of an angle grinder can become dull or damaged, affecting its performance. That’s why learning how to change the blade of an angle grinder is an essential skill for any DIYer or professional.
In this blog post, we’ll show you step by step how to change the blade on an angle grinder. You’ll learn about the different types of blades, the tools you’ll need, and the safety precautions you should take to avoid accidents. So, grab your angle grinder and let’s get started!
Tools and Materials Needed
When it comes to changing the blade on your angle grinder, there are a few tools and materials that you’ll need. First and foremost, you’ll need a new blade that is compatible with your specific angle grinder. You’ll also need a wrench or lock-nut tool to remove the old blade and secure the new one in place.
It’s important to wear protective gear like gloves and goggles to protect yourself from any flying debris during the process. Additionally, having a clean and well-lit workspace will help make the task easier and safer. Remember to consult your angle grinder’s manual for specific instructions and safety precautions, and take your time to ensure you’re completing the task accurately.
By having the right tools and taking the necessary safety precautions, you can change the blade on your angle grinder efficiently and effectively.
– Angle grinder
When it comes to using an angle grinder, there are a few tools and materials that you’ll need to ensure that you’ve got everything you need to get the job done. The first thing you’ll need is, of course, an angle grinder. You’ll want to make sure that you choose the right size and type of grinder for the job, as there are different types for different applications.
Additionally, you’ll need a pair of safety goggles and ear protection, as using an angle grinder produces a lot of noise and sparks. You’ll also need a dust mask to protect yourself from any dust or debris that’s created during the grinding process. Lastly, it’s a good idea to have a pair of gloves to protect your hands.
With the right tools and materials, you’ll be able to use your angle grinder safely and efficiently, and get the results you’re looking for.

– Replacement blade
When it comes to replacing a blade, there are a few tools and materials you’ll need to get the job done right. First and foremost, you’ll need a replacement blade that matches the make and model of your tool. This might involve a bit of research, but it’s essential that you get the right blade to avoid damaging your tool or injuring yourself.
Other tools and materials you’ll need for the replacement process include a screwdriver, pliers, and a pair of safety gloves. The screwdriver will be used to remove any screws holding the old blade in place, while the pliers may be necessary to loosen and detach other components before you can access the blade. Safety gloves are also crucial to keep your hands protected from any sharp edges or debris that may be present during the replacement process.
Once you have all of your tools and materials, be sure to follow the instructions provided with your replacement blade carefully. With the right tools and a bit of patience, replacing your blade can be a simple and straightforward process that will keep your tool working properly for years to come.
– Wrench or key
When it comes to DIY projects, having the right tools and materials is essential for success. Whether you are a seasoned pro or a complete beginner, having a good wrench or key is an important part of your toolkit. These tools are used for tightening or loosening nuts and bolts and can come in a variety of sizes and shapes to fit different applications.
From basic household repairs to automotive work, having a wrench or key can make the job much easier and more efficient. When selecting a wrench or key, make sure to choose one that is appropriate for your needs and that is comfortable to use. A good quality wrench or key can last a lifetime and is an investment that is well worth making.
So the next time you are tackling a DIY project, be sure to stock up on all the necessary tools and materials, including a trusty wrench or key.
– Protective gear (safety glasses, gloves)
When it comes to any DIY project, safety should always come first. That’s why having protective gear such as safety glasses and gloves is crucial. Safety glasses protect your eyes from flying debris and potential chemical splashes while working with tools and materials.
Gloves will protect your hands from cuts, burns, and exposure to chemicals. It’s important to choose the right pair of gloves for the task at hand, such as heavy-duty gloves for cutting metal or chemical-resistant gloves for handling harsh chemicals. Don’t risk your health and safety by neglecting the proper protective gear.
By investing in the right equipment, you’ll not only be protecting yourself, but you’ll also be able to focus on the task at hand and complete your project efficiently. So don’t forget to gear up with safety glasses and gloves before starting any project.
Preparing the Angle Grinder
Changing the blade on an angle grinder can seem like a daunting task, but with the right preparation, it can be done quickly and efficiently. Firstly, ensure that the grinder is switched off and unplugged, or the battery is removed if cordless. The next step is to remove the disc from the angle grinder.
Using the spindle lock button, press down on the disc while simultaneously turning the locking nut anticlockwise until it comes off. Once the locking nut is removed, the disc can be taken off the spindle. It’s essential to inspect the spindle for any damage or debris that may affect the new disc’s performance.
To fit the new disc, insert it onto the spindle, making sure it’s seated correctly, and replace the locking nut. Ensure that the locking nut is tightened enough to hold the disc in place but not too tight, as this may cause damage to the grinder. By following these steps, changing the blade on an angle grinder can be done quickly and safely.
– Unplug the angle grinder from the power source
Before you start using an angle grinder, it’s essential to prepare it properly. One of the first things you need to do is unplug the angle grinder from the power source. This is a crucial step since it ensures that nobody gets hurt accidentally.
Even if you’re confident that you won’t switch it on, someone else might not know, so it’s always best to be safe. After you unplug it, you should attach the right disc to the angle grinder. Make sure you choose the right disc for the task ahead.
Different types of discs perform different functions, so it’s essential to know what kind of job you’re doing before choosing the disc. Additionally, make sure that the disc is the correct size and fits snugly without any wobbling. It’s important because a disc that isn’t secure can cause an accident.
Once you’ve successfully attached the disc, inspect it for any cracks or chips. Replace it immediately if you find any. Doing so will ensure that you have a safe and smooth operation.
– Remove the battery if it’s cordless
To prepare your angle grinder for use, it’s essential to remove the battery if it’s a cordless model. This step may seem simple, but it’s important for your safety and the performance of your tool. When you remove the battery, you reduce the risk of electrical shock, overheating, and battery damage.
Additionally, removing the battery ensures that the angle grinder won’t accidentally turn on during maintenance or cleaning. Depending on the model, you may need to locate the battery compartment and release it using a button or latch. Once removed, you can inspect the battery for any signs of damage or wear.
If you notice any issues, it’s best to replace the battery before using the angle grinder again. Overall, removing the battery is a crucial initial step that should never be overlooked when preparing to use your angle grinder.
– Lock the spindle with the locking mechanism or the spindle lock button
Angle grinder Preparing an angle grinder for use is essential to ensure your work is precise and safe. Firstly, it’s vital to know that an angle grinder can cause significant harm if not properly handled. This is why you must start by donning protective gear such as safety glasses, work gloves, and a dust mask.
Once you have all the necessary gear, you need to lock the spindle with the locking mechanism or the spindle lock button. This will help you to change the disc with ease and prevent the spindle from spinning uncontrollably when changing the blade. A locked spindle also provides stability to the blade, which is essential for accurate cuts and safety.
Always make sure to disconnect the grinder from the power source before changing the disc. Taking these steps ensures that you prepare your angle grinder appropriately, leading to a safer work experience and accurate cuts.
– Remove the disc if there’s any
When preparing to use an angle grinder, it’s important to make sure that the disc has been removed before continuing. This step is crucial in preventing accidents that may occur if the grinder is turned on with a disc still attached. To remove the disc, make sure the grinder is unplugged and the power source is disconnected.
Then, use the proper wrench to loosen the nut holding the disc in place. Once the nut is removed, the disc can be taken off and replaced if necessary. It’s essential to handle the disc with care, as it may still be hot from previous use or contain sharp edges that can cause injury.
Taking a few extra minutes to remove the disc before using the angle grinder can save time and prevent accidents. Remember to always prioritize safety first and double-check all equipment before beginning any job.
Removing the Blade
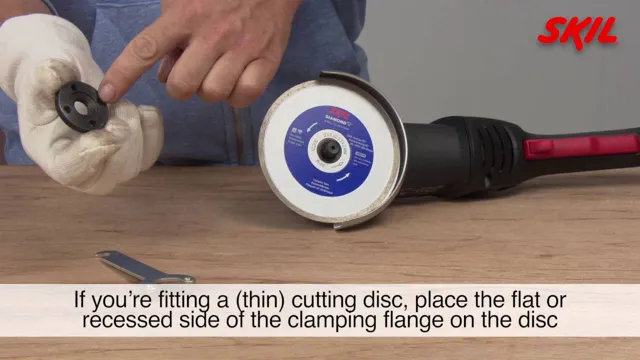
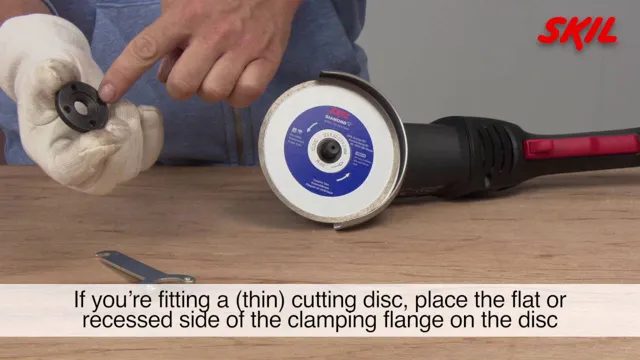
If you are looking to change the blade on your angle grinder, the first step is to remove the old blade. Before starting, make sure you have unplugged the grinder or removed the battery to ensure your safety. Once you have done that, locate the locking nut on the grinder and use the spanner wrench that came with the tool to loosen it.
This will release the blade, allowing you to remove it from the grinder. It is important to note that different grinders may have different locking mechanisms, so it’s always a good idea to consult the manual that came with your tool if you are unsure. Additionally, it is crucial to wear gloves and eye protection when changing blades to avoid any accidents.
With the old blade removed, you can now replace it with a new one and secure it in place by using the locking nut and spanner wrench. Remember to always double-check that the blade is securely fastened before operating the grinder.
– Locate the blade locking mechanism or button
If you want to change the blade on your power tool, the first thing you need to do is locate the blade locking mechanism or button. This is usually located near the blade guard or baseplate and can be a switch or a lever that you need to push, pull or slide. Once you have located the locking mechanism, it’s time to remove the blade.
You may need to use a special tool or key to loosen the bolt or screw that holds the blade in place. Be sure to follow the manufacturer’s instructions carefully to ensure that you don’t damage the blade or the tool. If you’re unsure of how to remove the blade, it’s always best to consult the user manual or seek professional advice.
Remember, safety should always come first when handling power tools, so take your time and proceed with caution.
– Hold down the locking mechanism or button and rotate the blade until it locks in place
Removing the blade from your tool is an essential skill that every DIYer or handyman should master. If not done correctly, it can result in injuries. So before starting the process, make sure to turn off the power source and unplug the tool.
Hold down the locking mechanism or button and rotate the blade until it locks in place. This step is critical because it will prevent the blade from moving when you remove it. Next, using a wrench or an Allen key, turn the bolt counterclockwise to loosen it.
After removing the bolt, the blade should come off. Be careful not to touch the sharp edges or place your hands anywhere near the cutting edge. If the blade is difficult to remove, you can use a blade removal tool or contact the manufacturer for assistance.
Remember, safety should always come first when removing blades.
– Use a wrench or key to loosen the bolt holding the blade in place by turning it counterclockwise
If you need to remove the blade from your tool for maintenance or replacement, the first step is to use a wrench or key to loosen the bolt holding the blade in place. Remember to turn it counterclockwise to ensure it comes loose. It’s important to use the right size wrench or key to avoid damaging the bolt or surrounding parts.
Once the bolt is loose, carefully remove the blade and set it aside. Be aware of any washers or spacers that may be located between the blade and bolt, as they will need to be reinstalled correctly when you put the blade back on. Keep in mind that the blade may be very sharp, so handle it with care and wear gloves if necessary to avoid injury.
Once the blade is removed, you can inspect it for damage, clean it, sharpen it, or replace it as needed. By following these steps, you can safely and efficiently remove the blade from your tool.
– Remove the bolt and the blade
Removing the blade of your lawn mower is a simple process that you can do on your own. The first step is to disconnect the spark plug to prevent any accidents from occurring. Then, flip the lawn mower over so that you can access the blade.
Look for the bolt that secures the blade in place and use a wrench to loosen it. Be sure to place the bolt and any washers in a safe place so that you don’t lose them. Once the bolt is removed, you should be able to slide the blade off the spindle.
Take a good look at the blade while you have it off to make sure it doesn’t need sharpening or replacing. If it does, be sure to take care of that before reattaching the blade. Remember, safety first!
Installing the New Blade
Changing the blade on an angle grinder is a crucial task that requires a bit of patience and focus. Start by disconnecting the tool from the power source, then disassemble the unit by unscrewing the spindle. Remove the worn-out blade from the grinder and put the new blade in its place, making sure it’s properly aligned with the teeth facing the right direction.
After that, reassemble the spindle and tighten the nut to secure the blade in place. Finally, plug the grinder in, turn it on, and check that the blade is running smoothly. Remember to always wear protective gear, such as gloves and safety glasses, when working on power tools to avoid injury.
With just a few easy steps, you can successfully change the blade on your angle grinder and get back to your DIY projects or professional tasks in no time!
– Make sure the new blade is compatible with your angle grinder and the job you want to do
When installing a new blade on your angle grinder, it’s crucial to make sure that the blade is compatible with both the tool and the job you want to do. First, check the tool’s manual to determine if the new blade is within the recommended size and RPM range for your specific angle grinder. Once you have the right blade, make sure the grinder is turned off and unplugged before removing the old blade.
Use a wrench to loosen the blade nut and remove the old blade carefully. Next, take the new blade and place it onto the spindle, making sure that it aligns with the flanges on either side. Finally, secure the blade nut tightly using the wrench, making sure not to over-tighten it.
Congrats! You have successfully installed the new blade and you’re ready to use your angle grinder tool. Remember, proper installation ensures safety and a successful grinding outcome.
– Align the threaded hole in the center of the new blade with the spindle on the angle grinder
When you’re ready to install your new angle grinder blade, there are a few simple steps to follow. First, make sure your grinder is turned off and unplugged before you begin. Then, remove the old blade by loosening the retaining nut with an adjustable wrench.
Once the old blade is removed, you can align the threaded hole in the center of the new blade with the spindle on the angle grinder. Use your fingers to tighten the retaining nut onto the spindle, making sure it’s snug but not over-tightened. Finally, use the wrench to securely tighten the retaining nut and ensure that the new blade is firmly in place.
With your new blade installed, you’re ready to get back to work with your angle grinder. Remember to always use proper safety equipment, including eye protection and a dust mask, when using power tools.
– Place the new blade on the spindle and screw the bolt back in place by turning it clockwise
If you’re looking to replace the blade on your lawnmower, it’s important to follow proper safety precautions. Once you have safely removed the old blade, it’s time to install the new one. First, inspect the new blade to ensure there are no defects or damage.
Once confirmed, place the blade onto the spindle, ensuring it is properly aligned with the blade bolt holes. Then, screw the bolt back into place by turning it clockwise. Make sure the bolt is tightened securely but be careful not to over-tighten, as this can cause damage to both the bolt and the mower.
By following these simple steps, you can safely and effectively install your new lawnmower blade. Keep in mind that proper maintenance and replacement of your lawnmower blade can increase its longevity and efficiency. So, make sure to take the time to properly replace it when needed.
– Tighten the bolt firmly with a wrench or key
When installing a new blade on your equipment, it’s crucial to tighten the bolt properly for safe and efficient use. Armed with a wrench or key, tighten the bolt firmly, ensuring that it’s not too loose or too tight. Tightening the bolt too loosely can lead to the blade wobbling, which can lead to a dull blade or even cause it to slip out of place.
In contrast, over-tightening the bolt can cause stress on the blade or the washer, leading to costly repairs or replacements. A good rule of thumb is to tighten the bolt securely, but not to the point where it’s difficult to remove in the future. Taking the time to properly secure your new blade can greatly increase its longevity, preventing accidents and prolonging the life of your equipment.
Testing the Blade
If you need to change the blade on your angle grinder, don’t worry – it’s a simple process that you can do yourself with a few basic tools. Start by unplugging the tool and removing any attachments or accessories. Then, use a wrench to loosen the nut that holds the old blade in place, taking care to follow any specific instructions in your tool’s manual.
Once the nut is loose, you should be able to remove the old blade and replace it with a new one, being sure to align the blade correctly with the spindle. Finally, tighten the nut back up firmly, making sure the blade is secure and won’t come loose during use. With a sharp new blade fitted onto your angle grinder, you’ll be ready to tackle all kinds of cutting and grinding tasks with ease.
– Remove the locking mechanism or button
Now that you’ve removed the locking mechanism or button on your knife, it’s time to test the blade. As tempting as it may be to dive right in and start chopping away, it’s important to proceed with caution. Begin by inspecting the blade for any signs of rust, nicks, or chips.
If you notice any imperfections, it’s best to have them repaired before using the knife. Once you’ve determined that the blade is in good condition, find a cutting board or other suitable surface and make a few test cuts. Pay attention to how the knife feels in your hand, the sharpness of the blade, and how easily it cuts through the material.
It’s always a good idea to work slowly and deliberately when testing a new blade to avoid any accidents. Remember, a sharp knife is a safer knife, so be sure to keep your blade honed and in good condition to ensure the best results every time. So, be careful and enjoy chopping your favorite ingredients with this newly tested knife.
– Reattach the battery or plug the angle grinder back in
After assembling your angle grinder and attaching the blade, the next step is to test it before putting it to use. This is to ensure that the blade has been installed correctly and is functioning as it should. To do this, you will need to reattach the battery or plug the angle grinder back in.
Once you have done this, switch on the angle grinder and let it run for a few seconds, ensuring that the blade is spinning properly and is not wobbling or vibrating excessively. If the blade seems to be working correctly, turn off the angle grinder and disassemble it once again. However, if there are any issues with the blade, such as improper installation or defects, you will need to address these before using the angle grinder for any cutting or grinding tasks.
Remember, safety is critical when using power tools, and routine checks will help you avoid accidents and ensure that your tools remain in good working order.
– Turn the angle grinder on and let it run for a few seconds to make sure everything is working properly
When using an angle grinder, it’s important to take the time to test the blade to ensure everything is working properly. This step is crucial for both safety and efficiency in your work. First, turn the angle grinder on and let it run for a few seconds to make sure everything is working properly.
This will also help to warm up the blade for better performance. If you notice any vibrations or strange noises, be sure to turn off the angle grinder immediately and troubleshoot the issue. Once you’ve confirmed the blade is working properly, you’re ready to start your task.
Remember, taking the time to properly test your blade can prevent accidents and ensure you get the job done quickly and effectively. So, don’t skip this essential step!
– If there are any issues, turn off the angle grinder and make sure to troubleshoot before continuing with your project
When you’re using an angle grinder, it’s important to make sure that the blade is functioning properly. Before you start cutting or grinding, take the time to test the blade and make sure there are no issues. This step is critical because it ensures safety and helps you avoid potential accidents.
To test the blade, simply turn on the machine and let it run for a few seconds. If you hear any unusual sounds or notice any vibrations, turn off the angle grinder immediately. Troubleshoot the problem and make sure everything is in working order before continuing with your project.
Remember, safety should always come first when using any power tool. By taking the time to test your blade and troubleshoot any problems, you’ll be able to work more efficiently and with confidence.
Conclusion
Congratulations! You’ve successfully tackled one of the toughest feats in the world of DIY – changing the blade on an angle grinder. From the initial intimidation to the painstakingly precise steps, you’ve shown great tenacity and skill. Who knows? Maybe next time you’ll tackle a bigger beast – but for now, let’s give ourselves a good ol’ pat on the back.
As they say, change is the only constant – and now, thanks to you, you’re well-armed to face whatever curveballs come your way. Keep grinding!”
FAQs
What tool do I need to change the blade on an angle grinder?
You will need a wrench to remove the bolt holding the blade in place.
Do I need to unplug my angle grinder before changing the blade?
Yes, always unplug your angle grinder before attempting to change the blade for safety purposes.
How do I remove the old blade from my angle grinder?
Use a wrench to loosen the bolt holding the blade in place, then carefully remove the blade by hand.
What is the proper way to install a new blade on an angle grinder?
Align the new blade with the spindle and tighten the bolt using a wrench. Make sure the blade is secure and properly aligned before use.
Can I sharpen my angle grinder blade instead of replacing it?
Yes, you can sharpen the blade using a file or grinding wheel, but be sure to follow proper safety precautions and techniques.
How often should I change the blade on my angle grinder?
It depends on the frequency of use and the material being cut. It is recommended to check the blade regularly and replace it when it becomes worn or damaged.
What should I do if my angle grinder blade becomes stuck or won’t come off?
Try using a penetrating oil or lubricant to loosen the bolt, and carefully tap the blade with a rubber mallet to loosen it from the spindle. If all else fails, seek professional assistance.

