How to Change the Disc on an Angle Grinder: A Step-by-Step Guide

Angle grinders are a versatile and powerful tool in any handyman’s toolbox. They can grind, cut, polish and sand among other things. One of the most common things you need to do when using an angle grinder is to change the disc.
However, many people are puzzled by the process. How do you safely and efficiently change the disc on an angle grinder? In this blog post we will answer this question and offer tips on how to do it quickly and easily. Let’s get started!
Overview of Angle Grinder Disc Replacement
Changing the disc on your angle grinder is a straightforward process that anyone can do with the right tools and knowledge. First, make sure your grinder is unplugged and the disc has stopped spinning. Next, using a wrench or spanner, loosen the flange nuts that secure the current disc in place.
Once the nuts are loose enough, remove the old disc and carefully clean the spindle and surrounding area. Now it’s time to insert the new disc, making sure it is positioned correctly and securely fastened with the flange nuts. Finally, test the new disc by turning your grinder on and off a few times, making sure it rotates smoothly without any wobbling or vibrations.
With these simple steps, you can easily change the disc on your angle grinder and be ready to tackle your next DIY project with ease.
Understanding the Parts and Tools Required
When it comes to angle grinder disc replacement, it’s important to have a good understanding of the parts and tools required. In general, you’ll need to have a replacement disc that matches the size and type of the existing disc, as well as a wrench or other tool to remove the old disc and attach the new one. Depending on your grinder and replacement disc, you may also need a backing pad or adapter.
Switching out the disc is typically a straightforward process, but it’s crucial to follow the manufacturer’s instructions and take all necessary safety precautions. With the right tools and knowledge, you can quickly and easily replace your angle grinder disc and get back to your work or project.

Safety Precautions to Take Before Replacing Disc
Angle grinder disc replacement is an important yet potentially dangerous task that every user of this tool should take seriously. Before replacing a disc, it’s crucial to take safety precautions to avoid any potential hazards. The first thing you should do is make sure the tool is unplugged and the battery removed if it’s a cordless angle grinder.
Wear gloves to protect your hands and goggles to safeguard your eyes from debris and sparks. Avoid wearing loose clothing or jewelry that can get caught in the grinder. It’s also paramount to check the disc for any cracks or chips before installation.
Using a damaged disc can lead to serious injury. Additionally, ensure that the disc’s size and type match the requirements of your angle grinder. Finally, when fitting the new disc, ensure it’s correctly tightened and secure before using your angle grinder.
By taking these safety precautions, you can confidently replace your angle grinder’s disc without risking harm.
Steps to Remove the Old Disc
Changing the disc on an angle grinder can be overwhelming, but here are some simple steps to make the process easier. First, make sure that the grinder is turned off and unplugged. Then, remove any accessories that may be attached to it.
After that, use the lock button on the grinder to secure the spindle in place. This will prevent the disc from spinning during removal. Grab a wrench and use it to loosen the nut holding the disc in place, making sure to turn it in the correct direction.
Once the nut is loose, use your fingers to carefully remove the disc from the spindle. And that’s it! With these simple steps, you can easily remove the old disc from your angle grinder and get started on your next project. Remember to always take proper safety precautions when working with power tools.
Detaching the Angle Grinder from the Power Supply
If you’re going to be changing an angle grinder disc, the first step is to detach the grinder from the power supply. This is an essential safety measure that should always be taken before attempting to remove the old disc. To do this, you should unplug the grinder from the power socket or, if it’s wired directly, turn off the main switch or unplug the cord.
After ensuring that the power supply is completely disconnected, you can proceed to remove the old disc. First, use a spanner wrench to hold the grinder spindle steady, then use another wrench to turn the disc retaining nut in an anti-clockwise direction. This will loosen and unscrew the nut from the spindle.
Hold onto the disc with your other hand as you do this, to prevent it from falling off while the nut is being removed. Once the retaining nut comes off, the old disc should come off easily.
Removing the Disc Guard and Locking Mechanism
Removing the disc guard and locking mechanism in a CD or DVD player can seem like a daunting task, but it’s actually quite simple. The first step is to unplug the player from any power source to ensure safety. Then, locate the disc guard and locking mechanism on the player, typically found on the top cover or near the disc tray.
Carefully unscrew any screws holding these parts in place with a screwdriver and gently remove them. Be cautious not to damage any other components or wires inside the player. Once the old disc guard and locking mechanism are removed, the new ones can then be installed in the same manner.
Remember to always seek professional help if necessary. By following these simple steps, you can easily remove and replace the parts on your CD or DVD player and keep it in great working condition.
Removing the Old Disc
Removing the old disc from your computer may be necessary when upgrading to a new one or installing new software that requires more space. To get started, make sure you’ve shut down your computer and unplugged it from any power source. If you’re working with a desktop, locate the tower’s back panel and remove the screws to open it.
Look for the drive bay containing the old disc, which should be connected via a SATA cable and power cable. Disconnect both of these cables from the old disc, taking note of which cable goes where so you can reconnect them correctly later. You can then remove the screws holding the old disc in place and slide it out of the drive bay.
If you’re working with a laptop, check the manufacturer’s instructions on how to remove the old disc, as the process can vary based on the model. By successfully removing the old disc, you’re one step closer to upgrading or adding needed space to your system.
How to Install the New Disc
If you need to change the disc on your angle grinder, don’t worry, it’s not as complicated as it may seem. First, make sure the grinder is unplugged and the current disc is secure. Remove any accessories or guards that may be in the way.
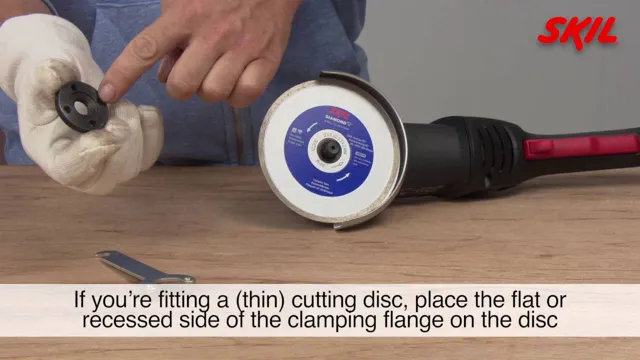
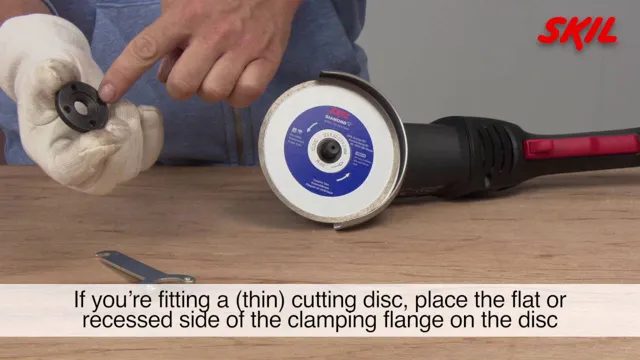
Depending on your grinder, you may need to use a tool to remove the disc or simply twist it off with your hands. Once the disc is removed, clean the spindle thoroughly to remove any debris or dust that may have accumulated. Now, take your new disc and carefully align it with the spindle.
Make sure the arrows on the disc match up with the arrow on the grinder to ensure proper placement. Use the tool (if required) to tighten the disc onto the spindle. If you’re using your hands, be sure to tighten it as much as you can.
Finally, reattach any guards or accessories and you’re good to go! Remember to inspect the new disc before using your angle grinder and to always wear proper safety gear.
Preparing the Angle Grinder for Installation
Before installing a new disc on your angle grinder, it’s important to ensure that the grinder is prepared and ready for installation. Start by unplugging the grinder and locking the trigger to prevent accidental turn-on. Next, remove the old disc and clean any debris from the spindle.
Check whether the new disc is compatible with your grinder and ensure it’s the correct size and type before installing it. Place the disc on the spindle, aligning it with the marking on the grinder’s blade guard. Tighten the flange nut securely using the wrench provided or a compatible one.
Avoid overtightening the nut as this can cause the disc to warp or break during use. Once the nut is firmly secured, release the trigger lock, and you’re ready to use your newly installed grinding disc. Remember to always wear protective gear and follow safety instructions when operating an angle grinder.
Installing the New Disc
If you’ve purchased a new disc for your computer, you may be wondering how to install it. The process is actually quite simple. First, find the disc drive on your computer and open it by pressing the designated button.
Then, insert the new disc into the drive, making sure the label is facing upwards. Push the disc closed and wait for your computer to recognize it. Once it does, you should receive a notification asking what action you’d like to take.
Select the option to run the disc and follow the on-screen prompts to complete the installation process. With just a few clicks, your new disc will be up and running, ready for you to use.
Testing the New Disc
If you’ve never changed the disc on an angle grinder before, it can be a bit tricky to know where to start. The first thing you’ll want to do is turn off the grinder and unplug it from the power source for safety. Then, loosen the nut that holds the disc in place by using a spanner wrench to turn it counterclockwise.
Once the nut is loose enough, you should be able to remove the old disc by pulling it straight off from the spindle. Carefully inspect the new disc to ensure that it’s the right size and shape for your grinder before sliding it onto the spindle and tightening the nut again. Make sure that the disc is securely fastened before you start using the grinder again.
With these easy steps, you’ll be able to change the disc on your angle grinder with ease, whether you’re testing out a new disc or replacing an old one that’s worn out.
Re-attaching the Disc Guard and Angle Grinder to Power Supply
After properly attaching the disc guard and angle grinder to the power supply, the next step is to test the new disc. It’s essential to ensure that the disc is safe to use before starting any work. Start by turning on the angle grinder and leaving it to run for a few seconds.
This will help to check if the disc is properly attached and whether it’s spinning smoothly and without any wobbling. If there’s any vibration or wobbling, it’s important to turn off the angle grinder immediately and re-check the disc attachment. Once you’re satisfied with the disc’s performance, you can proceed with the work that you’ve planned.
It’s always a good idea to wear protective equipment such as gloves, goggles, and a face shield during the process to protect yourself from flying debris and sparks. It’s important to avoid exerting too much pressure on the angle grinder as it can cause the disc to break or become unstable, leading to accidents. In conclusion, testing the new disc is crucial to ensure that it’s safe to use before starting any work.
Always follow safety protocols and wear protective gear to minimize any potential risks. With proper handling and care, angle grinders and discs can be powerful and effective tools for a range of DIY and professional projects.
Testing the New Disc for Proper Functioning
Once you have installed a new disc, it’s important to test it to ensure it’s functioning properly. The first step is to check for any physical damage or scratches on the disc. If the disc is in good physical condition, then you can move on to testing it on your device.
Start by inserting the disc into the appropriate drive and waiting for it to load. Check if the disc is recognized by your computer or console. If it is, then you can proceed to check if it can play, open files, or run programs without any issues.
If the disc is not recognized, try cleaning it with a soft cloth and try again. If the disc is still not working, it may be a compatibility issue with your device or a faulty disc. In such cases, it’s best to contact the manufacturer for assistance.
Remember, proper testing of the new disc is crucial to ensure that it functions as expected and avoids disappointment in the future.
Conclusion and Final Thoughts
And there you have it, folks! Changing a disc on an angle grinder may seem intimidating at first, but with these simple steps, it’s a piece of cake. Just remember to disconnect the power, wear protective gear, and take your time. After all, there’s no rush when it comes to keeping yourself and your tools safe.
So go ahead and show that old disc who’s boss, and get back to tackling those tough grinding jobs with ease. Happy grinding, everyone!”
FAQs
What tools are needed to change a disc on an angle grinder?
You will need a wrench, a new disc, and possibly a screwdriver to change the disc on an angle grinder.
How do I remove the old disc from my angle grinder?
Use the wrench to loosen the nut holding the disc in place, and then remove the old disc from the angle grinder.
Can I reuse old discs on my angle grinder?
No, it is not recommended to reuse old discs on an angle grinder. Always replace old discs with new ones.
What should I do if the nut is stuck when trying to change the disc?
Try tapping the wrench lightly with a hammer to break the nut loose, or apply some penetrating oil to help lubricate it.
How tight should the nut be when installing a new disc on my angle grinder?
The nut should be tightened snugly, but do not overtighten it as this could cause damage to the disc or angle grinder.
What safety precautions should I take when changing a disc on my angle grinder?
Always wear gloves and eye protection when changing a disc on an angle grinder, and make sure the tool is unplugged from the power source before starting.
Can I change the disc on my angle grinder without any prior experience?
While it is possible to change the disc on an angle grinder without prior experience, it is recommended that you have a basic understanding of how the tool works and how to use it safely.

