How to Clean Airless Paint Sprayer Gun: A Step-by-Step Guide for Optimal Performance.

Is your airless paint sprayer gun clogged and not functioning properly? Are you wondering how to clean it so you can get back to your painting project? Look no further! Cleaning your airless paint sprayer gun is essential for maintaining its performance and longevity. Just like any tool, it requires proper maintenance to function optimally. In this blog post, we’ll guide you through the steps of cleaning your airless paint sprayer gun, from start to finish.
So, let’s dive in and learn how to keep your sprayer gun in top shape!
Materials Needed
When it comes to cleaning your airless paint sprayer gun, you will need a few materials to ensure that the job is done correctly. Firstly, you will need a container to hold the cleaning solution, such as a bucket or a cleaning pail. You will also need a cleaning solution specifically designed for airless paint sprayers, which will effectively remove any paint residue.
Additionally, you will need cleaning accessories such as a brush and a hook, which will help to dislodge any stubborn paint buildup, as well as a clean cloth or rag for wiping down the gun. Finally, it is important to make sure that you have protective equipment such as gloves and safety goggles, as some of the cleaning solutions can be harsh on the skin and eyes. By gathering these materials beforehand, you can ensure that your airless paint sprayer gun is cleaned properly and ready for its next use.
– Water – Paint thinner – Cleaning brush – Gloves – Safety goggles
If you’re planning on taking on a painting project, it’s important to have all the necessary materials before getting started. When it comes to painting, you’ll need a few basic materials such as water, paint thinner, a cleaning brush, gloves, and safety goggles. Water is essential for cleaning your brushes and diluting your paint if needed.
Paint thinner is necessary for thinning oil-based paints and for cleaning up any spills. A cleaning brush is essential for keeping your brushes clean and in good condition between use. Gloves and safety goggles are must-haves to protect your hands and eyes.
Safety should always be the first priority when working with paint and these materials will ensure that you have a safe and successful painting project.

Step 1: Disassemble the Sprayer Gun
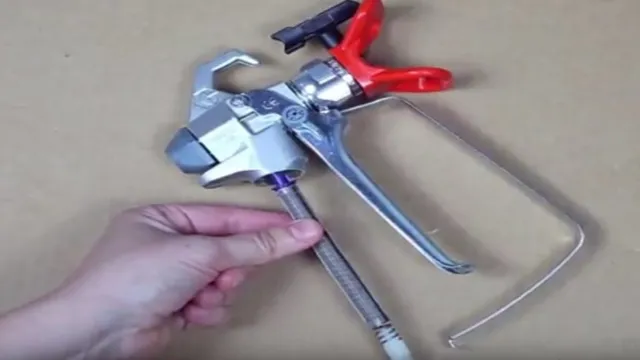
If you want to learn how to clean an airless paint sprayer gun, the first step is to disassemble the gun. Since the gun is made up of several small parts, removing them will make it easier to clean each component thoroughly. Start by removing the spray tip and the filter basket, which can be located at the base of the gun.
Next, take out the ball and the spring that are in the gun’s inlet valve. You should also remove the trigger guard and the trigger itself for easy cleaning. Once all the parts are removed, clean each one with warm soapy water and a soft brush to remove any paint residue or debris.
Rinse them all with clean water and let them dry completely before reassembling the gun. With this simple step, you can ensure that your airless paint sprayer gun will continue to operate well for your next project.
– Turn off the sprayer and detach the nozzle guard – Remove the spray tip and filter – Unscrew the gun’s handle and detach the housing and trigger assembly
When it comes to painting projects, using a sprayer gun is a popular choice for achieving a smooth, professional-looking finish. However, before you can start spraying, you need to disassemble the gun and its various components. This process typically involves turning off the sprayer and detaching the nozzle guard, removing the spray tip and filter, and unscrewing the gun’s handle to detach the housing and trigger assembly.
While this may seem like a lot of steps, disassembling the gun is essential for proper cleaning and maintenance, which can extend the life of your sprayer and ensure consistent, high-quality results. By taking the time to thoroughly disassemble your sprayer gun, you’ll be better equipped to tackle any painting project that comes your way.
Step 2: Clean the Nozzle, Filter, and Tip
If you want to keep your airless paint sprayer gun functioning at its best, cleaning it regularly is a must. Cleaning the nozzle, filter, and tip will ensure a consistent spray pattern, prevent clogging, and make your painting projects much easier. To clean the nozzle, simply remove it from the gun and use a small brush or toothpick to remove any dried paint or debris.
For the filter, remove it from the gun and rinse it with warm water until it’s clean. If it’s still dirty, you can use a mild soap or solvent. To clean the tip, some people prefer to use a small wire brush, while others use a specialized tip cleaner.
Regardless of what method you use, the key is to remove any paint or debris that may have accumulated inside. By doing these simple steps, you can keep your airless paint sprayer gun clean and working properly for years to come.
– Soak the filter, nozzle, and tip in water – Use the cleaning brush to remove any remaining paint or debris – Rinse thoroughly with water and dry completely
When it comes to making sure your paint sprayer is performing at its best, cleaning is a crucial step. In Step 2 of the cleaning process, you will need to focus on the nozzle, filter, and tip. Begin by soaking these parts in water, which will help to loosen any leftover paint or debris.
Once they’ve had time to soak, use the cleaning brush to gently scrub away any remaining paint or clogs. Be sure to rinse everything thoroughly with water to ensure that there is no remaining residue. Finally, allow everything to air dry completely before reassembling and storing your sprayer away.
By taking the time to clean the nozzle, filter, and tip properly, you’ll be able to prolong the life of your sprayer and ensure that it’s always ready for your next project. So, don’t overlook this important step in the cleaning process. Your paint sprayer (and your wallet) will thank you in the long run!
Step 3: Flush the Gun’s Hopper and Hose
When it comes to cleaning your airless paint sprayer gun, it’s important not to overlook the hopper and hose. After all, these components play a crucial role in the sprayer’s functioning and can easily become clogged with dried paint if not properly maintained. To flush the gun’s hopper and hose, start by disconnecting the gun from the sprayer and removing the filter.
Next, fill the hopper with clean water and connect the gun to a bucket or similar container. Turn on the sprayer and spray the water until it runs clear. Then, disconnect the gun and flush the hose with clean water until no more paint comes out.
This simple step can go a long way in extending the life of your sprayer and ensuring that it works properly for years to come.
– Fill the hopper with water or paint thinner – Connect the gun to a bucket or waste container – Turn on the sprayer and flush until the liquid running through the gun is clean
When it comes to cleaning your paint sprayer gun, flushing the hopper and hose is a crucial step. To start, fill the hopper with either water or paint thinner, depending on the type of paint you used. Then, connect the gun to a bucket or waste container, making sure it is securely fastened.
Once everything is in place, turn on the sprayer and let it run until the liquid running through the gun comes out clean. This ensures that all of the paint residue is completely flushed out and that the gun is ready to use for the next project. It’s important to do this after each use to prevent clogs or damage to the equipment.
Taking the time to properly clean and maintain your paint sprayer will ensure that it lasts longer and performs better. So, make sure you don’t skip this important step.
Step 4: Reassemble the Sprayer Gun
Once you are done with cleaning all the individual parts, it’s time to reassemble the sprayer gun. Start by putting back the filter into its original position, followed by the tip guard and the tip. Make sure to place them securely in the right order, as this will affect the spray pattern and the quality of the application.
Then, reattach the gun’s handle and trigger, and insert the piston rod. Check that everything is correctly aligned and tighten any loose bolts or screws but be careful not to overtighten them. Lastly, connect the hose and the power source and run some clean water or solvent through the sprayer gun before you start the actual painting process.
Following this comprehensive cleaning process regularly will help maintain the performance and lifespan of your airless paint sprayer gun, ensuring you achieve the desired finish for your painting projects every time.
– Reattach the housing and trigger assembly to the handle – Screw the gun back together – Attach the spray tip and filter – Reattach the nozzle guard
Now that you’ve successfully cleaned and inspected your paint sprayer, it’s time to reassemble it. Step four is all about putting the gun back together, and it’s relatively simple if you took your time disassembling it in the first place. First, reattach the housing and trigger assembly to the handle, making sure all parts are snug and secure.
Next, screw the gun back together, taking care not to over-tighten any screws or parts. Once the gun is securely fastened, it’s time to attach the spray tip and filter. These pieces are essential for ensuring that your paint goes on smoothly and evenly, so make sure they are free from any debris before you attach them.
Finally, reattach the nozzle guard, and your paint sprayer is back in action! Remember, reassembling your paint sprayer is the last step in a thorough cleaning, so take care to double-check that all parts are properly secured before using it again. Once you’re finished, you can start painting again with confidence, knowing that your sprayer is working at peak performance. So, are you ready to tackle your next painting project with a like-new paint sprayer? Let’s get started!
Step 5: Dispose of Paint Thinner Safely
To wrap up the cleaning process of your airless paint sprayer gun, it’s important to dispose of the paint thinner safely. Paint thinner is considered to be hazardous waste and should never be poured down the drain or into the trash. One way to dispose of it safely is to take it to a hazardous waste disposal facility in your area.
You can search online to find a disposal facility near you. Another option is to contact your local government and inquire about their hazardous waste disposal program. They may have a specific collection day where you can drop off your paint thinner.
Remember, proper disposal of paint thinner not only protects the environment but also ensures the safety of yourself and others in your community. So, make sure to handle it with care and responsibility.
– Do not pour paint thinner down the drain – Follow local regulations for proper disposal
When it comes to disposing of paint thinner, it’s important to follow proper guidelines to protect our environment. Pouring paint thinner down the drain is not only harmful to our water system but can also lead to contaminating our soil. Many local regulations prohibit the disposal of hazardous waste via regular means, so it’s crucial to follow their guidelines.
One option to consider is to find a hazardous waste disposal facility or event in your area that accepts paint thinner. Some cities also offer household hazardous waste pickup services, so check with your local government for more information. Remember that it’s our responsibility to take proper care of our environment and dispose of hazardous waste such as paint thinner in a safe and responsible way.
Conclusion
In conclusion, cleaning your airless paint sprayer gun is not rocket science, but it’s certainly not a walk in the park either. Just like any other painting equipment, it requires a bit of elbow grease and a lot of patience. However, with the right tools and techniques, you’ll be able to spruce up your sprayer gun in no time.
Remember to always wear protective gear, dismantle the gun properly, clean the parts thoroughly with appropriate solutions, and reassemble it with care. And if all else fails, you can always hire a professional to do the dirty work for you. So, go ahead and give your sprayer gun the TLC it deserves and enjoy those freshly painted walls without any hassle or clogs!”
– Regular cleaning of an airless paint sprayer gun ensures optimal performance and longevity – Use caution when handling cleaning materials and always wear proper safety gear
When it comes to cleaning your airless paint sprayer gun, it’s important to also consider how to dispose of paint thinner properly. Firstly, never pour paint thinner down the drain or onto the ground. Instead, check with your local waste management facility for specific instructions on how to dispose of hazardous waste materials safely.
Some cities offer hazardous waste collection events or drop-off locations, while others may require you to schedule a pickup. Remember to always wear proper safety gear and handle cleaning materials with caution. Disposing of paint thinner safely not only protects the environment but also ensures that your airless paint sprayer gun maintains optimal performance and longevity.
So, take the necessary steps to dispose of paint thinner responsibly and enjoy hassle-free painting for years to come.
FAQs
What are the necessary steps to clean an airless paint sprayer gun?
The necessary steps to clean an airless paint sprayer gun include flushing the system with water, cleaning the filters, removing any remaining paint with a brush or scraper, soaking the gun tip in solvent, and lubricating the gun with oil.
Can I use any type of cleaner to clean my airless paint sprayer gun?
No, you should only use the recommended cleaning solutions for your particular airless paint sprayer gun. Using the wrong type of cleaner can damage the gun or affect its performance.
How often should I clean my airless paint sprayer gun?
You should clean your airless paint sprayer gun after every use to prevent clogs and buildup. If you notice decreased spray pattern or pressure, it may be time for a more thorough cleaning.
Is it necessary to disassemble the gun for cleaning?
Yes, it is necessary to disassemble the gun for a thorough cleaning. This allows you to access all parts of the gun and remove any buildup or debris.
Can I use my airless paint sprayer gun without cleaning it?
No, it is not recommended to use your airless paint sprayer gun without cleaning it. This can lead to clogs and damage to the gun, as well as affect the quality of your paint job.
How long does it take to clean an airless paint sprayer gun?
The time it takes to clean an airless paint sprayer gun can vary depending on the level of buildup and the type of gun. Generally, it can take anywhere from 30 minutes to an hour.
What should I do if I encounter a stubborn clog in my airless paint sprayer gun?
If you encounter a stubborn clog, you may need to use a specialized cleaning solution or seek professional help. Do not attempt to force the clog out, as this could damage the gun.


