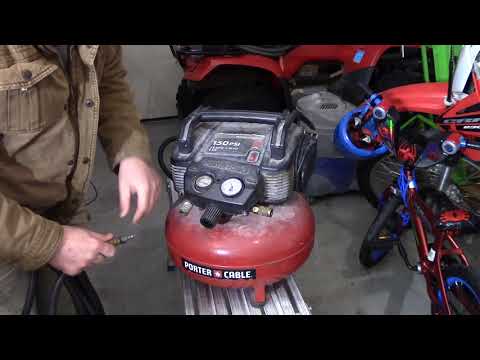
You’ve got a trusty air compressor sitting in your garage, ready to help power through your DIY projects. But before you can start using it to its full potential, you need to know how to fill it up properly. Filling an air compressor may seem like a no-brainer, but there are a few things you need to keep in mind for safety and efficiency.
Firstly, it’s important to make sure you’re using the right type of oil for your compressor. Each compressor has its own specific requirements, so be sure to consult the manual before you start filling. Secondly, you’ll need to make sure you’re using the right amount of oil, as too little can cause damage and too much can impede its performance.
Once the oil is taken care of, you can move on to filling the air tank. To ensure optimal performance and longevity, make sure to keep an eye on the pressure gauge and fill to the recommended levels. And don’t forget to bleed the tank regularly to release accumulated moisture and prevent corrosion.
Filling your air compressor doesn’t have to be a complicated process, but it does require attention to detail and a little bit of care. By following these basic steps, you’ll be well on your way to getting the most out of your trusty tool. So, let’s get started!
Before You Begin
Before filling an air compressor, it’s important to make sure that you have the correct type of oil. Check your owner’s manual to find out what type of oil is recommended for your specific model. Once you have the correct oil, you can start filling the compressor.
Make sure the compressor is turned off and the pressure valve is released before you begin. Next, remove the oil fill cap and pour in the oil slowly. Be sure not to overfill the reservoir, as this can cause damage to the compressor.
Once the oil is filled to the appropriate level, replace the oil fill cap, and you’re all set. Now you’re ready to use your properly oiled air compressor for all of your project needs. Happy DIYing!
Check Your Compressor’s Manual
If you’re planning on working on your compressor, it’s essential to read the manual before you begin. Compressor manuals provide important information on how to properly maintain and use the machine to avoid any injuries or damages. In the manual, you’ll find things like the specific type of oil and how much to use, the best ways to clean it, and the correct method of tightening bolts.
Remember, each compressor is unique, so you shouldn’t assume that the instructions for one machine will apply to another. By taking the time to read your manual before you start any work, you’ll be able to confidently tackle any maintenance or repairs that your compressor may need. So, before anything else, check your compressor’s manual!

Locate the Air Intake Valve
Before you begin cleaning your car’s air intake valve, it’s important to locate it first. The air intake valve is usually found on top of the engine and looks like a plastic or metal box with a hose connected to it. It’s important to note that the location of the air intake valve may vary depending on the make and model of your car, so be sure to consult your vehicle’s manual if you are having trouble locating it.
Once you’ve found the air intake valve, inspect it for any signs of damage, such as cracks or wear and tear. It’s also important to make sure that the valve is properly attached to the engine and that the hose is securely fastened. By locating the air intake valve before you begin cleaning it, you will be able to properly access it and ensure that you are cleaning the right part of your car’s engine.
Gather Your Materials
Before you begin any project, it’s important to gather all the necessary materials to ensure its success. When it comes to crafting, this is especially true. Whether you’re creating a new piece of jewelry or a DIY home decor project, you’ll need to gather all the necessary tools and supplies first.
Take stock of what you already have on hand and make a list of what you still need to purchase. Be sure to consider the size, shape, and color of the materials you need, as well as any specific measurements or quantities required. By gathering all your materials ahead of time, you’ll avoid the frustration of starting a project only to find you’re missing a crucial component.
So grab your list and head to the store or start browsing online to gather everything you need so that you can enjoy a smooth and successful crafting experience.
Step 1: Prepare the Compressor
The first step to filling your air compressor is preparing it for use. Firstly, ensure your compressor is situated on a stable, level surface to prevent any accidents or spillages. Check your oil and air filter levels and ensure they are at appropriate levels to avoid any mechanical issues.
Next, plug in your compressor to an outlet with enough voltage to power it. Once it is plugged in, turn the regulator valve counterclockwise and the release valve clockwise to ensure the tank is empty of any remaining air. It is essential to take the necessary safety precautions in preparing your compressor, so always wear protective gear such as safety goggles and gloves.
With these steps completed, you are now ready to fill your compressor with air and begin your tasks.
Turn Off the Power
Before doing anything, turn off the power to the compressor. This is a crucial first step to ensure your safety and prevent any accidents. You don’t want to be electrocuted while trying to fix your air compressor.
Make sure that the power switch is in the OFF position and the cord is unplugged from the power source. This step is especially important if you are going to be working on the compressor’s motor or any electrical components. Remember, safety should always come first when handling any equipment.
By doing this, you’re already taking a significant step towards a successful repair.
Release Any Built-up Pressure
When it comes to using your air compressor, you want to make sure you take the necessary steps to avoid any accidents or malfunctions. One important step in this process is releasing any built-up pressure that may be lurking in the machine. To do this, you’ll need to start by preparing the compressor.
Begin by unplugging it from the power source and letting it cool down if it has been in use. From there, locate the pressure release valve and turn it on to allow all of the air to escape. It’s important to note that this may take a few minutes depending on how much pressure has built up, so be patient and ensure all air has been released before moving on to the next step.
By taking this precautionary measure, you’ll be able to safely use your compressor without any surprises.
Step 2: Connect the Hose
To fill your air compressor, the next step is to connect the hose securely. Make sure the compressor is turned off before attaching the hose to prevent any possible injury. Locate the air outlet valve on the compressor and connect the hose to it.
Use a wrench to tighten the connection if necessary, but be careful not to overtighten it. Once the connection is secure, turn the compressor on and let it fill up your desired device – whether it’s a tire or a power tool. Remember to always keep an eye on the pressure gauge and turn off the compressor when the desired pressure is reached.
With this step done, you’re well on your way to using your newly filled air compressor!
Attach the Hose to the Air Intake Valve
When it comes to cleaning out your car’s engine, attaching the hose to the air intake valve is a crucial step. This valve is responsible for filtering out any debris that might harm your engine, so it’s important to give it a thorough cleaning. To attach the hose, first locate the air intake valve on your engine.
It’s usually found on the side or top of the engine and is easily recognizable by its circular shape. Once you’ve found it, take the hose provided with your cleaning kit and attach it to the valve. Make sure it’s tightly secured, so you don’t have any air leaks.
This hose will act as a vacuum, sucking out any debris that might be inside the valve. The process may take a while, depending on how dirty your engine is. And remember, make sure your engine is completely cooled down before attempting to clean it.
By properly attaching the hose to the air intake valve, you’ll be able to deep clean your engine and keep it running smoothly for years to come.
Attach the Other End of the Hose to the Air Compressor
Now that you have the hose, it’s time to connect it to your air compressor. The first thing to do is to ensure that your air compressor is turned off. Then, locate the connection point on your compressor and attach one end of the hose to it.
Make sure that the connections are tight and secure. Next, take the other end of the hose and attach it to the appropriate port on your air tool or accessory. It’s important to use the right size fittings to ensure that you get the best performance out of your equipment.
Once everything is connected, turn on the air compressor and allow it to pressurize the hose. Check for any leaks and tighten any connections if necessary. And that’s it, you’re all set to use your air tools! Remember to always use caution and wear appropriate safety gear.
Step 3: Add Oil to the Compressor
One of the most important steps in maintaining your air compressor is to add oil to it regularly. If you’re wondering how to fill air compressor with oil, it’s actually a very simple process. First, make sure you have the correct type of oil for your compressor, as recommended by the manufacturer.
Next, locate the oil fill port on your compressor. This is typically located near the motor or on the bottom of the compressor. Remove the fill cap or dipstick, and slowly pour in the correct amount of oil.
Be sure to check the oil level with the dipstick or sight glass, and don’t overfill. Too much oil can cause damage to your compressor. By keeping your compressor properly lubricated, you’ll extend its lifespan and ensure that it runs smoothly and efficiently.
Check the Oil Level
When it comes to maintaining your compressor, checking the oil level is an essential step. Without adequate oil, your compressor won’t work efficiently or may even break down entirely. So, how do you add oil to the compressor? First, locate the oil fill cap and remove it.
Then, using a funnel, add oil to the compressor until it reaches the recommended level. Be sure to check your compressor’s manual to determine the ideal type and amount of oil needed. Overfilling can be just as problematic as underfilling, so take care to add the correct amount.
Remember, regular oil changes can prolong the life of your compressor, so don’t neglect this crucial aspect of maintenance. By keeping your compressor properly lubricated, you can ensure it continues to perform at its best, helping you get the job done without any hiccups.
Add Oil If Necessary
When it comes to maintaining your compressor, one important step is to add oil if necessary. Most compressors have a sight glass that allows you to check the oil level, and if it’s low, you’ll want to add more oil. But not just any oil will do – you need to use the manufacturer’s recommended oil type and viscosity.
Adding too much oil can also be harmful, so be sure to add it in small increments until the level reaches the appropriate range. Proper oil levels help lubricate and protect the compressor’s internal components, preventing unnecessary wear and damage. Neglecting to add oil when needed can cause the compressor to overheat and potentially fail, resulting in costly repairs.
So, make sure to regularly check your compressor’s oil level and add oil when necessary to keep it running smoothly.
Step 4: Fill the Compressor
Filling an air compressor can seem like a daunting task, but it’s actually quite simple. The first step is to ensure that your compressor is turned off and disconnected from any power source. Next, locate the fill port on your compressor.
This is typically located on the top of the machine and can be identified as a small valve or screw. Once you have located the fill port, use an appropriate filler nozzle to insert the oil into the compressor. Be sure to use the correct amount of oil for your particular compressor and refer to the manufacturer’s instructions if you are unsure.
Once you’ve added the oil, you can then turn your compressor on and allow it to run for a few minutes to distribute the oil evenly throughout the machine. With just a few simple steps, you can be sure that your compressor is properly filled and ready to use.
Turn On the Power
Now that you’ve connected your compressor with the power, it’s time to fill it up. Before you start filling, make sure to check the oil level. If it’s low, add the recommended oil, as mentioned in the manual.
Once you’ve checked the oil level, it’s time to add air. First, close the drain valve tightly. Now attach the air hose to the compressor intake and turn the compressor on.
You’ll notice that the pressure gauge will start to rise as the compressor fills up. Keep monitoring the pressure gauge until the needle reaches the recommended pressure level specified in the manual. This is usually around 120 PSI, but it may vary based on the compressor model and your requirements.
When the pressure reaches the recommended level, stop the compressor and turn off the power. Your compressor is now ready to use. Remember that it’s always important to follow the instructions in the manual and take necessary safety precautions to ensure optimal performance.
With these simple steps, you can ensure long-lasting and efficient use of your compressor with optimal pressure.
Open the Air Intake Valve
Before the compressor can start doing its job, it needs to be filled with air. To do this, it’s essential to open the air intake valve. This valve allows outside air to enter the compressor, which is then compressed and stored in the tank.
When opening the valve, make sure to do so slowly to prevent any unnecessary damage and ensure efficiency. Once the valve is open, the compressor will begin to suck in the surrounding air, and it’s essential to keep an eye on the air pressure gauge to monitor the compression process. It’s a crucial step to ensure that the compressor is functioning correctly.
Without proper air intake, the compressor won’t be able to create the necessary pressure. Remember to close the valve once you’ve reached the desired pressure level. Overall, opening the air intake valve is a simple yet crucial step when filling a compressor and should always be done with care.
Wait for the Compressor to Fill
As you’ve connected the right fittings, adjusted the regulator, and turned on your compressor, it’s time for the next step, which is filling it up. Depending on the size of your compressor, the unit may take several minutes to reach maximum pressure. It’s important to give it time so that you don’t risk damaging the equipment or causing injury if it’s not yet filled up.
When the compressor reaches its limit, it will cycle off automatically, indicating that it’s ready for use. Remember that the process of filling your compressor will differ based on its size, type and makes. It’s advised to always refer to the manufacturer’s instructions for correct directions.
In a nutshell, waiting for the compressor to fill up is a crucial process that requires your patience and attention to ensure that your compressor is ready for use.
Step 5: Shut Down the Compressor
Now that you’ve filled up your air compressor tank, it’s important to remember to properly shut it down. First, turn off the power switch to the compressor and unplug it from the outlet. Next, close the tank’s drain valve to prevent any remaining air from escaping and causing potential safety hazards.
It’s also important to allow the compressor to cool down for a few minutes before storing it away. This will ensure that any excess heat is dissipated and prevent any damage to the compressor’s motor. Following these steps will not only help to prolong the life of your compressor but also help to ensure your safety while using it.
So don’t forget to shut it down properly every time you use it!
Close the Air Intake Valve
Closing the air intake valve is an essential step in shutting down the compressor safely. By doing so, you prevent dirt, dust, or debris from entering the compressor’s system, which can cause damage and increase maintenance costs. The air intake valve controls the flow and pressure of the air intake, and it should be closed slowly to avoid a sudden burst of air that can cause injury or damage nearby equipment.
After closing the valve, let the compressor run for a few minutes to release the built-up pressure and drain any condensate from the tank. Once the tank is empty, turn off the compressor and unplug it from the power source. With these steps, you can safely shut down your compressor and ensure its longevity and reliability.
Turn Off the Power
After completing the necessary tasks, the final step in shutting down your air compressor is to turn off the power. Ensure that you disconnect the power supply, switch off the power button, and unplug the device from the socket. Doing this will prevent any electrical malfunctions or accidents that may occur due to the compressor being connected to the power source.
Moreover, it helps to conserve energy and extend the lifespan of the equipment. Remember, proper care and maintenance is key to ensuring that your air compressor remains functional and efficient for a long time. So, be sure to turn off the power each time you are done using the compressor.
This will help to save you costly repair bills and ensure that you get value for your money.
Disconnect the Hose
As the last step in using your compressor, it’s important to disconnect the hose and shut it down properly. Begin by releasing the pressure in the hose by pulling the safety release valve or adjusting the regulator knob. Once all the air has been released, disconnect the hose from the compressor.
Be sure to do this carefully, as the hose may still be under pressure and can whip around dangerously if not handled properly. Once the hose is disconnected, take a moment to clean any debris or dirt from the compressor and hose, using a small brush or cloth. Then, turn off the compressor and unplug it from the power source.
This will help to prolong the life of your compressor and ensure safe usage. So, don’t forget to follow this important last step, and your compressor will be ready to use next time you need it.
Conclusion
In conclusion, filling an air compressor is as easy as filling a balloon with helium. All you need is the right equipment, a bit of know-how, and a willingness to get your hands dirty (or greasy). The key is to make sure you’re following all safety precautions, using the right kind of oil and lubricant, and checking your compressor regularly for any signs of wear and tear.
So don’t be afraid to dive into the world of compressed air – with a little practice, you’ll be a pro in no time!”
FAQs
What is an air compressor?
An air compressor is a device that converts power into potential energy stored in compressed air.
What are the types of air compressors?
The types of air compressors include reciprocating, rotary screw, centrifugal, and axial flow compressors.
How much air pressure do I need for my air compressor?
The air pressure you need for your air compressor depends on the tools you’re using. Usually, 90 PSI is a good starting point.
How often should I change the oil in my air compressor?
It’s recommended to change the oil in your air compressor every 500-1000 hours of operation.
How do I fill my air compressor with oil?
To fill your air compressor with oil, locate the oil fill cap, remove it, and pour in the recommended oil for your compressor.
How do I drain the water from my air compressor tank?
To drain the water from your air compressor tank, turn off the compressor, open the tank drain valve, and let the water drain out.
What is the best way to maintain my air compressor?
The best way to maintain your air compressor is to keep it clean, change the oil regularly, drain the tank of water, and follow the manufacturer’s instructions for maintenance.