How to Hold a MIG Welding Torch for Perfect Welds: A Step-by-Step Guide
When it comes to MIG welding, proper torch handling technique is essential to ensure a safe and successful weld. But if you’re new to welding or just aren’t quite sure of the proper way to hold a MIG welding torch, it can be intimidating. Fear not! Holding a MIG welding torch isn’t as tricky as it may seem.
With a few tips and practice, you’ll be welding like a pro in no time. Think of holding a MIG welding torch like holding a pencil. You want to grip it comfortably, but firmly, with your dominant hand.
Your other hand will hold the workpiece steady. It’s important to keep your grip relaxed; a tight grip can lead to hand fatigue and shakiness. Remember to keep your elbow tucked in close to your body and your wrist straight for optimal control.
Proper torch angle is also crucial for a successful weld. Generally, a 15-20 degree angle is recommended. This allows the wire to melt into the base metal without excessively penetrating it.
Experiment with different angles to see what works best for the specific project you’re working on. Another thing to keep in mind is to make sure the wire is properly feeding through the torch. If it isn’t, your weld will suffer.
It’s important to periodically check the wire feed speed and adjust as needed. In summary, holding a MIG welding torch is all about finding a comfortable grip, maintaining proper torch angle, and ensuring the wire is feeding correctly. With practice and a little patience, you’ll be welding with confidence in no time.
Introduction
Learning how to hold a MIG welding torch is essential if you want to achieve precise welds. The first step is to position yourself correctly and ensure that you have a good grip on the torch. Next, hold the torch with your dominant hand, with your index finger on the trigger and your other fingers supporting the torch.
You should also keep your wrist straight to avoid fatigue and make sure that the torch is at a comfortable angle. It’s also important to maintain a consistent distance between the torch and the workpiece to ensure a steady flow of the weld. By mastering the proper techniques for holding a MIG welding torch, you’ll be able to perfect your welding skills and achieve better results in your welding projects.
What is a MIG Welding Torch?
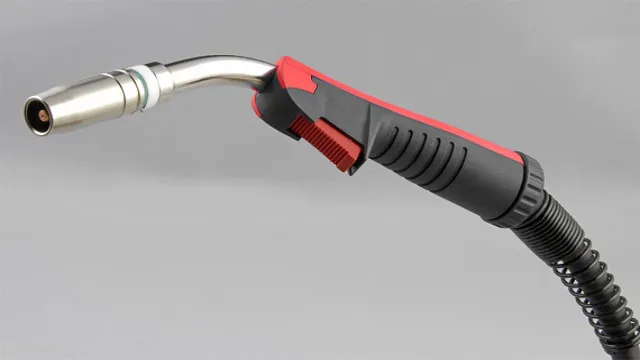
“MIG Welding Torch” A MIG welding torch, also known as a MIG gun, is an essential tool used in the process of MIG welding. It is a hand-held device that connects the welding wire to the power source and the shielding gas. The torch has a trigger that controls the wire feed speed and the flow rate of the shielding gas.
The wire feed speed determines the amount of wire melted per second, whereas the flow rate of the shielding gas determines the quality of the weld and how much protection it gets from atmospheric gases. The MIG welding torch also has a nozzle that directs the flow of shielding gas to the weld pool. The nozzle’s shape and size can vary depending on the welding application and the type of shielding gas used.
With the help of a MIG welding torch, a welder can produce high-quality welds and achieve precise control over the welding process.
Why is Proper Torch Handling Important?
Proper torch handling is an essential safety requirement in any welding or cutting activity. The consequences of handling a torch carelessly can be dire and could result in injury, damage to property, or even fatalities. To ensure that the use of a torch is safe and controlled, welders must comply with specific safety measures.
These measures include wearing appropriate protective gear, regular checks of the equipment, and following established procedures. Failure to comply with these safety measures can lead to accidents, such as torch leaks, gas explosions, and overheating of the equipment. Therefore, it is crucial to ensure that when handling a torch, the relevant safety procedures are strictly adhered to.
By doing so, you are not only ensuring your safety but that of those around you.
Steps to Hold a MIG Welding Torch
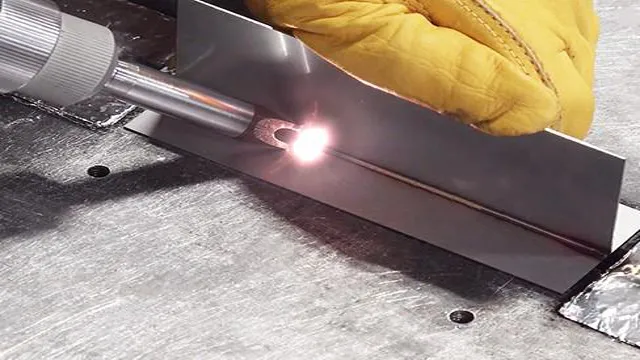
When it comes to MIG welding, one of the most important steps is learning how to hold the torch correctly. Proper torch placement is crucial for achieving quality welds and for your overall safety. The first thing to consider is your dominant hand- this hand should hold the torch while your non-dominant hand operates the weld angle.
Next, grip the torch handle with your dominant hand, making sure your fingers wrap comfortably around the handle. Your thumb should rest on the torch’s trigger, allowing you to easily adjust the wire speed. Finally, keep your wrist straight and your elbow close to your body to maintain control and accuracy while welding.
With these simple steps, you can ensure that your MIG welding torch is held correctly and that your welding projects are strong, safe, and built to last.
Step 1: Choose the Correct Torch for the Job
When it comes to MIG welding, choosing the correct torch is crucial in achieving quality welds. The torch must match the thickness and type of metal being welded, as well as the welding amperage and wire size being used. Once you have selected the correct torch, the next step is to hold it correctly.
A firm grip is essential in maintaining control and stability while welding. The torch should be held with both hands, with the non-dominant hand stabilizing the torch and the dominant hand controlling the trigger. Keep your elbows close to your body for added stability, and make sure the torch is not too far away or too close to the workpiece.
Remember, proper torch positioning and control are fundamental in producing clean and consistent welds.
Step 2: Place Your Hand at the Torch’s Center of Gravity
When holding a MIG welding torch, it’s crucial to understand its center of gravity. Placing your hand at the center of gravity will provide you with adequate balance and control of the tool. The torch’s weight distribution may vary, which means you may need to adjust your grip accordingly to maintain balance while working.
Imagine holding a pencil close to its tip versus holding it in the middle. You’ll notice that it’s easier to control the pencil’s movement when holding it in the middle due to the shift in the center of gravity. It’s similar to how you would hold the MIG welding torch.
Proper hand positioning not only ensures safety but helps you achieve precise welding results as well. So remember, find the center of gravity, adjust your grip, and handle the torch confidently like a pro.
Step 3: Grip the Torch Firmly with Your Dominant Hand
When it comes to holding a MIG welding torch, it’s essential to have a firm grip with your dominant hand. This is the hand that will control the direction and angle of the torch as you weld, so it’s crucial to have complete control. One of the best ways to grip the torch is to have your thumb and index finger around the trigger, while the rest of your fingers are wrapped around the torch handle.
This grip allows you to maneuver the torch easily while keeping it steady during the welding process. It’s also important to maintain a comfortable grip, so you don’t experience fatigue or strain while welding. Remember, the more control you have over the torch, the better your welds will be.
So, take the time to practice your grip and ensure that you have a comfortable and secure hold on the torch before you begin welding.
Step 4: Hold the Torch at a Comfortable Angle
When it comes to MIG welding, it’s important to hold the torch at a comfortable angle to ensure a smooth and steady weld. This may take some practice, but it’s essential for achieving high-quality results. The right angle will depend on the position of the weld and the type of material being used.
Typically, a 10-15 degree angle is recommended for beginners. It’s important to keep the torch at a consistent angle throughout the welding process to avoid uneven welds or splatter. You can use your free hand to steady the torch and help you maintain the correct angle.
With a little practice, you’ll be able to find the perfect angle for each welding project.
Step 5: Keep Your Arm and Wrist Steady While Welding
When holding a MIG welding torch, it’s essential to keep your arm and wrist steady. This helps to maintain a consistent and even weld. To hold a MIG welding torch, start by gripping the handle firmly with your dominant hand.
Keep your wrist straight and avoid bending it too much. Use your other hand to stabilize your arm and keep it steady. When you’re ready to start welding, position the torch at a 15-20 degree angle and keep it about ⅛ inch away from the metal.
As you move the torch along the weld joint, keep a steady pace and make sure your arm and wrist stay in the same position. This will help you achieve a clean and uniform weld that looks professional. Remember to take breaks as needed to avoid muscle strain and fatigue, and always wear proper safety gear to protect yourself from sparks and heat.
With these tips in mind, you’ll be able to hold a MIG welding torch like a pro in no time!
Common Mistakes to Avoid
When it comes to MIG welding, it’s important to hold the torch correctly to ensure a successful weld. One common mistake is holding the torch too far away from the workpiece, which can result in poor penetration and an incomplete weld. To avoid this, make sure to hold the torch at a 10-15 degree angle and keep the tip close to the workpiece, about ⅛ inch away.
Another mistake is gripping the handle too tightly, which can lead to hand fatigue and difficulty maneuvering the torch. Instead, hold the torch with a loose grip and use your whole arm to move it, keeping your wrist steady. By avoiding these common mistakes and practicing proper torch positioning and technique, you can achieve high-quality MIG welds every time.
Mistake 1: Holding the Torch Too High or Low
When it comes to holding your torch, one of the most common mistakes is either holding it too high or too low. If you hold the torch too high, you won’t be able to see the path in front of you properly, and your hand will tire quickly from holding it up so high. On the other hand, if you hold the torch too low, you won’t light up enough of the area in front of you, and you might miss important details.
The key is to find the right balance, holding the torch at a height that illuminates your path perfectly while also being comfortable to hold for an extended period. By finding the right height, you’ll have better visibility, a more comfortable grip, and be a safer explorer. Whether you’re exploring caves, hiking at night, or doing repairs around the house, finding the sweet spot when holding the torch will make all the difference.
So, make sure to avoid this common mistake and keep your torch at the optimal height for your needs.
Mistake 2: Gripping the Torch Too Tightly or Loosely
When it comes to welding, one of the most common mistakes that beginners make is gripping the torch too tightly or loosely. It may seem like a small detail, but it can have a significant impact on the quality of your welds. If you grip the torch too tightly, your hand and arm muscles will fatigue quickly, making it difficult to maintain a steady hand.
This can lead to unsteady welds, which can compromise the strength and integrity of the joint. On the other hand, if you grip the torch too loosely, you won’t have enough control over the arc, which can cause spatter and a lack of fusion. To avoid these issues, you should grip the torch firmly but not too tightly, with enough pressure to maintain control and stability.
With some practice and experience, you will find the right grip that works best for you. In summary, gripping the welding torch correctly is crucial for producing quality welds. By avoiding the mistake of gripping the torch too tightly or loosely, welders can achieve better stability and control, resulting in stronger and more durable welds.
Remember to find a grip that is comfortable for you, and practice until your technique becomes second nature. By doing so, you can ensure that your welding projects are both safe and successful.
Mistake 3: Doing Too Much with Your Non-Dominant Hand
One common mistake people make when learning a new skill is doing too much with their non-dominant hand. It’s natural to want to use both hands equally, but this can actually hinder your progress. For example, if you’re learning to play the piano, focusing on your non-dominant hand can slow down the learning process for your dominant hand.
It’s important to remember that it’s perfectly normal for one hand to be stronger and more dexterous than the other, and that’s okay. Instead of trying to force both hands to do the same thing, try giving your dominant hand a little extra attention and practice. You’ll likely see faster improvement overall, and can gradually work on strengthening your non-dominant hand as you progress.
Remember, it’s a journey, not a race!
Conclusion
In conclusion, holding a MIG welding torch is like wielding a powerful magic wand – with great power comes great responsibility. Grip the handle with confidence and control, keeping your wrist steady and avoiding any sudden movements. Think of the torch as an extension of your welding skills, guiding you toward flawless, dazzling welds that would make even the most skeptical onlooker say “weldone” in admiration.
So go forth, young welder, and harness the spark of creativity with your trusty MIG welding torch!”
FAQs
What is a MIG welding torch?
A MIG welding torch is a tool used for welding that feeds a consumable wire electrode and shielding gas through the torch to the welding site.
What is the proper grip for holding a MIG welding torch?
The proper grip for holding a MIG welding torch is to grip the handle with your dominant hand and support the torch with the other hand around the barrel.
How do you adjust the wire speed on a MIG welding torch?
To adjust the wire speed on a MIG welding torch, use the wire speed control dial on the welder or torch. Slowing the wire speed down can help reduce spatter.
What is the purpose of the shielding gas used in MIG welding?
The purpose of the shielding gas used in MIG welding is to protect the welding site from atmospheric contamination, such as oxygen and nitrogen.
How do you choose the right size MIG welding torch for your project?
To choose the right size MIG welding torch for your project, consider the thickness of the metal being welded. A general rule of thumb is to use a torch with a wire diameter 0.035 inches or smaller for thin metals and a diameter of 0.045 inches for thicker metals.
What safety measures should be taken when using a MIG welding torch?
When using a MIG welding torch, it is important to wear protective gear such as gloves, a welding helmet, and flame-resistant clothing. Additionally, ensure that the work area is well-ventilated to prevent inhalation of harmful fumes.
What are common mistakes to avoid when using a MIG welding torch?
Common mistakes to avoid when using a MIG welding torch include incorrect wire speed and voltage settings, not cleaning the welding surface properly, and not holding the torch at the appropriate angle. It is important to refer to the manufacturer’s instructions and practice proper technique.

