How to Remove Blade from Angle Grinder Easily and Safely: Tips and Tricks
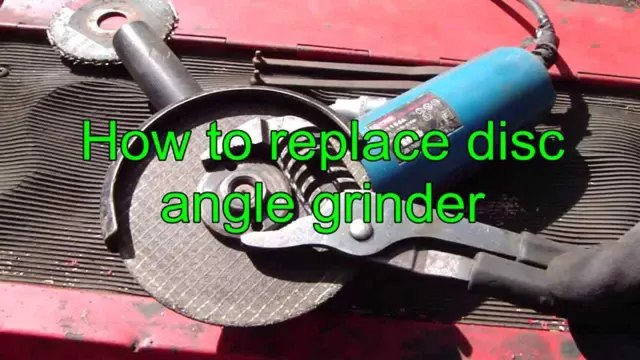
Are you looking to remove the blade from your angle grinder but don’t know where to start? Don’t worry, we’ve got you covered. A blade is an essential component of an angle grinder, and removing it might seem like a daunting task. However, with a few simple steps, it can be done quickly and easily.
In this blog post, we’ll walk you through the process of removing your angle grinder blade safely and efficiently. So, let’s dig in! Think of it like taking off a tire from your bike, it might seem challenging at first, but with practice, it will become second nature.
Step 1: Unplug the Angle Grinder
Removing a blade from an angle grinder is crucial in ensuring its proper maintenance. The first step in the process is to unplug the grinder from its power source. It is important to ensure that the grinder is completely disconnected to avoid the risk of electric shock.
Next, place the grinder on a stable work area and make sure it’s positioned securely. Most angle grinders have a locking mechanism that you need to press before you can remove the blade. To find this mechanism, check the user manual to determine where it’s located.
Once you locate the locking mechanism, use a wrench to hold it in place and then use another wrench to loosen the bolt or nut that secures the blade. Once the bolt is loose, you can now remove the blade and inspect it for any damage or wear and tear.
Make sure the angle grinder is turned off and unplugged from the power supply.
When it comes to using an angle grinder, the first step should always be to unplug it from the power supply. This might sound like common sense, but believe it or not, many accidents happen when people forget to do this. It’s important to make sure that the power cord is completely disconnected from the outlet before you start working with the angle grinder.
Once you’ve unplugged the tool, you can rest assured that there’s no way it can accidentally turn on while you’re adjusting the blade or performing other routine maintenance. Remember, safety always comes first when you’re dealing with power tools. So, take a few seconds to unplug the angle grinder, and you’ll be well on your way to working safely and effectively with this powerful tool.
Step 2: Locate the Blade Lock Button
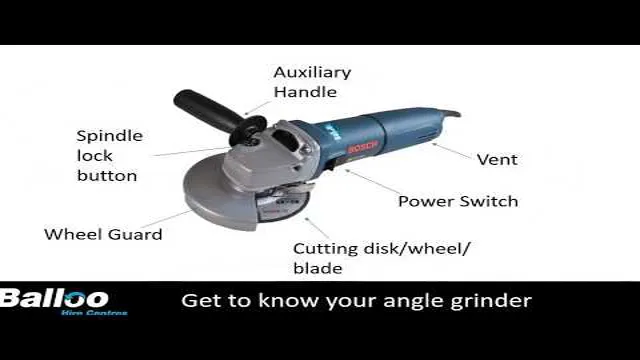
Once you have unplugged your angle grinder, it’s time to locate the blade lock button. This button is typically located on top of your angle grinder near the blade. It’s an essential feature that locks the blade in place, so it doesn’t spin during the blade removal process.
The button is usually big and can be pressed with your thumb or forefinger. In some angle grinders, the button is also marked with an arrow or a padlock symbol to signify that it’s the lock button. Once you locate the blade lock button, press it down and hold it while you remove the blade.
It’s important to note that some models may require you to turn the blade while pressing the button to access the locking mechanism. Always consult your angle grinder’s manual to ensure you are following the proper blade removal steps. With the blade lock button engaged, you can safely and easily remove the blade from your angle grinder.
The blade lock button is usually located on top of the angle grinder near the blade.
When it comes to using an angle grinder, one of the most important things you need to do is make sure the blade lock button is engaged before making any changes to the blade. This button is usually located on top of the grinder near the blade and is used to secure the blade in place, preventing any accidental movement while in use. It’s an essential safety feature that can help prevent serious injury, so it’s important to check that it’s engaged before you begin using your angle grinder.
Once you’ve located the button, simply press it down to lock the blade in place. It’s a simple step that can make a big difference in your overall safety while using your angle grinder. So, always double-check that the blade lock button is properly engaged before you start working with your tool.
Step 3: Press and Hold the Blade Lock Button
To remove the blade from an angle grinder, it is important to know how to safely do it. One essential step is to press and hold the blade lock button. This button is usually located on the right side of the grinder, near the base of the blade.
When you hold down this button, it will prevent the blade from turning, even if the grinder is still plugged in. This ensures that you can remove the blade without any risk of injury. It is important to note that you should always unplug the grinder before attempting to remove the blade.
Remember to use caution and be aware of your surroundings, as angle grinders can be dangerous tools if not used correctly. With the blade lock button pressed, you can safely continue with the next steps in the removal process.
Using your other hand, insert a wrench or other tool in the blade lock and rotate it until you feel the lock button depress and the blade is locked into place.
When changing the blade on your saw, the next step after adjusting the blade size is to press and hold the blade lock button. You can find the lock button on the side of your saw, usually located right between the blade guard and the handle. With your dominant hand securely holding the handle, take your other hand and insert a wrench or other tool into the blade lock.
Slowly rotate it until you feel the lock button depress, and the blade is now locked in place. This step is crucial for your safety, as it ensures that the blade will not move while you work on the rest of the saw. Keep in mind that the process may vary slightly depending on the model of your saw, so it’s best to consult the manual before proceeding.
By following this step, you can guarantee a safe and efficient blade change, making your work much more manageable. Remember, safety should always be your top priority when working with any tool.
Step 4: Unscrew the Blade
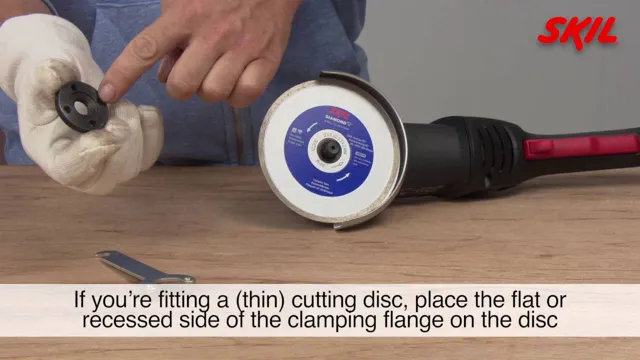
One of the essential parts of maintaining your angle grinder is being able to change the blade when necessary. Removing the blade from an angle grinder requires a bit of skill and caution, but it’s relatively easy to do with the right tools. After safely securing the angle grinder, you can start by removing the disc support flange that holds the blade in place.
Next, take a wrench that fits onto the blade’s retaining bolt and rotate it counterclockwise until the blade loosens up. Once it’s loose enough to move around, you can use your hand to unscrew it completely. Be sure to use caution when handling the blade, as it’s incredibly sharp and can cause injuries if handled improperly.
With the blade removed, you can inspect it and either sharpen it or replace it with a new one. Overall, knowing how to remove the blade from an angle grinder is critical, as it will ensure that your tool continues to operate smoothly and safely for years to come.
Turn the nut that holds the blade with a wrench counter-clockwise until it comes loose.
To continue with our guide to replacing the blade on your lawn mower, step four is to unscrew the blade from the mower. This may seem intimidating, but it’s actually a straightforward process. Start by locating the nut that is holding the blade in place.
You may need to use a wrench to turn it, so make sure you have the right size on hand. Remember: turn the nut counter-clockwise to loosen it. Once it starts to come loose, you should be able to remove it by hand.
Keep in mind that the blade may be sharp, so it’s important to handle it with care. Once the nut is removed, you can gently lift the blade off the mower. Set it aside in a safe place while you continue with the replacement process.
With this step complete, you’re one step closer to a fresh, sharp blade that will give your lawn a clean, even cut.
Step 5: Remove the Blade
Removing a blade from an angle grinder can seem like a daunting task, but it’s actually pretty straightforward. After you’ve unplugged the tool and removed the disc, you’ll need to locate the blade lock button. This button is typically located near the base of the tool, and it’s what prevents the blade from turning while you’re trying to remove it.
Once you find the button, hold it down and use a wrench to loosen the bolt that’s holding the blade in place. You may need to use a bit of force to get the bolt loose, but be careful not to damage the blade or the tool itself. Once the bolt is loose, you should be able to slide the blade off of the shaft and remove it entirely.
That’s all there is to it! Just be sure to handle the blade carefully and store it safely until you’re ready to use it again.
Take off the nut, washer and the blade from the angle grinder
In order to remove the blade from your angle grinder, you will need to take off the nut, washer, and the blade itself. This is an important step in both changing and maintaining your blade. To begin, ensure that your grinder is unplugged or that it has a disconnected battery, for your safety.
Then, using a wrench, remove the nut that holds the blade in place. Keep in mind that the nut may be threaded in the opposite direction, so you may need to turn it clockwise instead of counterclockwise to loosen it. Once the nut is loose, you can remove the washer and take off the blade.
Check the blade for any damage or wear, and replace it if necessary. Remember that using a damaged or worn blade can be dangerous and can negatively impact the performance of your grinder. With this step completed, you can now move on to changing or maintaining your blade.
Keep in mind that taking proper care of your angle grinder will extend its lifespan and keep you safe while using it.
Step 6: Clean and Maintain the Angle Grinder and Blade
Removing the blade from an angle grinder is a simple process but has to be done with care to avoid accidents. To remove the blade from your angle grinder, ensure it’s unplugged from the electrical outlet, then use a locking or toggle pin to lock the spindle’s rotation. Make sure you’re wearing protective gloves and goggles before proceeding.
Locate the blade lock button and push it down to release the blade from the spindle. Unscrew and carefully remove the blade from the angle grinder. Clean any debris stuck on the blade and spindle using a brush or rag, then reassemble the angle grinder.
It’s important to regularly clean and maintain your angle grinder and blade to ensure they stay in good working condition. Wipe the surface of the grinder and blade after every use and store them in a cool, dry place. Proper maintenance guarantees a longer lifespan for your angle grinder and ensures it’s always ready for use when needed.
Clean the blade and the angle grinder before attaching the new blade.
When replacing the blade on an angle grinder, it’s important to clean both the tool and the blade before attaching the new blade. This step is essential in ensuring the longevity and effectiveness of your angle grinder and the new blade. A dirty tool can cause friction and damage to the new blade, ultimately resulting in reduced efficiency and functionality.
Use a damp cloth or a compressed air canister to clean the angle grinder, making sure to remove any debris or residue from the tool’s surface. Once the tool is clean, proceed to clean the blade gently with soap and water, taking care not to damage the blade’s edges. After cleaning, thoroughly dry both the tool and blade with a clean towel and inspect them for any signs of wear and tear.
Regular maintenance of your angle grinder and blade will ensure longevity, enhance performance, and promote safety in your workshop. Don’t forget to clean your tool and blades after every use, and always handle them with care.
Lubricate the angle grinder’s moving parts to keep it running smoothly.
Angle Grinder To keep your angle grinder running smoothly, it’s important to clean and maintain it regularly. One crucial step in this process is lubricating the moving parts of the machine. Lubrication helps to reduce friction and prevent wear and tear on the grinder’s components.
To lubricate your angle grinder, start by unplugging it and removing the blade. Then, use a lubricant specifically designed for power tools and apply a small amount to the moving parts of the grinder, such as the spindle and gears. Be sure to wipe away any excess lubricant with a clean cloth to prevent it from attracting dirt and debris.
Regular lubrication will help keep your angle grinder running like new and extend its lifespan. So, don’t forget this important step in your maintenance routine.
Conclusion
Removing the blade from an angle grinder may seem like a daunting task, but with the right steps, it can be a breeze. Remember to always disconnect the power source and take necessary safety precautions. With a little finesse and a push of a button or twist of a wrench, you’ll be able to switch out blades like a pro.
And just like that, you’ve unlocked a new level of craftsmanship. Time to get grinding!”
Removing the blade from the angle grinder requires some caution and care to prevent any possible injuries. It is advised to strictly follow the safety instructions whenever dealing with any power tool.
When it comes to power tools, cleaning and maintenance is a crucial aspect that ensures the longevity and optimal performance of the equipment. After using your angle grinder and blade, the next step is to clean them thoroughly. Begin by using a brush to remove any debris or dust from the tool’s surfaces and crevices.
Wipe it down with a damp cloth, and avoid using harsh chemicals that could damage the tool’s structural components. After cleaning, inspect the blade for any wear and tear or damage that may affect its performance. If you find that the blade is dull or damaged, it’s best to replace it altogether.
Proper maintenance of the angle grinder and blade prolongs their durability and ensures their effectiveness. Remember to store your tool in a suitable location that’s dry and away from sources of moisture or extreme temperatures. Taking the time to maintain and clean your tool regularly ensures that it serves you well for years to come.
FAQs
What is the safest way to remove the blade from an angle grinder?
The safest way to remove the blade from an angle grinder is to unplug the tool first, then use a wrench to loosen and remove the blade bolt. Carefully lift the blade off the spindle and replace it with a new blade.
Can I remove the blade from an angle grinder without a wrench?
No, you need a wrench to remove the blade from an angle grinder. Attempting to remove the blade without a wrench can damage the tool and cause injury.
What size wrench do I need to remove the blade from my angle grinder?
The size of the wrench you need to remove the blade from your angle grinder will depend on the size of the blade bolt. Check your owner’s manual or consult a professional to determine the correct wrench size.
Is it necessary to wear gloves when removing the blade from an angle grinder?
Yes, it is recommended to wear gloves when removing the blade from an angle grinder to protect your hands from sharp edges and prevent slippage.
Can I reuse the old blade after removing it from the angle grinder?
It is not recommended to reuse an old blade after removing it from an angle grinder. Blades can become worn or damaged after use and should be replaced with a new one to ensure safe and proper operation.
What should I do if the bolt is stuck and I can’t remove the blade from the angle grinder?
If the bolt is stuck and you can’t remove the blade from the angle grinder, try using a penetrating oil or a heat source to help loosen the bolt. If the bolt is still stuck, consider taking the tool to a professional for repair.
How often should I replace the blade on my angle grinder?
It is recommended to replace the blade on your angle grinder after 25-30 hours of use or when the blade becomes worn or damaged. Always follow the manufacturer’s recommendations for replacing the blade to ensure safe and proper operation of the tool.

