How to Repair Cordless Drill Batteries: Tips & Tricks for Reviving Dead Batteries
Do you rely on your cordless drill for DIY projects around the house? If so, you know how frustrating it can be when the battery dies mid-project. While many people simply replace the battery or the entire drill altogether, there are ways to repair cordless drill batteries and save money in the process. In this blog post, we’ll discuss some tips and tricks for repairing your cordless drill battery, including how to diagnose the problem and what tools you’ll need.
By the end of this post, you’ll be well on your way to becoming a pro at fixing your cordless drill batteries and getting back to your DIY projects in no time!
Understanding Cordless Drill Batteries
If you’re the kind of DIY enthusiast who enjoys tinkering around with power tools, you’ve probably encountered a dead cordless drill battery. While replacing it may seem like an easy solution, did you know that you can actually repair your dead cordless drill battery? Yes, you heard that right! The process involves reviving the cells inside the battery pack to restore its full capacity. One easy way to repair a cordless drill battery is by deep cycling it a few times, letting it fully discharge before recharging it again.
Alternatively, you can try to replace the faulty cells inside the battery pack, which requires a bit of technical know-how and patience! Remember that the best way to avoid having to replace or repair your battery is to take good care of it by not overcharging or over-discharging it and storing it in a cool, dry place. By applying these tips, you can keep your cordless drill battery in good working condition for a long time, saving you money in the long run.
So, why not give it a try?
Types of Cordless Drill Batteries
Cordless drill batteries come in various types, but understanding them can be challenging. Nickel-cadmium (NiCad) batteries were the first type of rechargeable batteries developed for cordless drills. They offer excellent power and runtime, but their charge can diminish quickly and suffer from the memory effect, which reduces their overall lifespan.
Nickel-metal hydride (NiMH) batteries were then introduced, which solved many of the problems associated with NiCad batteries. While they have a higher capacity, they still suffer from the memory effect and require conditioning to maintain their lifespan. Lithium-ion (Li-ion) batteries are now the most widely used for cordless drills.
They have a longer lifespan, hold a charge for longer periods, and maintain their full power throughout their discharge cycle. However, they can be more expensive. Understanding the different types of batteries for cordless drills can help you choose the right one for your needs.
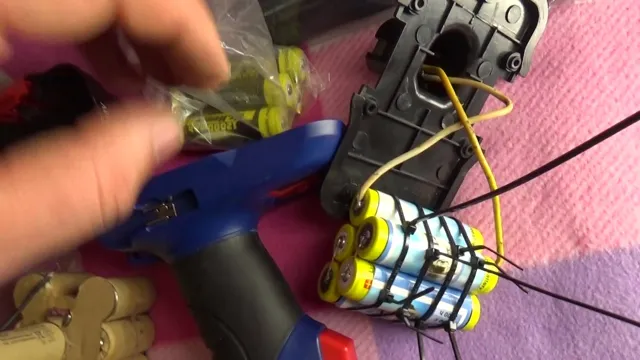
Signs of a Dead Cordless Drill Battery
Cordless drills are incredibly useful tools for DIY enthusiasts and professionals alike. However, all cordless drill batteries will eventually die after prolonged use. Understanding the signs of a dead cordless drill battery is crucial to ensure that you get the most out of your drill.
One common symptom of a dead battery is reduced power output, resulting in a slower spinning drill. Another tell-tale sign is a reduced runtime, forcing you to charge your battery more frequently than usual. You may also notice that the battery heats up more than usual during use; this can be dangerous and may indicate that the battery is about to fail.
To avoid getting caught out by a dead cordless drill battery, it’s best to keep an extra one on hand or invest in a corded drill that doesn’t rely on batteries.
Tools and Materials You’ll Need
When it comes to repairing cordless drill batteries, there are a few tools and materials you’ll need to get started. These include a multimeter, a soldering iron, solder, and replacement cells. The multimeter will help you test the voltage of the battery before and after repairs, while the soldering iron and solder will be necessary to reattach any wires that may have come loose during the process.
Replacement cells are also important, as they allow you to replace any damaged or worn out cells in the battery. It’s important to make sure you have the right replacement cells for your specific battery model, as using the wrong type could cause further damage. Overall, having these tools and materials on hand will allow you to successfully repair your cordless drill battery and get back to work quickly.
So let’s dive in and learn how to repair that cordless drill battery!
Multi-meter or Volt Meter
A multi-meter or volt meter is an essential tool for anyone looking to work with electrical circuits or appliances. When it comes to choosing the right one for the job at hand, there are a few key factors to consider. Firstly, you’ll want to determine the range of measurements needed for your project.
You May Also Love:
A basic multi-meter will typically measure voltage, current and resistance, but more advanced models may offer additional features such as capacitance, frequency and temperature. Secondly, you’ll need to take into account the accuracy and precision of the meter, as well as its build quality and durability. Finally, it’s important to consider the size and portability of the meter, as you’ll want to be able to easily carry it with you as you move around your workspace.
Whether you’re a professional electrician or just a DIY enthusiast, a quality multi-meter is an essential tool that can help you tackle a wide range of electrical projects with confidence and precision.
Battery Charger
Assembling a battery charger requires a few essential tools and materials. Firstly, a soldering iron is needed to connect the charging socket and diode. Additionally, a multimeter is necessary to measure voltage and ensure that the connections are properly secured.
Other materials include wires, a PCB board, a capacitor, and a battery holder. It’s crucial to select the right battery holder that matches the size and voltage of the battery being charged. Also, choosing the right capacitor is important for preventing voltage spikes and ensuring a stable output.
Overall, a good understanding of electronics and the ability to follow instructions are necessary for building a reliable battery charger. With the right tools and materials, anyone can create a custom charger that caters to their specific needs and preferences.
Soldering Iron
When it comes to soldering electronics, a good soldering iron is essential. But it’s not just the iron you’ll need to get the job done. To start, you’ll need a soldering stand to hold your iron and keep it from touching any surfaces when it’s hot.
You’ll also need solder, which is a metal alloy used to connect two metal pieces together. For smaller jobs, a thin solder is best, while larger jobs may require thicker solder. Flux is another necessary material, as it helps the solder flow smoothly and adhere to the metal.
Additionally, a set of helping hands can be beneficial when getting started, as they hold your workpiece in place while you solder. Don’t forget safety goggles, too, as they protect your eyes from sparks and hot metal. With these tools and materials, you’ll be well on your way to mastering the art of soldering.
Steps to Repair Cordless Drill Batteries
If your cordless drill batteries have stopped holding a charge or have completely died, you may be wondering if it’s possible to repair them instead of replacing them. The good news is that it is possible! Here are the steps you can take to repair your cordless drill batteries. First, you’ll need to remove the battery from your drill and ensure it’s completely discharged.
Next, open up the battery case and take out each individual battery cell. Test and mark each cell to identify which ones need to be replaced. You can then purchase replacement cells and reassemble the battery pack.
Finally, charge the battery pack fully and test it to ensure it’s functioning properly. It’s important to note that this process requires some technical knowledge and can be dangerous if not done carefully. However, with some patience and the right tools, you can save money and repair your cordless drill batteries rather than replacing them.
Step 1: Disassemble the Battery Pack
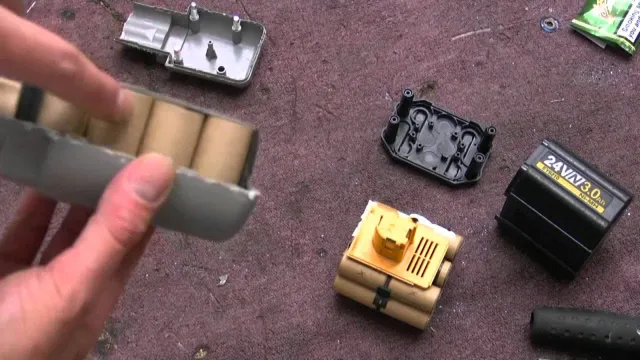
Repair Cordless Drill Batteries If your cordless drill batteries have failed and you don’t want to spend money on new ones, don’t worry! You might be able to repair them yourself. The first step is to disassemble the battery pack. This can be done by removing any screws or clips that hold it together.
Once the case is open, you’ll need to remove the cells from the casing. Be careful not to puncture or damage any of the cells, as this could cause them to leak or explode. Next, you can test the cells with a multimeter to see if they still have any charge left.
If they do, you might be able to revive them by charging them individually. However, if the cells are completely dead, you’ll need to replace them with new ones. Once you’ve replaced the dead cells, you can reassemble the battery pack and test it to see if it works.
With a little bit of know-how and some patience, you can repair your cordless drill batteries and save yourself some money in the process.
Step 2: Test the Cells Individually
Once you have opened up your cordless drill battery, the next step is to test each cell individually. This is a crucial step to identify which cells are faulty and which ones can still be salvaged. To do this, you’ll need a multimeter to check the voltage of each cell.
Start by touching the negative probe to the negative terminal of the first cell, and the positive probe to the positive terminal. Check the reading and record the voltage. Repeat this process with the rest of the cells, making sure to write down each voltage reading.
If you notice any significant difference in voltage readings, it is likely that one or more of the cells are faulty and in need of replacement. By identifying the faulty cells, you can save money by only replacing the ones that need it, rather than buying a whole new battery pack.
Step 3: Replace Dead Cells
When repairing cordless drill batteries, replacing dead cells is a critical step. Dead cells mean there is no longer any charge remaining in those cells, rendering them useless and ineffective. These dead cells can cause the overall battery performance to suffer, leading to reduced efficiency and shorter runtimes.
To replace dead cells, you first need to remove them from the battery pack, ensuring proper handling to avoid damage to other cells. Next, you will need to purchase replacement cells that match the original ones in size, voltage and capacity. You can also use cells from another drill battery pack if they are compatible.
Once you have the new cells, you can attach them to the battery pack using solder or tabs, ensuring proper alignment to avoid any short circuits. Finally, you’ll need to balance the new cells by charging and discharging them to ensure they are at the same voltage level as the rest of the pack. With the dead cells replaced, your cordless drill battery should now perform like new, giving you longer runtimes and better efficiency.
Step 4: Reassemble the Battery Pack
Now it’s time to put your battery pack back together in its original position. Start by replacing the screws that were removed earlier, but do not tighten them yet. Before proceeding, insert the battery pack back into your cordless drill to ensure it is back to its original working condition.
Then, go ahead and tighten the screws firmly to hold the battery pack in place. Once done, put the plastic casing back together and ensure everything snaps in place tightly. Finally, give your battery pack a quick charge and test it out on your drill.
If it’s up and running like new, then your repair job is a success! By following these simple steps, you have not only saved yourself money but also the environment by not contributing to e-waste.
Step 5: Charge and Test the Battery
Charge and Test the Battery Now that you’ve done all the hard work of repairing your cordless drill battery, it’s time to give it a charge. Before you plug it in, make sure to check for any leaks or cracks in the battery casing. If you spot any damage, do not charge the battery, as it can be dangerous.
If everything looks good, go ahead and plug it in using the charger that came with the drill. It’s important to use the right charger, as different batteries require different currents. Once the battery is fully charged, it’s time to test it out.
Attach it to your cordless drill and see how it performs. If it works well, congratulations! You’ve just saved yourself the cost of a new battery. However, if the battery doesn’t hold a charge or doesn’t provide enough power, then it may be time to start looking for a replacement.
Remember, regular maintenance and proper storage can help extend the life of your battery, so be sure to take good care of it.
Tips and Precautions
Cordless drills are the ultimate tool for DIY enthusiasts and professionals alike. Unfortunately, even the best cordless drill batteries can suddenly stop holding a charge, leaving you with a useless tool and a dead battery. But before you throw away your battery and buy a new one, consider repairing it.
With the right tools and a bit of patience, you can save a lot of money by repairing and extending the life of your cordless drill battery. To start, make sure you’re using the proper tools, including a multimeter to test the voltage of the battery. Then, carefully remove the cover of the battery, taking care not to damage any of its internal components.
Next, replace the cells if necessary, making sure to solder them in properly. When repairing your cordless drill battery, safety is key, so make sure to wear gloves and eye protection and work in a well-ventilated area. By following these tips and precautions, you can repair your cordless drill battery and extend the life of your trusty tool.
Use Proper Safety Equipment
When it comes to working with heavy or dangerous equipment, the most important thing is safety. It cannot be overstated how important it is to use proper safety equipment at all times. In fact, it can mean the difference between life and death.
So, what are some tips and precautions to take when it comes to safety equipment? Firstly, it’s important to always wear a helmet. Whether you’re working with power tools or construction equipment, your head is always at risk. A hard hat could be the only thing standing between you and a serious head injury.
Secondly, safety glasses should be worn to protect your eyes. Dust, debris, and flying particles can all pose a risk, so make sure you have proper eye protection. Lastly, steel-toed boots should be worn as they can prevent serious foot injuries.
It’s important to remember that proper safety equipment can mean the difference between a minor injury and a serious one. So, make sure you always have the proper gear on hand.
Avoid Overcharging the Battery
When it comes to prolonging the lifespan of your electronic devices, it’s important to keep the battery in mind. Overcharging can cause damage to the battery, resulting in shorter overall life and a decrease in performance. To avoid this, there are some tips and precautions you can take.
One of the easiest things to do is to unplug your device once it’s fully charged. If you’re not sure when that is, most devices have battery indicators that will show you when it’s full. Additionally, try to avoid using your device while it’s charging, as this can also cause overcharging.
Lastly, make sure you’re using the right charger for your device. Using a generic or incorrect charger can lead to overcharging and even damage to your device. By following these tips and being mindful of your battery usage, you’ll be able to keep your devices running smoothly for longer.
Don’t Mix Old and New Cells
When it comes to working with batteries, there are a few precautions that everyone should take. One of the most important is to never mix old and new cells. When you mix cells with different levels of charge, there is a risk that the new cell will overcharge and the old cell will drain too quickly.
This can cause damage to the battery, or even lead to a fire or explosion. To avoid this, it’s important to always use cells that are from the same batch, or at least the same age. Additionally, always check the voltage of each cell before using it, and if you notice any signs of damage or leakage, do not use it.
By taking these simple steps, you can help ensure that your batteries last as long as possible and that you stay safe while using them.
Conclusion
In conclusion, repairing cordless drill batteries may seem like a daunting task, but with the right tools and techniques, it can actually be quite simple. From identifying the issue to choosing the right replacement cells, the key is to be patient and persistent. After all, if you’re willing to put in the effort, your trusty drill will be back up and running in no time.
So don’t throw those old batteries away just yet – with a bit of know-how, you might just surprise yourself with what you can achieve. Now go forth and fix those batteries like the DIY superstar you are!”
FAQs
What are the common reasons that cordless drill batteries stop working?
Cordless drill batteries can stop working due to overcharging, undercharging, or simply from wear and tear over time.
How can I tell if my cordless drill battery needs to be repaired or replaced?
If your cordless drill battery is not holding a charge or is not providing enough power during use, it may need to be repaired or replaced.
Can I repair my cordless drill battery myself?
It is possible to repair some cordless drill batteries yourself, especially those with replaceable cells. However, it is important to follow proper safety protocols and have a basic understanding of battery repair.
What tools do I need to repair my cordless drill battery?
You will need a battery tester, a soldering iron, solder, and replacement battery cells to repair your cordless drill battery.
Is it cheaper to repair or replace my cordless drill battery?
In some cases, it may be cheaper to repair your cordless drill battery than to purchase a new one. However, this ultimately depends on the cost of replacement parts and your own repair skills.
How long does it take to repair a cordless drill battery?
The time it takes to repair a cordless drill battery will depend on the extent of the damage and your own repair skills. It could take anywhere from a few hours to a few days.
Can I prevent my cordless drill battery from needing repair in the future?
Yes, you can prevent your cordless drill battery from needing repair in the future by following proper charging and storage techniques, as well as using high-quality replacement parts.

