How to Replace Angle Grinder Disc: A Step-by-Step Guide for Easy and Safe Replacement
Have you ever found yourself stuck with a worn-out or damaged angle grinder disc, unsure of how to replace it? Fear not, for we’ve got you covered! Angle grinders are powerful tools that can be used for a variety of tasks, from cutting and grinding to polishing and sanding. However, the discs on these tools are prone to wear and tear over time, and must be replaced to ensure safe and effective performance. But how do you go about doing that? In this blog post, we’ll guide you through the simple steps involved in replacing an angle grinder disc, so you can get back to your DIY or professional projects in no time.
Get ready to swap out those discs like a pro!
Step 1: Turn off the Angle Grinder
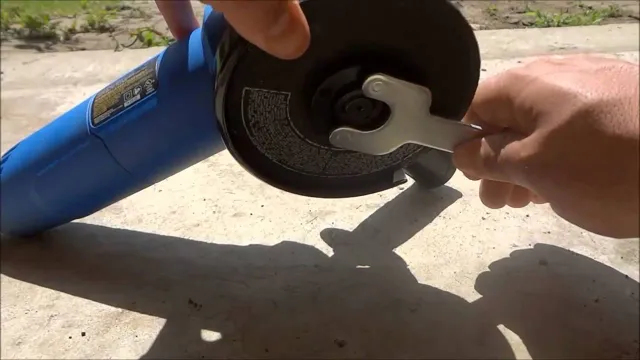
If you’re looking to replace your angle grinder disc, the first step is to turn off the device completely. This may seem like a no-brainer, but safety should always come first! Make sure the grinder is unplugged from its power source, and if it’s battery-operated, remove the battery. Once you’ve done this, you can go ahead and remove the old disc by holding down the spindle lock button and using the wrench provided with your grinder to loosen the nut.
Be sure not to lose the washer and any other parts that come loose in the process. Once the nut is off, you can remove the disc and dispose of it properly, making sure to take any necessary precautions. With the old disc out of the way, you can fit the new one onto the spindle, making sure it’s compatible with your make and model of grinder.
Tighten the nut with the wrench, making sure it’s snug but not overtightened. And with that, you’re ready to get back to work with your newly replaced grinder disc!
Make sure the grinder is disconnected from the power source
When it comes to using an angle grinder, safety should always be your top priority. Before you even think about turning on the grinder, make sure that it is disconnected from the power source. This is the first step you should take to prevent any accidents from happening.
It may sound obvious, but sometimes we forget to check the power source when we’re in a rush to get a job done. We don’t want any stray sparks or electrical shocks to occur, so it’s always better to be safe than sorry. Make it a habit to double-check that the angle grinder is unplugged before you start working with it.
This way, you can have peace of mind knowing that you’re doing everything in your power to ensure a safe work environment.

Step 2: Remove the Disc
Now that you’ve safely turned off your angle grinder, it’s time to remove the old disc. First, make sure your gloves are still on to protect your hands. Locate the locking mechanism on the grinder and hold it down while using your other hand to turn the disc counterclockwise.
Eventually, the disc will loosen and you can remove it completely. Be careful as you do this, as the disc may still be hot from use. If it is difficult to remove, try gently tapping it with a hammer or rubber mallet to dislodge it.
Once the old disc is removed, inspect the grinder for any damage or debris before moving on to installing the new disc. By following these steps, you’re ready for the next phase of changing your angle grinder disc – installation.
Use a wrench to loosen the nut holding the disc in place
Removing a disc from a piece of machinery can seem like a daunting task, but it doesn’t have to be. In this second step, we will show you how to easily remove the disc by using a wrench. The first thing to do is to locate the nut that is holding the disc in place.
Once you’ve found it, take your wrench and place it around the nut. Turn the wrench counter-clockwise to loosen the nut. It might require some force, so make sure to apply enough pressure but not too much so as to avoid damaging the machinery.
Once the nut is loose enough, remove it completely and carefully lift the disc out of its position. Keep in mind that each machinery may have slight differences so always refer to its manual for specific instructions. With this simple trick, you can remove the disc without much effort or stress.
Remove the nut and washer and carefully take off the old disc
When it comes to replacing a brake disc, the second step is to remove the old disc carefully. To do this, you’ll need to remove the nut and washer holding the disc securely in place. Use the appropriate tools to do this, and be sure to keep track of these small pieces as you move through the process.
Once the nut and washer are off, you can gently take off the old disc. Be sure to inspect it for any signs of significant wear or damage before proceeding. If you notice any issues, it’s best to replace the entire brake system components to ensure your safety on the road.
By taking the time to carefully remove the old brake disc, you’re setting yourself up for a successful installation of the new one that will keep you feeling confident and secure while driving.
Step 3: Insert the New Disc
Replacing the disc on your angle grinder may seem like a daunting task, but with a little bit of know-how, it’s actually quite simple. Once you’ve removed the old disc and checked the new one for any defects, it’s time to insert it into the angle grinder. First, make sure that the disc is the correct size and type for your grinder, and then slide it onto the spindle, ensuring that it’s seated securely.
Next, use the locking mechanism to keep the disc in place, making sure that it’s tightened properly. You can then test the grinder to make sure that the disc is running smoothly. Remember to always take the necessary safety precautions when working with power tools, including wearing eye protection and protective clothing.
By following these steps, you’ll be able to replace the disc on your angle grinder quickly and safely.
Check the label on the disc to make sure it matches the grinder
When it’s time to replace the disc on your grinder, you want to make sure that you are inserting the right one. That’s why it’s essential to check the label on the new disc before putting it on the grinder. Different discs have different specifications, and they are designed for specific types of materials.
So if the label on the disc indicates that it is meant for grinding metal and you’re working on concrete, using that disc can lead to disastrous results. It’s also advisable to look for any visible signs of damage on the new disc before installing it. If there are any cracks or chips, dispose of the disc and get a new one.
Once you have checked the label and inspected the disc’s condition, you can insert it onto the grinder’s spindle. Slide the disc onto the spindle and then tighten it with the wrench. That’s it; you’re now ready to use your grinder.
Remember to always wear protective gear such as safety glasses and gloves when using the grinder.
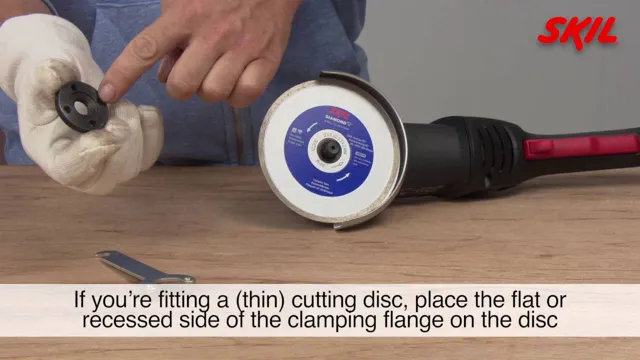
Carefully place the new disc onto the spindle
When it comes to inserting a new disc into your device, it’s important to do it carefully to avoid any damage to the disc or to the device itself. Step 3 involves placing the new disc onto the spindle, which is a small cylinder-shaped piece that holds the disc in place. Before doing so, make sure the spindle is clean and free of any debris that could scratch the disc.
Once the spindle is clean, place the new disc on top of it, making sure it’s centered and level. Gently push down on the disc to secure it onto the spindle. If you feel any resistance or the disc doesn’t feel secure, double-check its position and try again.
Once the disc is securely in place, you can move on to the next step of using your device. By taking the time to carefully insert the new disc, you can ensure a better user experience and prevent any potential damage to your device or the disc itself. So, take it slow, keep your workspace clean, and enjoy your new disc!
Step 4: Tighten the Nut
Now that you’ve successfully removed the old angle grinder disc and replaced it with a new one, the final step is to tighten the nut. This is an essential step since you want to ensure that the disc doesn’t wobble or loosen during use, which could cause serious injuries. To tighten the nut, you’ll need to use a spanner or wrench and ensure that it’s secure enough that you can’t move it by hand.
Make sure not to overtighten the nut, as this could potentially damage the tool or cause the disc to crack. Once you’re sure the nut is tight enough, do a quick inspection of the disc to check that it’s in the right position and properly aligned. With this final step, you can now turn on the angle grinder and begin using it with confidence, knowing that you’ve done everything safely and correctly.
Replace the washer and nut and tighten them securely with the wrench
When it comes to tightening the nut on a washer, it’s important to make sure it’s done securely to avoid any potential leaks or issues down the line. To properly tighten the nut, you’ll want to replace the washer first and foremost. Make sure you have the correct size washer before removing the old one, as this will ensure a proper fit when you put the new one on.
Once the washer has been swapped out, you can move on to the nut. It’s best to use a wrench for this step in order to get a good grip on the nut and tighten it as much as possible. You’ll want to make sure it’s tight enough that it won’t come loose on its own, but be careful not to overtighten it as this can cause damage.
With the washer and nut replaced and securely tightened, you can rest easy knowing your washer is ready to go.
Make sure the disc is correctly aligned before tightening the nut
When it comes to the final step of installing a disc brake, it’s crucial to make sure that the disc is correctly aligned before tightening the nut. This step ensures that the brake pads will make even contact with the disc and function properly. To tighten the nut, use a torque wrench and follow the recommended torque settings for your specific brake system.
Over-tightening the nut can cause damage to the disc or caliper, while under-tightening can result in a wobbling rotor, leading to reduced braking performance. Think of it like tightening a lid on a jar – you want it snug, but not too tight. Double-check the alignment after tightening the nut, and give the brake lever a few squeezes to ensure proper engagement before hitting the trails.
When done correctly, this step will help ensure that your brakes function at their best, giving you the confidence you need to ride with control and safety.
Step 5: Test the Angle Grinder
Now that you have successfully replaced the disc on your angle grinder, it’s important to test it before using it on any project. First, carefully turn on the grinder and let it run for a few seconds without applying any pressure to the disc. This will give you a chance to ensure that the disc is spinning properly and there are no strange noises or vibrations coming from the tool.
Next, hold the grinder in both hands and apply some light pressure to the disc while it is running. Again, listen for any strange noises or vibrations that could indicate an issue with the disc or the tool itself. If everything sounds and feels normal, you’re ready to get to work! Remember to always wear the appropriate safety gear and use caution when using an angle grinder, even if you know how to replace angle grinder disc.
Turn on the grinder and let it run for a few seconds to make sure the disc is properly secured
As the old saying goes, safety first! In order to make sure you’re not putting yourself or anyone else at risk, it’s important to test your angle grinder prior to use. To do this, turn on the grinder and let it run for a few seconds to make sure the disc is properly secured. This will help prevent any potential accidents that could arise from a loose disc coming off mid-operation.
Additionally, take note of any strange noises or vibrations that may be present during this testing period. If anything seems off, don’t hesitate to take a closer look and address the issue before proceeding. Remember, it’s better to be safe than sorry!
Conclusion
In conclusion, replacing an angle grinder disc may seem like a daunting task, but with the right tools and a little bit of know-how, it’s as easy as slicing through butter with a hot knife. Just remember to always wear protective gear, follow the manufacturer’s instructions, and never underestimate the power of a good angle grinder. So, go ahead and tackle that DIY project with confidence, and may your disc always spin true and your cuts always be precise.
“
Replacing the disc on an angle grinder is a simple process that can be done safely with the right tools and precautions.
When you have replaced the disc on your angle grinder, you should test it before using it for any project. First, ensure that the angle grinder is turned off and unplugged. Then, hold the grinder securely in one hand and turn the power on.
Listen to the sound of the grinder and ensure that it is running smoothly without any shaking or unusual noises. Next, gently touch the grinder to a scrap piece of metal or material to see if the disc is making contact properly. Check the rotation of the disc to ensure that it is not spinning erratically.
Finally, turn the grinder off and unplug it. If everything checks out, you’re good to go! Remember to always use proper safety equipment when operating an angle grinder, including eye and ear protection, gloves, and a mask if necessary. By testing your angle grinder before using it, you can ensure that it is operating safely and efficiently, and that your projects are successful.
FAQs
What are the steps to replace an angle grinder disc?
Firstly, unplug the grinder and remove the old disc. Then, install the new disc according to the manufacturer’s instructions and make sure it’s secured properly.
Can I replace the angle grinder disc without any tools?
No, you will need a wrench to loosen the arbor nut and change the disc.
What size of angle grinder disc do I need to buy for my grinder?
You need to buy a disc that matches the size of your grinder’s wheel. Check the specifications of your grinder to ensure you purchase the correct size.
How often should I replace my angle grinder disc?
It depends on the frequency of use and the type of work you are doing. Generally, abrasive discs need to be replaced more frequently than diamond discs.
What are some safety precautions to take when replacing an angle grinder disc?
Always wear protective gear, like safety glasses and gloves. Make sure the grinder is unplugged and the disc is cooled before replacing. Avoid contact with the sharp edges of the disc.
What is the procedure for changing a diamond disc on an angle grinder?
Firstly, unplug the grinder and remove the old disc. Then, install the new diamond disc by screwing on the arbor nut, making sure it’s tightened.
Can I reuse an old angle grinder disc?
It’s not recommended to reuse an old angle grinder disc. Over time, the disc can become worn and weakened, making it a safety risk. Always replace with a new disc for optimal performance and safety.

