How to Sharpen Chisels with Sandpaper: A Step-by-Step Guide to Achieve Perfect Edges
Are you tired of struggling to get your chisels sharp? Sharpening chisels is a task that every woodworker knows all too well. However, using traditional sharpening methods like oil stones and honing guides can be time-consuming and even frustrating. That’s why many woodworkers turn to a more efficient and easy approach – sharpening chisels with sandpaper.
Using sandpaper to sharpen your chisels may seem unconventional, but it’s a simple process that can yield fantastic results. With the right technique and the right grit, you can achieve a razor-sharp chisel that’s ready to use. Not only is it faster than traditional methods, but it’s also less expensive and more accessible for beginners.
In this blog, we’ll cover everything you need to know about sharpening chisels with sandpaper. We’ll discuss the best grits to use, the proper technique, and the tools you’ll need. Plus, we’ll share some tips and tricks to help you get the most out of your sharpening process.
So, if you’re ready to simplify your sharpening routine and get sharper chisels with less hassle, keep reading. We’ve got you covered.
Materials Needed
If you’re looking to sharpen your chisels, there’s no need to go out and buy expensive sharpening tools. In fact, all you need is some sandpaper. Here’s what you’ll need to get started:
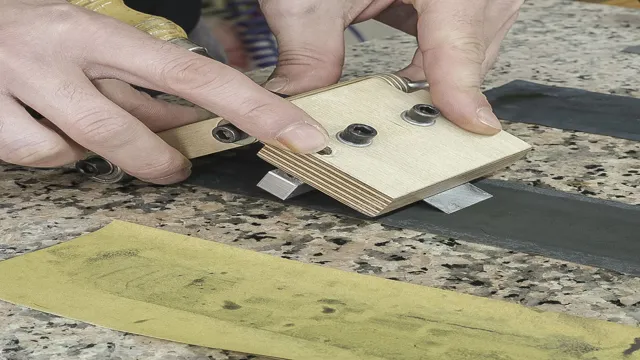
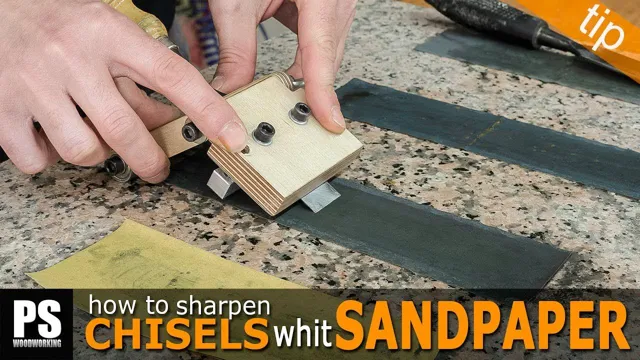
Sandpaper – You’ll want to have a few different grits on hand, starting with a coarse grit (around 120), moving up to a medium grit (around 400), and ending with a fine grit (around 1000). A flat surface – You’ll want to place your sandpaper on a flat surface, such as a piece of glass or granite, to ensure you’re sharpening your chisels evenly.
A sharpening guide – While not essential, a sharpening guide can help you maintain a consistent angle when sharpening your chisels. Once you have your materials, you can get started on sharpening your chisels with sandpaper.
It’s a simple process that involves rubbing the chisel back and forth over the sandpaper, starting with the coarse grit and working your way up to the fine grit. With a little patience and practice, you’ll have beautifully sharpened chisels in no time. So don’t be intimidated by sharpening your own tools – give it a try and see the difference it can make in your woodworking projects!
Sandpaper Grits
When it comes to sanding down surfaces, it’s essential to use the right grit of sandpaper for the job. Different grits are suitable for different surfaces and tasks. Typically, sandpaper comes in varying grits, ranging from coarse to fine.
The coarser grits (40-60 grits) are used for heavy-duty sanding, such as removing paint or smoothing down rough wood surfaces. For medium sanding jobs, such as removing scratches, 80-120 grits are suitable. Meanwhile, 150-180 grits are excellent for fine sanding, such as preparing a surface for painting or varnishing.
When choosing the right sandpaper grit, consider the condition of the surface you’re sanding, the type of material, and the level of sanding required. Remember to start with the coarsest grit and move on to finer grits for a smooth and even finish. By using the right sandpaper grit and following the proper sanding techniques, you’ll achieve a flawless DIY project every time.
Preparing the Chisel
If you want to sharpen your chisels using sandpaper, you’ll need to properly prepare the chisel before you begin. The first step is to remove any rust or debris from the blade. You can use a wire brush or sandpaper to do this.
Once the blade is clean, you should hone the edge by gently rubbing it back and forth on a coarse grit sandpaper. This will create a new, sharp edge on the blade. After honing, switch to a fine grit sandpaper and repeat the process until you achieve the desired level of sharpness.
Remember to keep the chisel flat against the sandpaper to avoid creating a rounded or uneven edge. With a bit of patience and practice, you can restore your chisels to their former glory and achieve precise, clean cuts in your woodworking projects.
Clean the Chisel
Preparing the chisel for use is a crucial step in achieving a clean and precise cut. Before starting any project, it’s important to clean the chisel so that it’s free from rust, dirt, and other debris. First, remove any visible rust from the blade using sandpaper or a rust eraser.
Next, soak the chisel in a container of vinegar for about 30 minutes to an hour to remove any stubborn rust that won’t come off with sandpaper. After that, use a cloth or steel wool to scrub the blade clean. Finally, sharpen the blade using a honing stone or sharpening system to achieve a razor-sharp edge.
By following these steps, you can ensure that your chisel is prepared for use and will deliver clean and precise cuts every time. Don’t forget to repeat this process periodically so that your chisel remains in top shape for many projects to come.
Identify the Bevel Angle
When it comes to chiseling, getting the right bevel angle is crucial. But before that, you need to prepare your chisel properly. Begin by honing the back of the chisel until it’s flat and shiny.
Once done, sharpen the beveled edge at the correct angle, one that’s easy to maintain and offers a balance between edge retention and sharpness. Ideally, a chisel bevel angle of 25-30 degrees is appropriate for most woodworking projects. However, some tasks may require a steeper bevel angle of up to 40 degrees.
Remember to maintain consistency when honing and sharpening your chisel, as even a slight deviation in angle can affect the quality of your work. By preparing your chisel with the right bevel angle, you can sharpen it easily and achieve precise cuts for any woodworking project.
Choose the Starting Grit
When it comes to sharpening your chisel, the first step is choosing the starting grit. This is the stage where you determine the type of sharpening you want to achieve. For a rough sharpening, you can start with a coarse grit and gradually move up to finer grits to achieve a smoother finish.
However, for a fine sharpening, starting with a higher grit allows you to skip the coarser stages and achieve a razor-sharp edge quickly. Before you start sharpening, you should ensure that your chisel is clean and free from any debris or rust. Once you have selected the right starting grit, you can proceed to sharpen your chisel with confidence, knowing that you have laid the foundation for a sharp and smooth edge.
Keep in mind that the starting grit you choose will determine the amount of time and effort needed to get your chisel to the desired sharpness, so choose wisely.
Sharpening the Chisel
If you’re looking to sharpen your chisels, sandpaper can be an easy and accessible option to get the job done. First, you’ll want to gather your materials – start by choosing sandpaper with a grit between 220 and 400. To begin the sharpening process, wrap the sandpaper around a wooden block and hold it firmly.
Then, place the chisel bevel flat against the sandpaper and push it back and forth until the beveled edge is shiny and the burr has been removed. To sharpen the other side, flip the chisel over and repeat the process. It’s important to maintain a consistent angle throughout the sharpening process – typically between 20 and 30 degrees.
If you find that your chisel is particularly dull or damaged, you may need to start with a coarser grit before moving to a finer grit. By learning how to sharpen chisels with sandpaper, you can maintain the sharpness of your woodworking tools and ensure that they are always ready to go when you need them.
Wrap the Sandpaper Around a Flat Surface
When it comes to sharpening your chisel, there are a few different methods you can use. One of the most effective ways is to wrap sandpaper around a flat surface, such as a block of wood. This allows you to create a consistent angle and sharpen the chisel evenly.
Start with a coarse grit sandpaper, around 120 to 150 grit, and move up to finer grits as you go. Begin by placing the chisel flat on the sandpaper and rubbing it back and forth, creating a bevel on the edge. Once you have a bevel, flip the chisel over and gently rub the back of the blade on the sandpaper to remove any burrs.
Repeat this process with progressively finer grits of sandpaper until you have a razor-sharp chisel. Using this method not only helps you sharpen your chisel quickly and efficiently but also saves you money as you won’t have to replace blunt chisels as often. So give it a try and see the difference in your woodworking projects!
Hold the Chisel at the Correct Angle
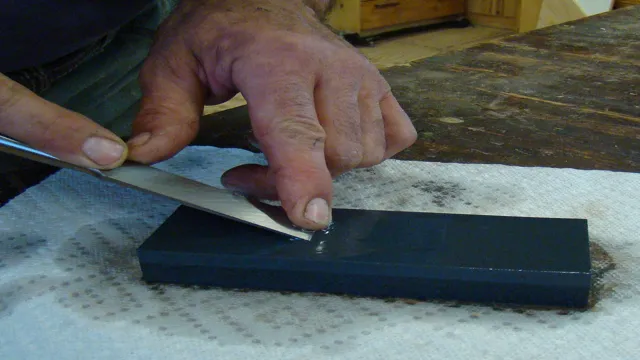
When it comes to sharpening your chisel, holding it at the right angle is crucial for achieving a sharp edge. It is essential to have a consistent angle for both setting the bevel and honing. The most commonly recommended angle for the bevel is between 25 and 30 degrees.
You can use a honing guide to achieve the correct angle or use the “ruler trick” method. With the ruler trick technique, you attach a ruler to the back of your chisel to create a consistent angle. Honing the edge at a steeper angle can lead to a sharper edge, but it will wear down more quickly.
Maintaining the correct angle throughout the sharpening process is important, as any change in the angle can result in an uneven edge. So, be sure to pay attention while sharpening your chisel and maintain a consistent angle throughout the process.
Start with the Coarsest Grit
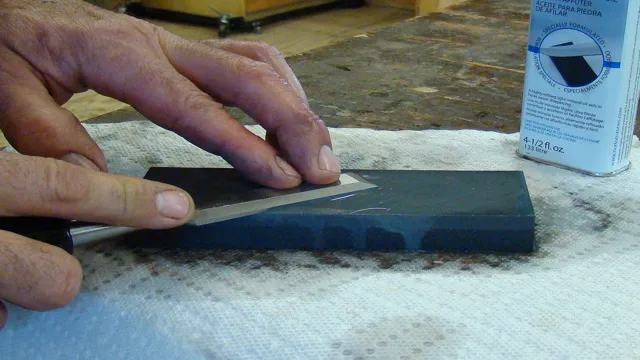
When it comes to sharpening a chisel, it’s important to start with the coarsest grit. This will help remove any nicks or burrs that may be present on the blade. Using a sharpening stone, begin by applying a few drops of oil to the stone and then rub the chisel against the stone in a circular motion.
Be sure to maintain a consistent angle as you move the blade across the stone. You can check your progress by wiping the blade with a rag periodically to see if any burrs or nicks remain. Once you’ve removed all of these imperfections, move on to the finer grits to smooth out the blade and create a sharp edge.
With a little practice and patience, you’ll be able to sharpen your chisels in no time, ensuring they’re always ready for your woodworking projects.
Work the Entire Bevel
When sharpening a chisel, it’s crucial to work the entire bevel. This means honing every last centimeter of the blade to ensure a super-sharp edge. Many beginners make the mistake of only focusing on the tip of the blade, neglecting the rest.
But blades that aren’t fully sharpened won’t give you the precision and accuracy you need for woodworking. Start by laying the chisel flat on the sharpening stone, then gradually raise the blade until you’re working the entire bevel. Use slow, deliberate strokes, moving evenly across the blade.
Remember to apply even pressure throughout the sharpening process. And when you’re finished, don’t forget to test the sharpness by cutting through a thin piece of wood. With practice, you’ll be able to sharpen your chisels quickly and effectively, ensuring your woodworking projects are always top-notch.
Move to the Next Grit
As you move to the next grit, sharpening your chisel becomes more crucial than ever before. The grit levels determine the coarseness of the sharpening surface, with lower numbers being coarse and higher numbers being fine. By using the right grit level, you can ensure that your chisel has a sharp and polished edge that cuts through wood like butter.
It’s important to start with a coarse grit and work your way up to a finer grit, giving your chisel the best chance of achieving a razor-sharp edge. Think of it like sharpening a pencil: you start with a rough surface to remove the dull tip and then proceed to a finer surface to achieve the perfect point. Keeping this concept in mind will help you understand that jumping to the fine-grit too quickly will leave you with an inferior edge.
Therefore, take your time and ensure that you work your way up to the next grit level gradually. This will give you the best results for your chisel when you begin carving or woodworking.
Finishing Touches
When it comes to woodworking, having sharp chisels is essential. Fortunately, sharpening chisels with sandpaper is a straightforward process. First, start with a coarse grit sandpaper and wrap it around a flat surface, like a block of wood.
Then, holding the chisel at a consistent angle, move it back and forth against the sandpaper until a burr forms on the edge. Next, move to a finer grit sandpaper and repeat the process until the burr is gone and the edge is sharp. Finally, hone the edge with a leather strop and some honing compound.
It may take some practice to find the right angle and pressure, but with a little patience, you’ll be able to sharpen your chisels like a pro.
Hone the Edge with Leather or Felt
When it comes to sharpening a blade, the actual sharpening process is only one part of the equation. To truly create an edge that will impress, you’ll want to add a finishing touch that will hone the blade to razor-sharp perfection. One of the best ways to achieve this is by using leather or felt.
By using a strop made of either material, you can remove any microscopic burrs left by the sharpening process and create a smooth, polished edge. The process is simple – just take your blade, lay it flat on the strop, and use long, smooth strokes to pull the blade toward you. By doing this, you’ll achieve an edge that’s truly honed and ready for action.
So, next time you sharpen your blade, don’t forget the finishing touch – it can make all the difference!
Check the Sharpness of the Edge
As you near the end of sharpening your knife’s edge, it’s important to check for sharpness. A dull edge can ruin all your hard work and render your knife useless. To check for sharpness, you can perform a paper test.
Simply take a sheet of paper and slice it with your knife. A sharp edge will easily cut through the paper without tearing it. If your knife struggles or tears the paper, you’ll need to continue sharpening.
You can also gently run your finger along the blade’s edge to feel for any imperfections or rough spots. Remember to always use caution when handling a sharp knife. With proper sharpening and attention to detail, you can achieve a razor-sharp edge every time.
Conclusion
In conclusion, sharpening chisels with sandpaper is a budget-friendly and practical solution for the handyman in all of us. By following the steps outlined above, you’ll be able to bring life back into your dull and lifeless chisels, while also impressing your friends with your resourceful sharpening skills. So grab some sandpaper, channel your inner craftsman, and get to work – your chisels will thank you!”
FAQs
What grit sandpaper do I need to sharpen my chisels?
The grit of sandpaper you need will depend on how dull your chisels are. Typically, a coarse grit like 120 or 150 will be used to remove nicks, followed by a finer grit like 400 or 600 to hone the chisel edge.
Can I sharpen my chisels with just sandpaper?
Yes, you can sharpen your chisels with just sandpaper. Start with a coarse grit to remove any nicks or damage to the chisel edge, and then move to a finer grit to hone the edge.
How do I hold my chisel while sharpening with sandpaper?
To hold your chisel while sharpening with sandpaper, you can clamp it in a vise or use a sharpening jig designed for chisels to hold it at the correct angle. Some sharpening jigs even have a sandpaper holder built in.
How many times should I run my chisel over the sandpaper when sharpening?
You should run your chisel over the sandpaper enough times to remove any nicks or damage and hone the edge to a sharp point. This may take 5-10 passes over the sandpaper on each side.
Is wet sandpaper better for sharpening chisels?
Wet sandpaper can be used for sharpening chisels, but it is not necessarily better than dry sandpaper. Wet sandpaper can help prevent clogging and extend the life of the sandpaper, but dry sandpaper is also effective.
Can I use a sanding block to sharpen my chisels?
Yes, you can use a sanding block to sharpen your chisels. A sanding block will help ensure that you maintain a consistent angle while sharpening.
Do I need to use a honing compound after sharpening my chisels with sandpaper?
It is not necessary to use honing compound after sharpening your chisels with sandpaper, but it can help refine and polish the edge for an even sharper finish.

